
A36 Oy Veghel
The fifth game of Patch and I’s tour of the Market-Garden scenarios got going in September 2009…:
In our continuing series of Annual ’91 Market-Garden games, we discussed for a bit, and I decided to take the defending Americans.
Then I look at ROAR and find the Americans are the underdogs! >.< I demanded the American Balance. Not that I expect depriving him of Schuerzen to actually do much.
It’s an odd setup. The Americans start out piled in two hexes and move first. Then the Germans enter on their half of the turn.
I sent half the force east (up) through town to guard that road in, since I figured there was a good chance that Patch would send some infantry around that way behind the grain. The other half proceeded through town, behind the jeep, which dashed off to set up the 57mm ATG in 16B5.
Patch did not disappoint. Six of nine squads swung south to go around the edge of the pond on board 13. My MMG was in 10Z10, and I used it to put residual in 13Y6 (the first hex of the elevated road) the first time he moved through. Sadly, the original shot, and two Resid rolls did nothing. He parked the first PzIV in 13Y10, giving him a nice LOS down towards my position.
He did surprise me by having the StuH stay back.
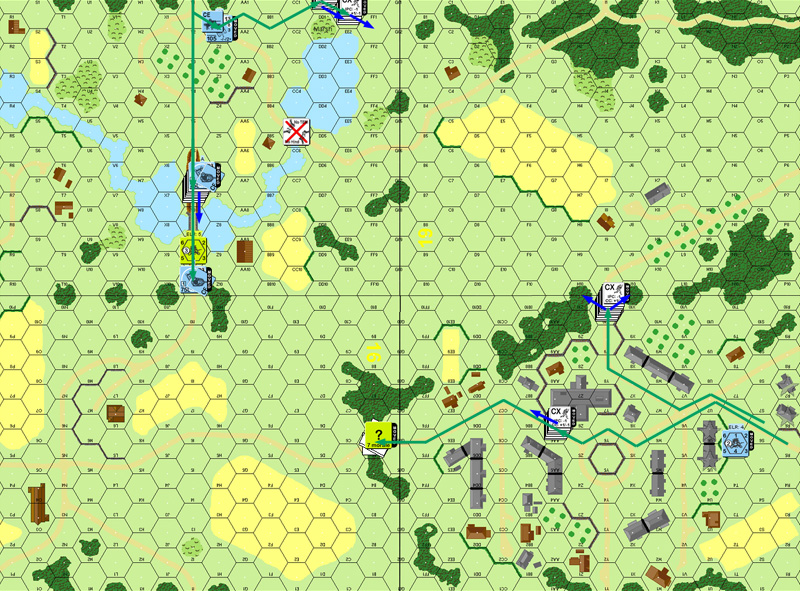
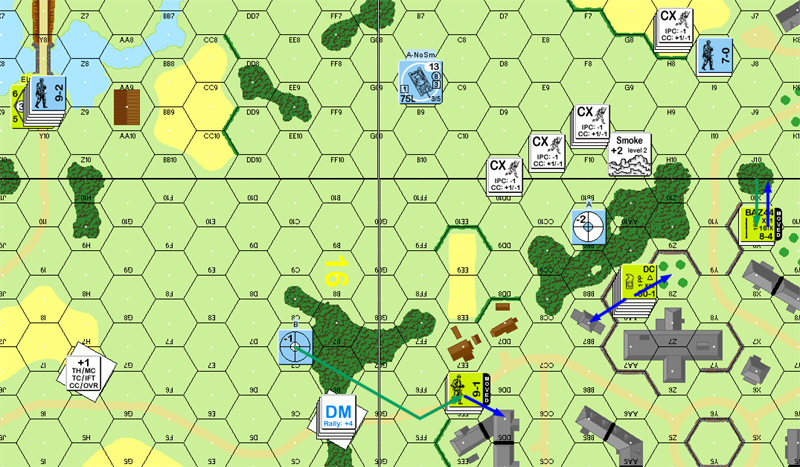
Situation, both halves of turn 1.
For my second turn, I started shuffling the east force around, to cover the NE area, especially since there was now a good chance that he’d end up in that area. I should have pulled the jeep out of LOS in 16B5, but decided I’d rather keep my quick move options open. He nearly got it with a DFPh shot that did cause a PTC to strip Concealment on the crew.
The StuH also fired at 19G10, obviously preparing to fire smoke there on his Prep.
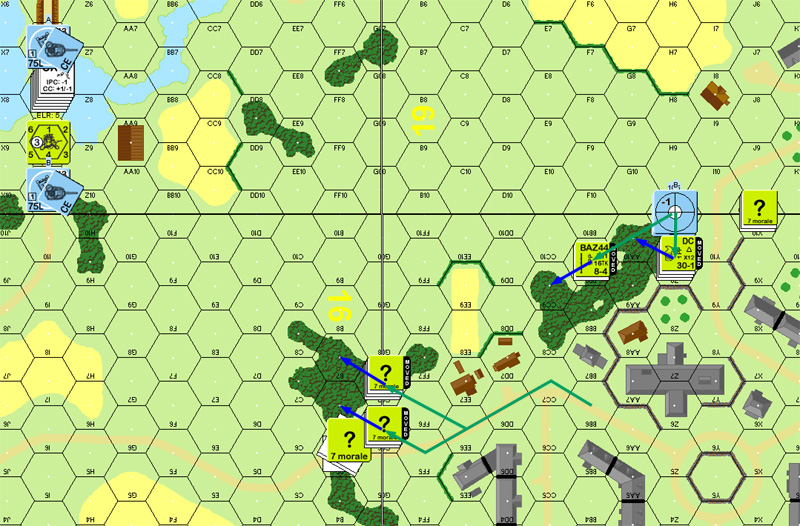
Situation, American turn 2, DFPh.
Patch’s plan went awry when it turned out the StuH had failed to bring any smoke rounds (10 on s9). So, he had to settle for the lead PzIV providing cover instead. Then things went bad for me when he killed the jeep and broke the ATG crew.
Hadn’t even fired a shot…. Some of the problem is that I was too prepared for a charge straight into the teeth of the Gun, and set it up facing due north. He wasn’t even firing through the gunshield.
Patch put himself even further on the the east approach, sending the second PzIV south to join up with the bulk of his infantry. He spent a couple hexes in Bazooka range, but I’d have needed a ‘2’ to hit, and it wasn’t worth breaking cover for. The MMG did manage to stun the first PzIV, who had been CE.
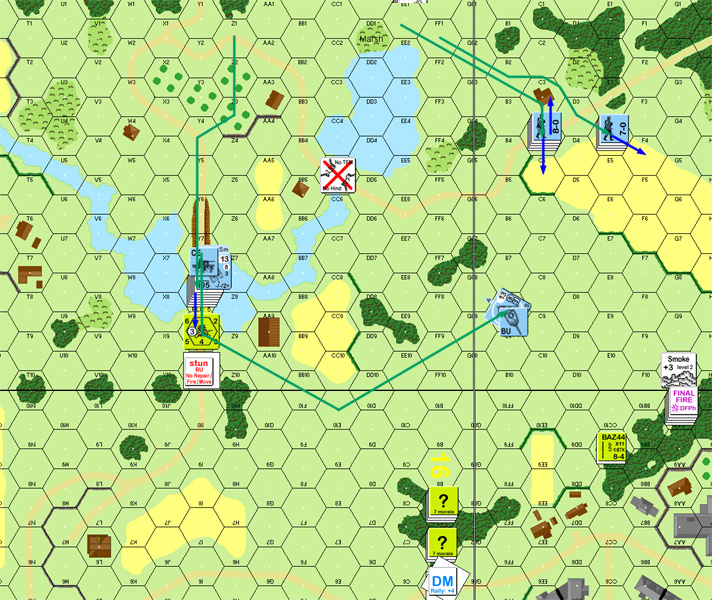
Situation, German turn 2, end of DFPh.
For my turn, the MMG squad skulked away from the Acq marker, and the Bazooka squad in CC9 threw smoke in DD8 to advance to the EE9 hedge where he could make the tank commander nervous.
Well, that was the plan. Actually, they muffed the smoke grenades (6) and got pinned anyway on Patch’s third shot against them. However, his Final Fire killed the crew (k/2) and broke the squad in CC9. The good news was a ‘1’ Sniper hit the CE StuH in 13Y8, and Recalled him.
This left me in a bit of a bind, since I couldn’t really cover everything I wanted to at the same time. Noting that it was impossible for Patch to actually cross all of the board 19/10 open area. So, I moved the 16B7 group to cover the north approach, while the B6 group (who were going to do that) went to recover the ATG. At the very least, it should slow him down.

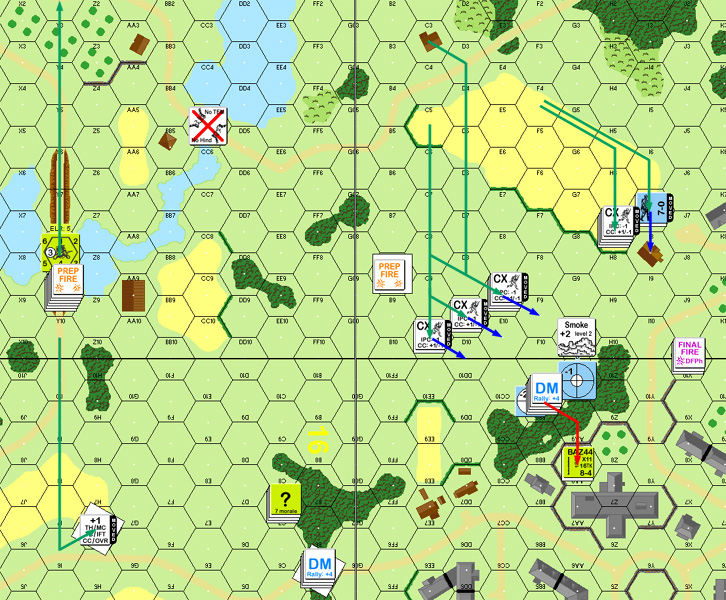
Situation, American turn 3, end of MPh.
“Ok, back to the trenches. Rindis elects to take the Americans in this one, and he’s defending once again. ROAR has this one fairly unbalanced, which is a bit discouraging, and the balance is nothing meaningful. I mean, if I’d ever seen Schurizen do something I’d be concerned, but really. That was the best AH could do?”
US Turn 1
“Rindis has to set up in two hexes, so as he moves first he’ll be running to get his defenses in order. The good news from this is it’s likely that his ATG will set up unemplaced, making it easier to kill.”
“Rindis divides into tow forces – one to cover teh north, and one to cover the east. I’m guessing the 10-2 and MMG are in the east, to balance out the ATG that’s obviously in 16B5.”
German Turn 1
“Damn, there’s a lot of OG out there. And only 8 turns? And I have to fight through stone buildings and a 10-2? And this is 75-25 Pro German? What am I not seeing?”
“I enter two platoons of infantry along the east edge. I can’t see sending everything in the same direction. The 9-2 kill stack CXs to 13Y7, where it will advance to the bridge in 13Y8. I park a MkIV in 13Y7 and 13Y10, where their sneaky LOS will let me get some fire on Rindis early. The Stg parks in 13Z1, where he has a long shot against 19H10. Probably should have stuck him in 13Y6, but what’s done is done.”
US Turn 2
“Rindis vacates 19H10 (naturally), and sends a 747 and bazooka down the woods line to increase his coverage. More infantry deploys in the 16B7 woods.”
“I’ve got several shots against the ATG in 16B5 and I take it, failing to break the crew but I do strip concealment. Rindis moves back into 10AA10, covering the east once again. Nothing I can do about his skulking, but some smoke should smooth movement along.”
German Turn 2
“The Stg has no smoke? How can that be? Sheesh. The MkIV in 13Y10 fills in and drops smoke in 19G10, and my 9-2 stack breaks the Gun crew and kills the jeep. With the crew down, I move a MkIV to the north side and move the Stg up to 13Y8 where it also can fire on the ATG. Infantry to the east floods into the wheatfield, and in the interest of deployment and reducing casualties I send the 8-0 into a rally point. Big mistake it turns out. Rindis scores on a MMG long shot with the 10-2 and stuns a MkIV.”
US Turn 3
“Rindis skulks from 10AA10, but 10CC9 doesn’t fare so well when instead of finding smoke grenades they choose to stand up and yell “Over here!”. Takes far too much fire, but I break them in the end. In revenge, Sgt York nails my Stg crew on a 1 SAN dr. He has a SAN of 3. This is most annoying. Rindis advances up front again 10 10BB9, and moves into 16C7 and 16B5, where he will try and man the ATG with an ad-hoc crew.”
——
“Man. Two turns down, I’m nowhere near the town (and don’t expect to be until Turn 5!). This scenario looks tougher than ROAR suggests. I need to break units taht aren’t with leaders, forcing them to do things other than fire on me. That 10-2 is gonna be tough to deal with in stone terrain, and I have to respect the bazookas. TK# of 15 on those things. The ATG down is big, but I need to kill that crew. If I can break up the 16B7 woods, perhaps I can flood in from the north.”
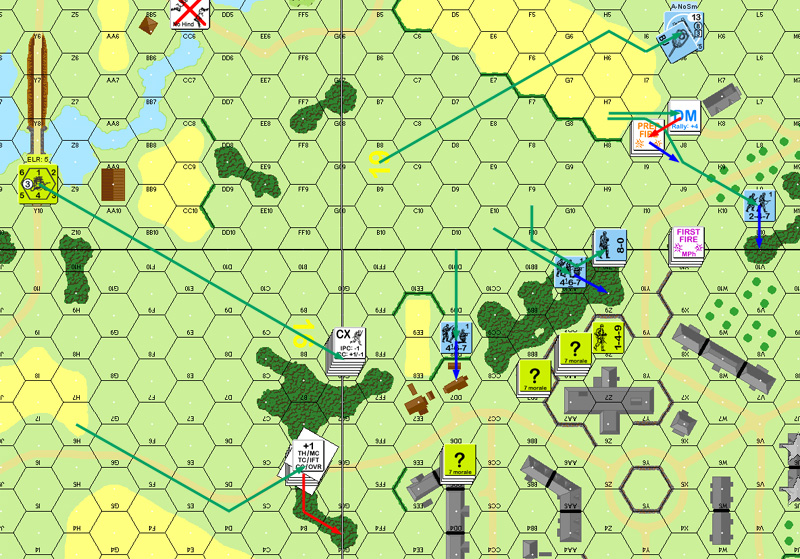
The German third turn started poorly when my HS failed to man the ATG. He’d still want to deal with it, but now he didn’t have to worry about the Gun shooting back. The PzIV on the east side tried to fire Smoke, found it didn’t have any, and then broke the 10-2 with regular HE. A ROF shot generated a 1MC that both units passed with ‘3’s (Original), and then the 747 broke to the CMG/BMG shot.
That broke open the center. Then he fired the entire stack on the elevated road in 13Y9 at the HS trying to man the ATG, and broke/Disrupted it.
I looked carefully at where he was and realized that even at full speed, he couldn’t get across the open ground in the center in one turn. So the squad in 10X10 concentrated on the nearer flank, moving up to 19I8, and managed to kill a HS. His forces in the center deployed into a nice line, while his 8-0 managed to catch up.
Situation, German Turn 3, end of MPh.
My turn began well, with the 10-3 and both squads with him rallying. Better yet, the second one generated a Hero! (That was the one with the MMG, so no handing a BAZ off to him.)
Instead of advancing, and shooting it out in light cover, I decided to fall back (the north flank especially needed to). The center would anchor on the stone wall and building in BB7-Z8, and that should slow down the bulk of his troops on the opposite side of the woods.
Situation, American Turn 4, end of MPh.
By this time I was starting to realize I had a dangerous problem brewing. He had 2 1/2 squads in the 19I8 area, and there was only one squad of mine covering the area between them, the edge of the board, and the victory areas. There’s a nice little section of woods there, and considering that it meant that he’d have to swing all the way south to get there, I hadn’t worried about it too much. But now he was nearly there, and if he slipped by, I wouldn’t be able to stop him.
He prepped with I8, pinning the 10X10 squad. The center moved up into the woods line. His HS moved into 19L9; I would have liked to have stopped that, but figured getting the squad sure to move after them would be better in the long run. Sure enough, they moved on a similar line, and I manged to break them. Sadly, they were able to rout to I8, where the 7-0 was.
Situation, German Turn 4, end of MPh.
This left me with several problems. 10DD5 was in danger of being cut off, and not of any use to protect the victory area. 10X10 was going to be Encircled if he stayed put, and really needed to move to block access to the victory area. The center was strong, perhaps too strong, considering that it wasn’t directly contesting an advance towards the victory hexes now.
I briefly contemplated trying to break the HS in 10V10 with the flanking squad, but the odds were way too low. I was about to have to start pulling back through the Z6 complex, but didn’t want to let him in without a fight. I eventually ended up prepping Z8/AA8 at Z9. I figured it’d probably break on a 8FP -1 shot, and that’d be that much less shooting at the retreating X10. They’d end up in a poor position for the next turn, but everything else would be maneuvering around it, and he’d still have avoid the area because of the +3 TEM and -2 leader.
Of everything, only one move worked, and the rest was a disaster. I rolled high, and only got an NMC, which he passed. BB7 pulled out to Y6, the general idea was to interdict things from X6, but Y5 was an option if necessary. Then DD5 Dashed to BB5.
Or tried to.
I had considered placing smoke in CC5, but was worried about the stack in GG7 getting during that. As it was, the 467 in DD7 rolled a ‘2’, and the 1KIA killed the squad and broke the leader, eliminating that flank.
There were several unattractive options in X10. I could Smoke X9 and let 19J8 & J5 fire on him; AM in X9 and not get into position, or I could run for it.
I ran for it. There was a wall between me and most of the troops, and I’d just have to take my chances with the HS in V10.
They fired and got a 1MC. I rolled a ’12’ to CR to a broken Disrupted HS.
There goes the other flank.
To top it off, he killed the Hero in DFPh.

Situation, American Turn 5, end of MPh.
I kept going, but he saw what he needed to do to checkmate me. He advanced into BB5, and then walked the 467 from DD7 down the road to Z5. To protect the victory area, I had to ignore him, but I only got one shot, and he had two units in range. He first moved a squad adjacent to the R6/R7 victory area, which I broke, then the HS in V10 moved into U6, and there wasn’t a thing I could do about it.
German Turn 3
“Rindis failed to man the ATG, opening up my move this turn. I tried firing Smoke into the 10-2’s hex but failed. Seriously. How am I supposed to screen movement with smoke when I don’t pack the shells? I fire HE instead, get ROF, and break the 10-2 and the squad. On second thought, the hell with smoke. My 9-2 stack breaks the 337 in the ATG’s hex and Disrupts him. Yeah, stuff’s gonna be moving this turn.”
“I move units one at a time in the wheat field up to the 19I8 farmhouse, trying to draw the fire of the 747 in 10X10, which i do at the cost of a HS. 19C5 charges to the board edge in a nice line to maintain a FG yet reduce the risk of a good Defensive Fire. Free of the ATG threat, the stunned MkIV moved into the center of board 16 to cover the entire woods frontage. I certainly don’t expect Rindis to stick around here as me center unit are about to cut off 16C7, and if he stays I will make it hurt.”
US Turn 4
“Rindis rallies the 10-2 and both broken squads in 10AA8, and creates a Hero on a HOB rally roll. Nasty little hex there now. Rindis doesn’t Prep and skulks with 10X10, forms a line from 10BB7 to 10Z8, and retreats from 16C7 to 10DD5. No one can see the center now so next turn will be a free movement turn for me over much of the board, but now we’re entering that damn stone terrain, and the BB7-Z8 line he has is too strong to attack frontally with my platoon. I’ll have to bypass.”
“Which makes me think not pulling back further was a big mistake on Rindis’ part. Aside from the woods in front of him, he has no meaningful LOS from these positions. If I do flank him, he can’t fire on me, and he simply has to control my movement. I think perhaps leaving the hero and a squad in this area to blunt a frontal thrust would have worked, with the 10-2, 747, and MMG making a run to Z7-Y7-X7-AA8 to reinforce the flank closest to the victory hexes was a better choice. But heck, hindsight’s 20/20 and I’m no ASL master myself.”
German Turn 4
“I Prep Fire a 467 against 10X01, hoping to break that flank, but only Pin instead, which is good enough. In Movement I move the stunned MkIV to 16B5 to control the ATG hex and get an eye on 10BB7 (the EE5/FF5 hedge blocks LOS from the dangerous bazooka in 10DD5). the 902 stack makes a mad rush across the board to 16A8, heading finally to 16A7 for a LOS on 10DD5. I send the center trio to 10DD7, 10Z9, and 10Z10 to cut off 10DD5 and interdict Y8 and X7. For the big move, I send a HS to 19L9 without trouble, but when a squad follows he’s zapped in 1J7. I move my last MkIV to 19J5 to cover 10X10.”
“With a HS in 10V10, I have a clear run to the victory hexes. There’s precious little else to follow-up, but that little unit is forcing Rindis to move next turn, yet I can nail many of his units that try. 10X10 is effectively encircles, and 10DD5 has a difficult extraction problem to deal with. If he tries to bail out of 10DD5 by placing smoke first in CC6, I have a shot with 16A7 at 16(+2) when he does so. Nor can he cross the Z5-CC7 road without getting shot from DD7. He’ll have to fall back through the Z6 building, which will seriously slow him down.”
US Turn 5
“Rindis… Prep Fires? 12(-1) against 10Z9 as Rindis desperately tries to reduce the fire against 10X10 when he moves, gets a NMC that I easily pass.”
“With the center now frozen for the turn, Rindis is facing the problem of too much ground to cover, and too few units. He dashes 10DD5 into CC5, but gets hammered on a 2(-2) when I roll a ‘2’ with DD7. Cowering to the 1FP column doesn’t save him, as a ‘0’ is still a 1KIA, which kills the squad and breaks the leader. The 747 and bazooka in 10BB7 run to 10Y6, surviving several low odds 75mm HE rounds and MG fire. In 10X10, the 747 pulls out and gets hit with a 2(-2) from 10V10, gets a 1MC, then rolls a ’12’ to CR and ELR. Ouch! Ouch ouch ouch.”
“Ouch. That’s really the game right there”
“I kill the Hero in 10Z8 with an 8(+2) that gets a 1MC which the Hero fails, who then fails his wound dr. In Advance, the CX 747 moves to 10Y5, and the 10-2 and company move to 10Z7.”
“I think this was a mistake. 10Z7 has just no LOS to anything. 10Z8, though next to my squad (which would have WA), offers interdiction for the units in 19I8, 10Z9, and 10Z1. I think you have to chance the 10-2 and 747 surviving the looming 8(+0) in my next Prep. Any option really sucks, but it’s at least a half-suck option. I also would have put the CX 747 in X5. It covers the road a little better to the victory buildings, and allows immediate movement into the cover of W5 if he survives that long. Otherwise he has to cross OG to get there, and I’m certain to have any way out of that square interdicted next turn.”
German Turn 5
“I rally the squad in 19I8. No Prep Fire. Time to move and win this thing 3 turns early.”
“16A7 moves to 10BB5, followed by the stunned MkIV to 10DD6. I then shove 10DD7 down the road to 10Z5, daring him to fire or risk the loss of the squad to CC, but if he does, he can’t fire at anything moving at the victory hexes. Heh heh heh. The 7-0 and squad in 19I8 go CX and make a run for 10S8, but both units break under a 2(-1). No matter, for without anyone else to fire, the 247 in 10V10 goes CX and moves to 10U6 for the win.”
Reflections
“Another scenario with an outnumbered side trying to guard instant win victory hexes/board edge. Getting a little old, especially as so many in this series are seriously out of balance. This one, IIRC, as close to 75-25 Pro German, so I can’t say I’m that surprised at the win though Rindis did play well. And the US balance – “German AFV don’t have Schuerzen”. Seriously, who cares? Give the US another squad instead. Been playing since Squad Leader was the only game in town, and I’ve never seen the damn things save an AFV.”
“I really liked Rindis’ move to the town outskirts to slow down my movement. I think the US has to do this, or else they’ll be facing a well organized German force early, and with the FP disadvantage even with the stone buildings they’ll get kicked out of town rather quickly. I’m half and half about the ATG moving out there. It’s nice having the longer range AT firepower, and the bazookas are very effective in town (16 TK!), but you can expect to lose the Gun. The plan failed for Rindis as I killed the crew immediately, and he was never able to re-man it.”
“A fallback defense is tough to do, and Rindis muffed it by about a turn as I see it, and he definitely should not have Prep Fired his 10-2 on turn 5. He really needed to move that turn, and didn’t. 10X10 turned into a little death trap for him, but he didn’t expect me to flank it as fast as I did and just didn’t get out in time. If he could have, a move to 10V10 on turn 3 would have been better as you have an escape route, yet still screen the front. To be fair as well, both flanks disintegrated on a ‘2’ and a ’12’, and without the 1KIA in 10CC6, he may well have held me off for another turn, though he still would have been in a terrible position.”
“5 scenarios down, with 4 Axis wins. I have the Germans for A37, Dreil Team. Pro German, but only about 60-40, which is a lot closer than the last two games. I’ve offered Rindis the balance, so we’ll see how it goes.”
GeorgeBates spoke up:
“Nice AAR, guys. I’ve always passed this one over but now I’m a little more interested in spite of the balance issues. A couple of thoughts.”
“1) SSR2
Not sure why all the trouble is taken to spell out the condition of 13DD1 when a glance at the relevant rules explains all the circumstances for it and surrounding hexes. Also misses the fact that streams are not water obstacles. Simply saying, “All streams and water obstacles are flooded (B16.6, B20.44, B21.122); hexes adjacent to 13DD1 are soft ground (D8.21).” ought to be enough. Marsh hexes may be flooded, but per B16.6 they become stream/river hexes (possibly also pond hexes?) – there is no such thing as a “flooded marsh” hex.”
“2) US Initial Defensive positions
A lot of things depend on how far you can tow the AT Gun on 18 of the Jeep’s MP (add 1MP per hex traversed – i.e. 1.5MP per road hex – no bypass allowed). There’s no place you can drag it to and unhook it in time to get a shot off at the German AFV as they move over the elevated road. I’m not sure if James is saying he towed the gun all the way to 16B5 on T1(US), but if he did he could not have unhooked it, so the gun would not have been able to fire any earlier than DFF in T2(G). 16B5 is a good shoot-n-scoot position that denies the German armor the northern approach to the victory buildings, but if Jerry is wise and bypasses it to the east through 13Z9-AA10 (where he can also smoke 16C5 & C6 with impunity) in T2(G), hook it back up in T3(US) and tow it back to 10X5. Unhook in T4(US) and manhandle to over the wall into Y5 if you have the luxury. Both hexes cover the east approaches and if necessary the north should the German drivers decide to double back.”
“The TEM and field of fire offered by 10Y5 are particularly attractive – it is a strongpoint that anchors the US left denies access to the victory area across the 10Q9-X5 road so the squareheads must take additional time to knock it down. Perhaps positioning the gun there at the outset while the guys with BAZs play cat-&-mouse with the AFVs from the woods is worthwhile? If not the gun, a 747/BAZ or perhaps even the MMG (or both?) may want to fall back to that position. Somebody has to be there by the time Jerry is pushing through the woods lines.”
“Also on T1(US), the 10-2 needs to double-time a 747/MMG to 10Z10 in order to put DFF on 13Y6 to keep the German AFV BU and possibly knock off some riders. If the German infantry aims to run up through the grain on bd 19, a good fall-back position would be 10X8 L1. To support this and keep Jerry honest in the open ground on the middle of the board, the 337 should get to 19I8 in T2 and stay there or in K7 through T3, keeping the US right under surveillance, but commence withdrawal toward 10R7 no later than T5. Meanwhile, the 9-1 should quick march 2×747/BAZ as far as 10CC7 in T1, with the object of getting those boys into locations like 16B4/B6/B7 or 10GG7/EE7/EE9 (hopefully with ? intact). The third 747/BAZ is probably best put in 10X10/Z10/AA10.”
“However, after slowing the German AFVs in T2, I think the US needs to fall back on the left in T3 to a second line composed of hexes like 10EE5, DD2, and DD7 using WA when under ?; then pull back again in T4 to a line from 10BB1-BB5-AA7 and there make a stand with the backing of the gun in Y5. There is simply too little American infantry (and only 2 leaders) too hold the original wide perimeter – the Germs are bound to penetrate at some point cut off any glider boys that are too far afield.”
“Deploy? I almost never deploy squads with assault fire capability (not to mention a smoke exponent of 3) – even when on the defensive and skulking it’s too great an asset and one that might be needed in the endgame. A lot of players give BAZ to HSs, but I prefer to have SW with squads so as to be able to utilize both the no-rate BAZ and infantry FP.”
“3) What to do if it’s a howlin’ hound
Not having seen the scenario played anywhere but here I can only guess but I suspect that some of the US losses may be attributed to making the mistake of getting overextended. I agree that simply stripping the German AFVs of Schuerzen is no kind of equalizer, but rather than adding a squad (giving the US infantry FP parity), I suggesting changing the composition of the US infantry by substituting 667/347s for the 747/347s as the parent unit is 327 GIR. This is historically supported as even before D-Day it was recognized that glider infantry were under-armed and under strength. Thus the 327 had 1/401 GIR attached to it before the invasion, and glider squads unofficially began adding BARs (and later M1919A6s) to their armament to arm themselves like regular infantry. This ad hoc effort continued through Market-Garden until the TO&E was revised in mid-December 1944. The Americans come out of this change with a net -4FP, but they are able to project FP much farther, making crossing of open ground or grain much more hazardous for the Germans. If after this Joe still needs help, an extra HS would not hurt, but I think a full squad tips the scales too far and also goes against the spirit of the scenario in which the shortage of US infantry is a weakness that must be overcome or at least compensated for with astute play.”
“Thanks again for the opportunity to examine a scenario I had often looked at but never really seen.”
“Cheers!”
“- G”
“Well… damn. That certainly changes things. I didn’t save the 1st turn log, but nothing about that ATG move caught me as illegal. I’m wondering if we screwed the pooch by unloading at 1/4MP. I think that will allow us to continue the “1 major rule error per game” that’s been a regular item in our campaigns this year. o.o”
“Your analysis isn’t too far off of Rindis’ plan. He got a 9-1, 747, HS, DC, and BAZ up to the 16B4 woods, quickly, and did send the 10-2 to 10Z10. His MMG shot against my T1 movement was to no effect, but he did nail a MkIV with a Stun later. His biggest problem was that he didn’t fall back in time, and got flanked. I was surprised Rindis never moved into either 19I8 or 19K7 when it was apparent I was heading that way. It certainly would have slowed me down by a turn.”
“667s instead of 747s. Hmmm… that would be an interesting change to the US forces. It should help improve the balance, but it’s hard to say by how much without some games played. As you point out, the net FP effect is minor, but extending the squad range really improves the ability to interdict over all that OG.”
“Thanks for the review! Always nice to see other thoughts on our games.”
George Bates:
“The Wabbit speaks.”
“…I didn’t save the 1st turn log, but nothing about that ATG move caught me as illegal. I’m wondering if we screwed the pooch by unloading at 1/4MP.”
“C10.11. Basic rule of thumb is that hooking/unhooking is slower than personnel mounting & dismounting because it includes the loading of ammo into the vehicle and the time needed for the crew to embark/debark – hence 1/2 MF/MP.”
“I suppose 10Z10 could also be a good first position for the gun because it covers the whole NE quadrant of the board, but you won’t be able to manhandle it in there until T2(US), so it will face Jerry without benefit of concealment. Woods TEM and a gunshield is probably insufficient against the 9-2 accompanying a 467/LMG stack. Best to bug out before they come in range. Don’t dawdle.”
“… His biggest problem was that he didn’t fall back in time, and got flanked. I was surprised Rindis never moved into either 19I8 or 19K7 when it was apparent I was heading that way. It certainly would have slowed me down by a turn.”
“It seems obvious that the US must grab, then quickly give ground on the north side. 16A & B rows in T2, 10EE & DD in T3-T4, and 10BB & AA in T5-6. If you don’t move fast Fritz will be all over you.”
“If the gun starts T2(G) in 10Z10 and there’s a HS in I8-K7 with the MMG covering, the German flanking move may be delayed long enough to make the endgame meaningful.”
“667s instead of 747s. Hmmm… that would be an interesting change to the US forces. It should help improve the balance, but it’s hard to say by how much without some games played. As you point out, the net FP effect is minor, but extending the squad range really improves the ability to interdict over all that OG.”
“I was surprised that 747s were assigned when the parent unit was identified as 327 GIR. Their efforts to re-arm along the lines of an infantry regiment in 1944 are well-documented. I don’t think the change is too much (would still take away the Schuerzen), but won’t know if it is enough until it is tried. If I can find an opponent for this one I will suggest it to him (or her). Encourage you both to advise results if you try it again with this change.”
“Thanks for the review! Always nice to see other thoughts on our games.”
“Always appreciate good material on how the game is played. Glad I could contribute.”
Well, poo. I just assumed it’d be like normal (un)loading. I’d have possibly still done the same thing, as I was flying by the seat of my pants, and didn’t know if I’d even have the 1/4 MP until I got there and calculated it. Knowing that though, I’d probably be tempted to keep it near the Victory buildings or the Y5 traffic circle. Then again, I really wanted an initial up-front defense, including that Gun.
A lot of my trouble this time came down to (as it so often does) developing a blind spot as to where the action may go. With all the long distances, obvious tank chokepoint, and open ground, I didn’t really consider a slide all the way around the east past my southern flank. I really didn’t give much consideration to the R-V area until turn 4.
Postscript:
I don’t remember this one too well, but I know that my biggest regret was that it was all over so fast. The basic situation is very interesting, being another meeting engagement, which always leads to a very interesting time, though it then turns into a town defense. I’d certainly like to see someone else’s play of it; with or without George’s suggested change.
Discussion ¬