
Wraith Test
During May, Mark and I did a second test of a Vassal module for Necromancer. We stuck with the standard scenario (we need to try the conversion scenario someday), but used many of the optional rules: a conversion point allowance, miasma movement, the miasma demon, and we each took a couple picks from the extra units and items. Mark took a crystal ball and ring of flight for his necromancer, while I took an apprentice and gave him a ring of flight. (I might have taken mercenaries if I’d remembered that you get two of them when you pick them.)
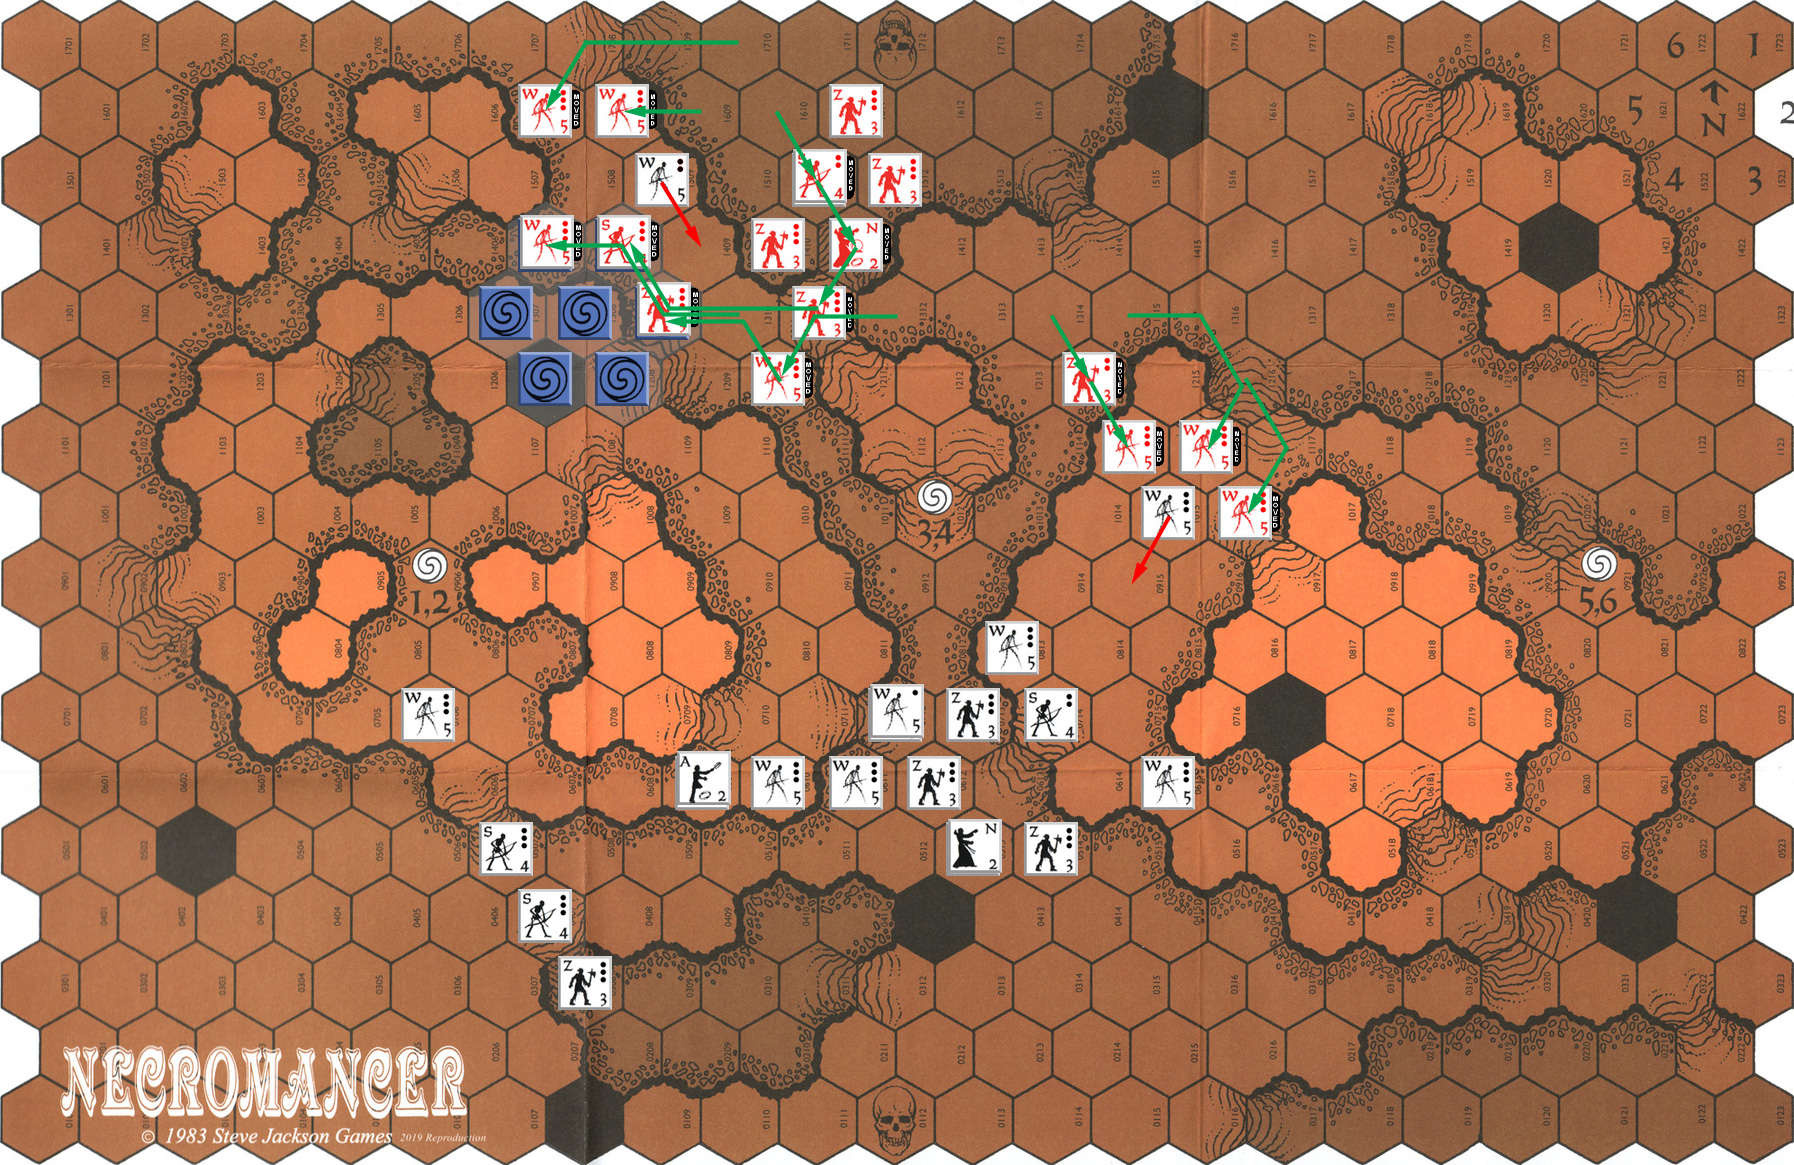
We started on the same sides of the map as last time, but swapped colors (which did cause a little confusion, but in the module, that determines who goes first). The miasma started on the west side, with an initial drift north-east—directly towards Mark.
I headed north from my entry area, and managed to convert three of his skeletons at the edge of his army, who survived combat (while on a slope) with NE results against his neighbors. Mark moved out and converted a stack of wraiths near the central neck. The skeletons died when forced to retreat up a slope, and the converted wraiths couldn’t manage a 1:3 combat, and so died.
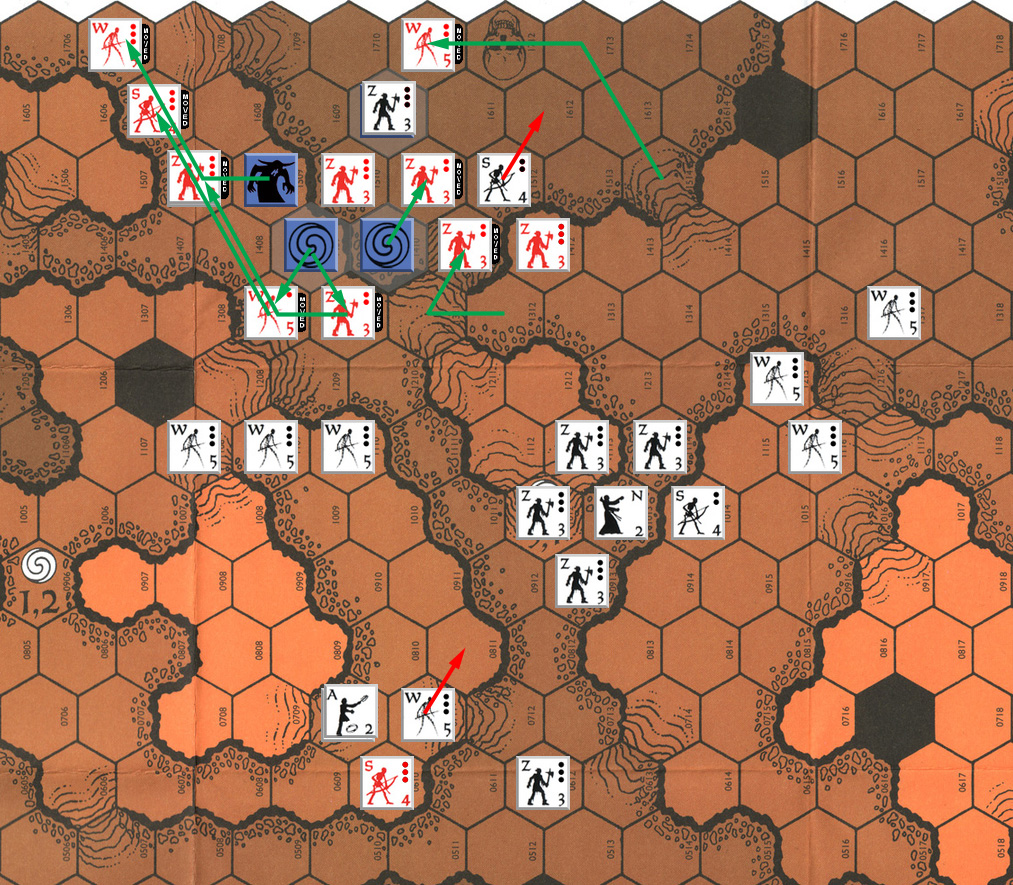
I continued north, on both sides of the map, and converted a stack of wraiths, who only had a similar stack to fight, but took an AR-1 after rolling a 2. Mark sent a bunch of undead into the approaching miasma, while also engaging my leading wraiths in the east, and then converted a pair of my skeletons. The converted wraiths took a DR-1 for one survivor, but the wraiths in the east just took a DR, and the skeletons got no effect against the neighboring wraiths.
The crystal ball showed its worth by bumping him up a column on the search table in all three cases, and his zombies found the first gem. On my turn I continued north, and re-converted my skeletons, and got a DR-1 against his forwards wraiths in the east to get some breathing room. Mark got the gem on his turn, with it turning out to be a 20 CP bonus. Meanwhile, he came up the center neck, and then converted the stack that he came in contact with (1xW, 2xZ). He lost the wraith in a soak-off, and then took an AR on the zombies, while getting no result on the eastern plateau. He successfully searched two more miasma hexes, and found a second gem in one. Also, the miasma converted a stack of zombies he had in there to my control.
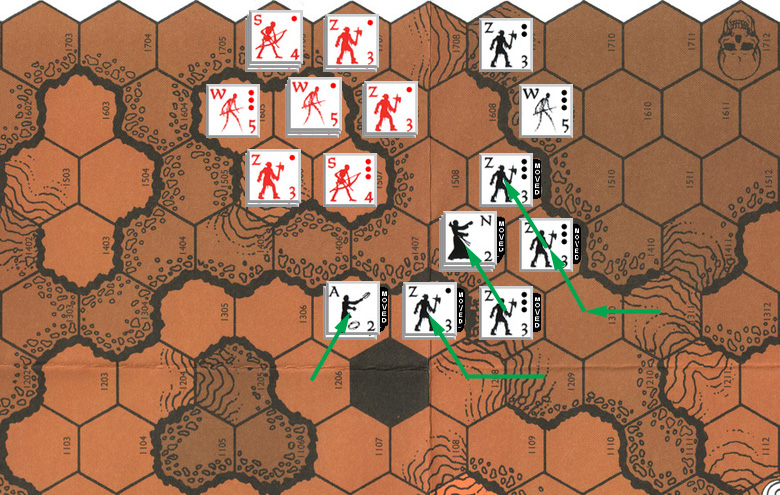
I pressed forward in the neck, forcing some zombies to retreat, and knocking out a stack of wraiths on the east plateau for failure to retreat, and the converted zombies knocked out a wraith and advanced to lock up several unit’s moves. Mark got the second gem to his necromancer, getting a +1 movement to all his zombies. He mostly pulled back, and then converted a stack of skeletons next to my apprentice (who got a NE in combat). Three stacks (some on a slope) vs the miasma-converted zombies only did a DR, and he successfully searched another miasma hex… discovering the demon! Who merely got a DR against the wraiths who disturbed him.
I mostly just adjusted my position a bit, and then converted a pair of skeletons still in Mark’s starting area/depression, along with the zombies, I got a DR-1 to get a zombie up there, and finally knocked out Mark’s wraiths on the east plateau. The demon went after Mark’s wraiths again, and destroyed them when they couldn’t retreat. Mark pulled back, and the demon got NE a against my converted zombies, and Mark’s attacks were generally just retreats.
I moved to do some boulder attacks, as well as send wraiths towards the depression, in case my units in there should survive another turn (I had figured everything I had converted in there would be gone in a turn). The demon attacked Mark’s zombies again, and got a AR-1 on a 2, to die before causing more than some concern. Meanwhile, I knocked out a stack of his zombies, and the skeletons he’d converted due to having no retreat path.
Mark used the ring of flying to get his necromancer on top of a four-hex mesa, and re-converted the skeletons in the depression, and then wiped out the zombies I’d converted a few turns earlier. The next few turns continued him pulling back towards that mesa, while I tried to give chase, and get the apprentice and a stack of skeletons into archery range of it (sadly, the apprentice is just as slow as the necromancer, and the skeletons stuck with him to be immune to conversion attempts). Some of his units needed to go counter-clockwise around the mesa to get to the entrance, and I tried to gum it up by converting one of the stacks, but all my rolls failed.
I searched the last two miasma hexes as it headed back towards me, and found a third gem in the last one. However, Mark converted the wraiths with it, and played hide-and-seek in a far corner of the map, and I could never retrieve it. Mark picked at the edges of my troops as they came up, and had a pretty good time with attrition. I finally got into archery range, and got a DR to force him to lose some zombies in displacement to make room for retreating skeletons.
 He rearranged and forced my necromancer back with his own ranged volley, but left his zombies on the mesa uncovered… which I failed to convert (again). I failed to affect the necromancer and skeletons on the second try, and as I tried to take care of the guys off the mesa, only got a retreat.
Mark got the idea, and backed off with the necromancer, leaving me to either run the gauntlet in front of the mesa, or spend about a dozen turns going around over the larger plateau to get to the entrance from a safer direction. I chose the former and paid for it badly. Partially thanks to the slope, it takes two turns to get through that area, and Mark counterattacked, knocking out some skeletons, and then an entire stack of zombies who couldn’t retreat with a boulder attack.
I did manage to kill a skeleton on the mesa with a DR-1. However, Mark then converted a rear stack of zombies and killed another set of zombies with a boulder attack. I re-converted the zombies, but my attacks had no effect, and Mark charged in for the kill on my necromancer, who was still separated from his ‘guard’, and Mark killed him with a DR and no place to go that was further from the attackers.
Afterword
We’d missed a couple of rules until the middle of the game, which would have changed things. First, after successfully searching miasma, you have to then roll to see if there was actually anything there (we missed that the entire first game, and found it here on the second search). Second, the miasma should change directions after every time a gem is found. Both could have helped me a bit. A more minor one was figuring out that the miasma is supposed to move at the start of the turn instead of the end, which made the change of direction rolls make more sense. And a re-examination of the boulder attack rules finally brought to light that they attack each creature in the hex separately, which made them overall a better idea, since they’re often low-odds attacks (since it’s usually wraiths up top doing it, and their power is low), but with up to three attacks at a time, something will probably happen.
But, the real problem was all the missed opportunities.
The demon really caused problems when combined with the moving miasma, since you had to worry about it moving onto your units during the enemy turn. And, despite an offense-favored CRT, and a good attack rating, it barely did anything while in the middle of Mark’s units. Worse, I had about three conversion attempts as he moved onto his little mesa that failed, and any one of them could have seriously changed what happened there.
So this game ended about how I figured the first would (and didn’t), with my bulkier forces destroyed trying to pry Mark out of the defensive hole he’d sealed himself in. The smaller four-hex mesa helped a lot with that, as the larger one on the east side he used in the first game had a lot more ways to get in and pick apart what he was doing.
I did find one error in the module, which I corrected between sessions. It is now available for download at the Vassal site.
Discussion ¬