
Zombie Test
Mark got me a copy of Necromancer for Christmas, so I put together a Vassal module, and we tested that back in March. (I plan on releasing it after one more test session.) As one of the old SJG pocket-box games, its fairly small and fairly simple. The main thing about the game is ‘what’s yours is mine’. The bulk of the forces are undead powered by one of the two necromancers vying for control of a valley, and one skeleton is much like another, so you can try to convert enemy units to your side. Also, the more units you have, the weaker (and less resistant to conversion) they all are.
The overall goal is to defeat the enemy necromancer, but they’re here to find jewels of power, which can grant bonuses. These are in miasma hexes, which can also spontaneously cause control to flip. You’re supposed to determine where the miasma is, and then set up, but we accidentally reversed that; it meant that it was in the one area I hadn’t set up to advance on easily.
Mark had Black (the first player), and boiled out of the northern depression. He then did a successful x2 conversion on a stack of my zombies, tying up much of the center of my formation… and incidentally using nearly a third of his CP. They were then forced to attack my units, and thankfully did no more than a DR, but didn’t take any losses either. (Unresolved question: You can only attack a single hex in a combat, and there can only be three units in a hex. Since you have to attack everyone you’re adjacent to, what do you do when three units must attack five hexes? We figured just pick three of the five as targets of one unit each, but clarity would be nice.)
I started moving towards the central and eastern choke-points, but with a bunch of units stuck, I had problems clearing part of my own setup area. (The two retreats actually helped with that.) Instead of trying to get my zombies back, I just prepared to wipe them out in combat, and attempted to convert some of his leading wraiths (which failed). The combat was DE, taking care of the rebellion… but I didn’t think to advance into the hex, which could have been helpful.
Mark continued emptying his starting area, and sent two stacks of wraiths into the center, while several units got close to the miasma. Another successful x2 conversion got three of my wraiths at the south edge, and lost one in combat (AR with nowhere to go). Then I did a x3 conversion on a stack of wraiths to hold the top of the slope of the plateau I was sending the bulk of my forces to. I had a couple combats that did nothing, but a DR-2 finished off the wraiths he’d converted (‘-2’ is losses, not the number of hexes to retreat).
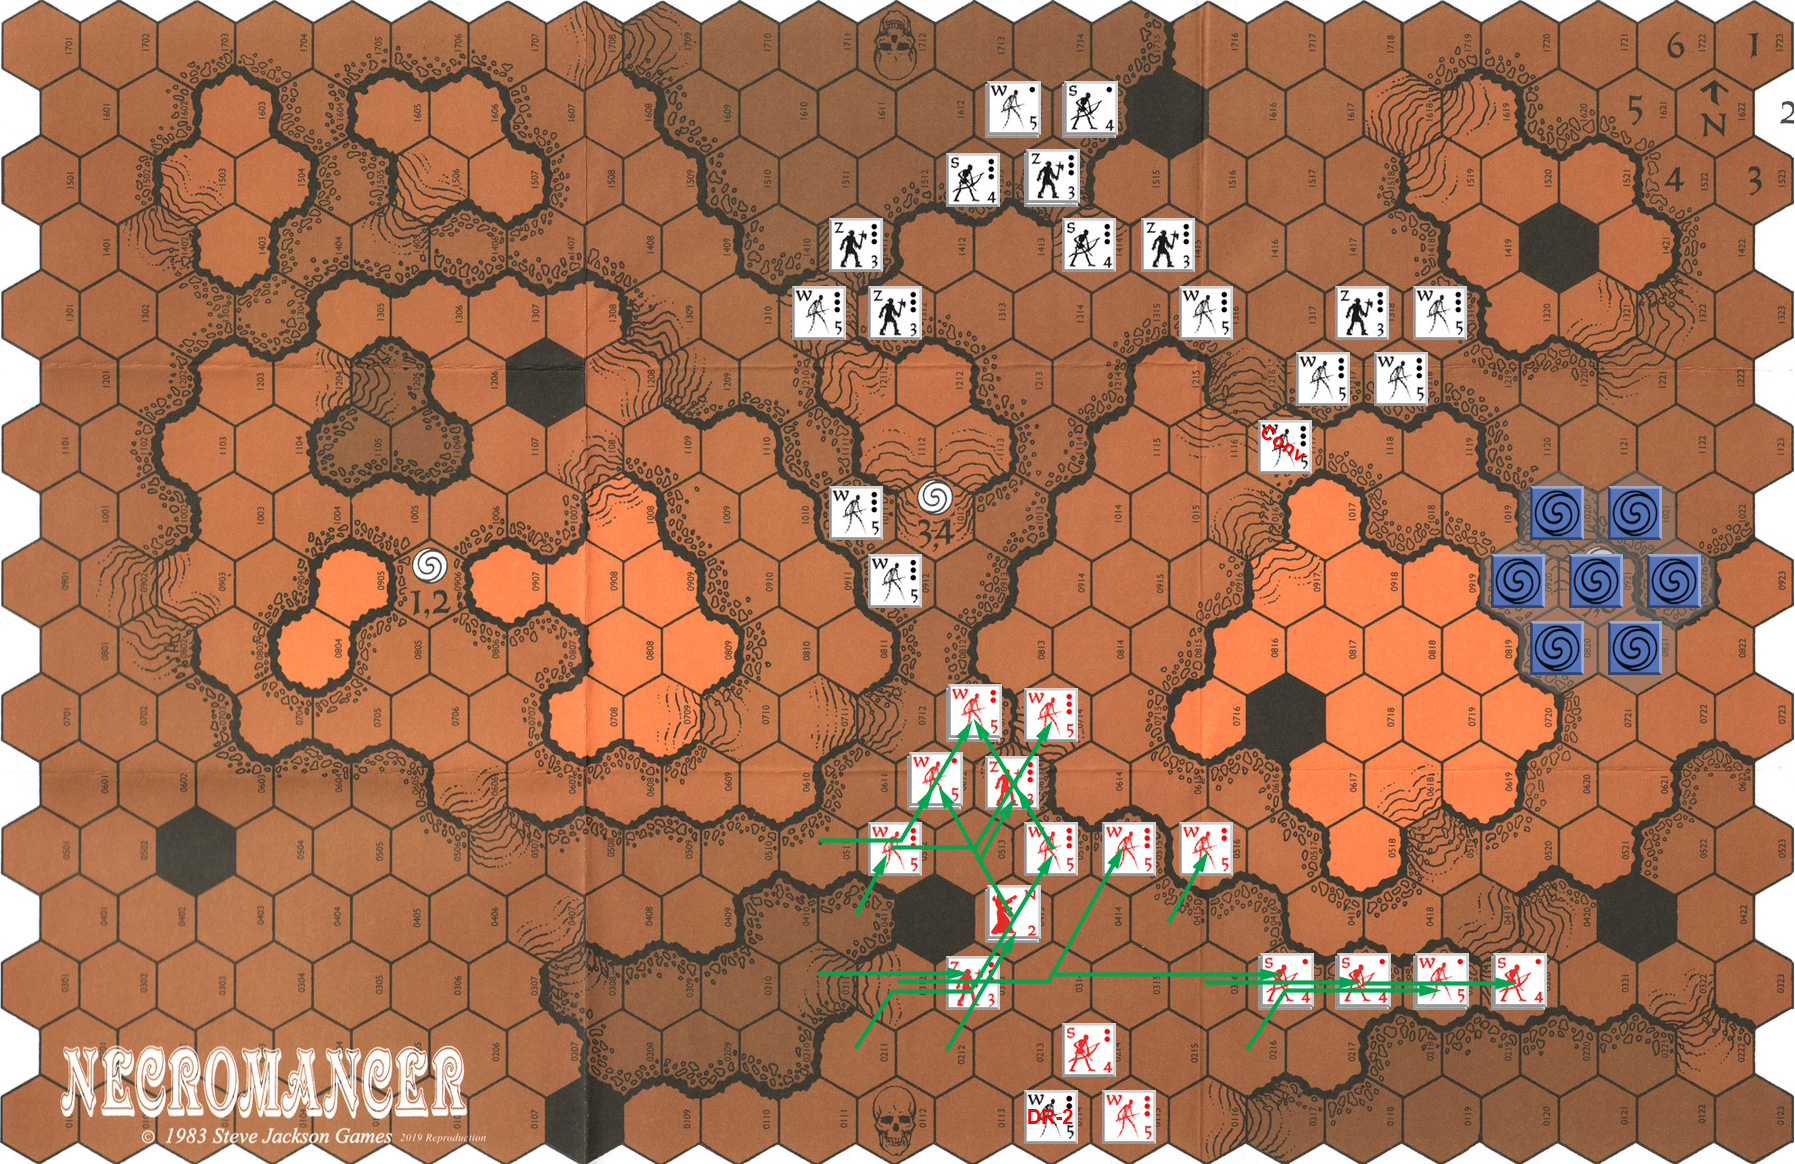
Mark moved one stack of wraiths into contact in the center, while the other forward set climbed up a cliff, and more units started picking their way towards the center. Another 2x conversion succeeded, getting him my forward skeleton and pair of wraiths in the center. The combats that spawned were AE and AR, knocking out a wraith in a soak-off while the other two units retreated. On the plateau, he attacked the wraiths I’d converted for a DR-1 (thanks to being halved while attacking on a slope). He had also put three stacks of wraiths into the miasma and successfully found a jewel with one of them. However, the miasma then converted them and one other stack to my side!
While nice, this did spoil my main plan, which was to stay one column below him on the conversion track, so that my units would be slightly better than his. In fact, I now had more units than him, and Mark would have the quality advantage once his next turn began. I finally started getting up onto the western plateau on both slopes, and sent one stack of wraiths to once again potentially block a slope on his side while the just-converted wraiths headed up and towards my units (the wraiths with the jewel were still inside the miasma, but thankfully weren’t converted by it), while I engaged in the center again. I missed on another x2 conversion attempt, but knocked out the remnants of the latest conversion in the center. A boulder attack in the miasma also forced Mark to retreat his remaining searching wraiths.
 Mark pressed on into the miasma, with three searching stacks again, but while he moved some units towards it, he kept away from the center, with the more forward wraiths dodging up onto the western elevations. Another x2 conversion got my forward units moving towards the miasma. The combat from that, his searches, and miasma conversion all had no effect. (We forgot a zombie vs wraith combat at the north slope.)
I gathered around his zombies on the slope and got them with a DR-1 (which killed the lot… as you’re not allowed to retreat onto a slope hex; harsh). A boulder attack forced a set of zombies to retreat out of the miasma (and off a slope, which with zombie speed also means setting them back a turn of movement).
At this point, Mark pulled his necromancer and a few guards back towards a small mesa in the north-west corner. In the center, he mostly worked wraiths around the flank while a stack of zombies moved towards the choke point. A single skeleton managed a DR against wraiths in the center, which left them vulnerable to a boulder attack that was another DR, but did nothing more. He had four stacks searching the miasma, but turned up nothing, and lost a stack of zombies to conversion.
I moved up, finally reaching the miasma on my own, and claimed northern the slope down from the plateau. I decided to start trying low-odds x1 conversions to save CP and fish for good units while Mark had to be careful since he only had a couple good conversion attempts left. I managed to knock out his skeleton in the center, and took out one of his searching stacks as my skeletons had finally gotten to archery range, which provided a surprising amount of firepower. I had one search, which failed, and thankfully didn’t convert from the miasma either.
Mark continued moving to the mesa, and failed on his conversion attempt, and finally found a second jewel. Meanwhile, I finally got the first one to my necromancer, and it gave me an extra 20 CP. Another cheap x1 conversion attempt failed, but I managed a DR-1 on the wraiths with the second jewel (and we forgot they couldn’t retreat down the slope). And I got a DR-1 against some of the zombies waiting to climb the mesa.
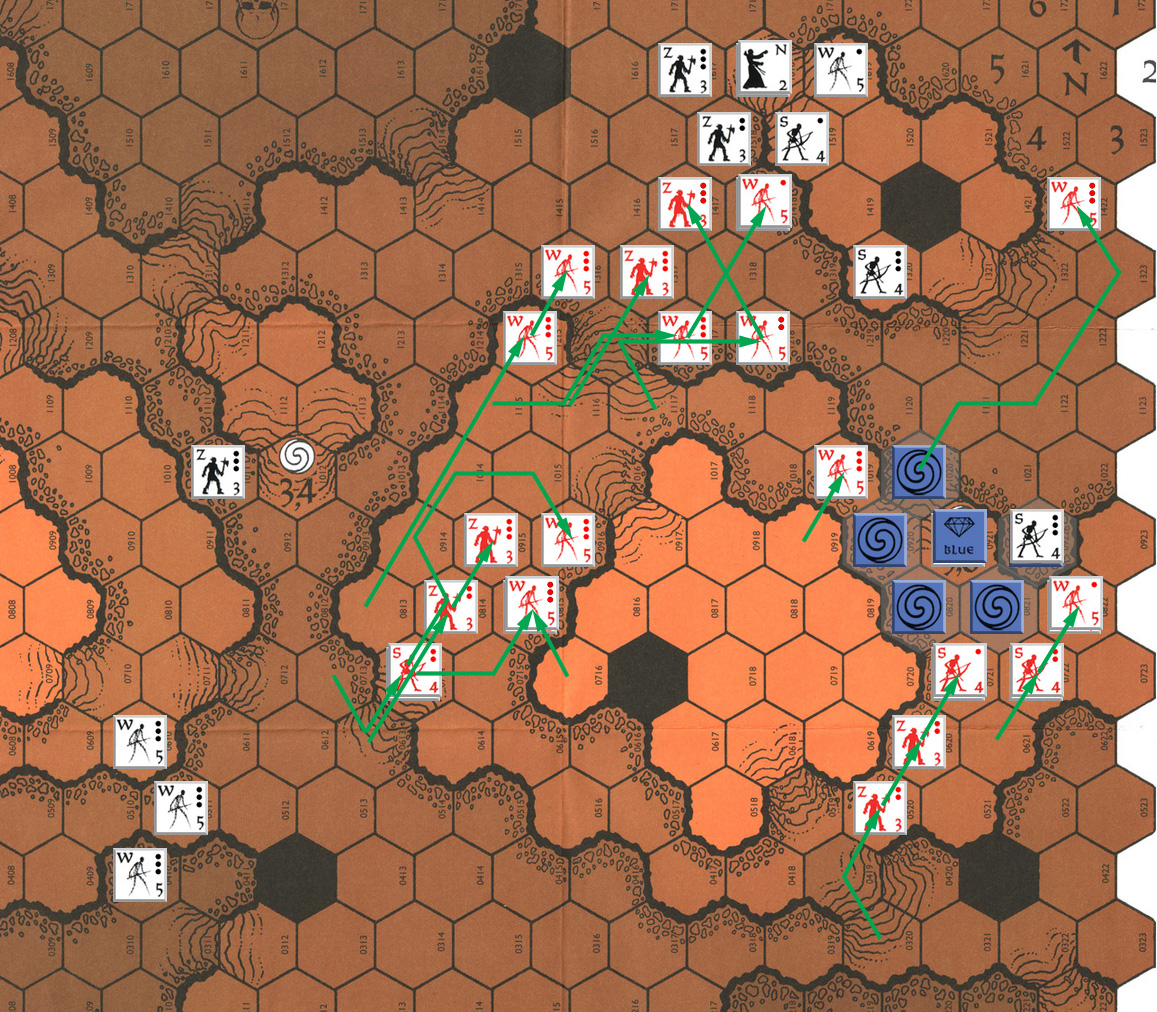
Mark got his jewel most of the way to his necromancer, and more units climbed up onto the mesa, while the units in the center started going up the NE slot to rejoin the action. I had sent some wraiths off to the side to try and climb up there, but Mark picked them off with skeletons. He also got a DE against a stack of wraiths who had supported last turn’s attack.
I moved up some more, but also paused to drop boulders on the set headed up the NE slot, an x2 conversion got me his skeletons on the mesa, who only made his wraiths carrying the jewel to retreat towards the necromancer. A lucky boulder attack got his zombies in the center (zombies are the toughest and most resistant units, though slow, so keeping them out of the fight was a big plus), while making the wraiths there retreat. I also only had a NE vs his zombies on the slope to the mesa, but that stuck them in place. I also had one search attempt, but nothing came of it.
Mark moved to get rid of the skeletons I’d converted, and his necromancer got the second jewel, getting a +1 combat ability for his skeletons. The wraiths in the center changed course and headed to climb of the southern cliffs of the plateau that I was still working my way out of. He was now down to the point where he had two conversion attempts a turn, but had hardly any CPs, so both x1 attempts failed. He rolled horribly against the converted skeletons, but that was still a DR… and they had nowhere to go. His skeletons picked off a pair of wraiths at range, but in at the north ramp, he only managed to make one of my stacks retreat.
I moved them back, moved up some more forces to deal with a wraith that had climbed down to add into the combat, engaged his skeletons… and moved a force of skeletons towards where they’d be able to use archery at the mesa, but they had to stop in miasma, and promptly got converted. I got a DR-1 at the north slope, which destroyed the stack due to having to retreat up the slope. A soak-off against an extra zombie merely caused an AR while I picked off the wraith.
Mark continued trying to shore up his position, and picked off a wraith, but had no other success. With the north slope partially clear, I advanced up it with a second set of zombies following, while more of the easternmost forces continued to clear the miasma at the south end of the mesa. A DR-1 finished off his spare zombie at the north end, and another near the south slope did for a stack of skeletons (with nowhere to go). I had one wraith searching the miasma… who ended up converting.
One set of his wraiths caught up with a pair of skeletons still slowly moving north near my necromancer and destroyed them with a DR-1 with no retreat options (too many slope hexes), while his necromancer and skeletons similarly destroyed a pair of zombies at range when they had nowhere to go. I picked off a single wraith and got two stacks of zombies to the top of the north slope, forcing a DR-1 on his zombies. A pair of wraiths with his necromancer fell off the side of the cliff to make room as the remaining zombies retreated. This time I had a pair of wraiths searching the miasma, and they converted. More of Mark’s wraiths caught up, and did a boulder attack on the necromancer’s stack (he himself is immune) managing a DR-1 to destroy a zombie, while a ranged attack on the mesa failed.
However, he’d separated his last skeletons from the necromancer to make that last shot, and I advanced on them while everyone else continued gathering, and I spent almost all of my remaining CPs to convert them. I’d had a stack of wraiths in the miasma, and then advanced in another set after a DR against one of the wraiths that had recently converted from me… and one of those stacks converted.
One of Mark’s x1 conversion attempts finally succeeded, getting him a wraith and a pair of skeletons near the south slope. His final stack on the mesa had attempted to boot back my zombies, but only managed a 1:1 (33 each) for an NE. He also had three different search sets of wraiths now, and finally turned up the third jewel of power. However, at this point, I had mass on the mesa and moved in for the kill with a five-hex combat against his necromancer (two hexes containing ranged units) for a… 1:1 (necromancers are really tough) that missed 2:1 by 10 points. Meanwhile, I lost a stack of wraiths to he current gem-bearers (between still having a quality disadvantage, and being halved on a slope, I was at 1:4), but caused a DR-1 on another stack.
However, my advance after that last stuck his gem-bearers in combat, and they suffered AE on a 1:3 on his turn (slope strikes again). An attempt on my necromancer with 5 wraiths only got an AR, and then his necromancer’s attack on my weakest adjacent stack (I had three adjacent, so the zombies and skeleton with him were being forced to split up) was an AR that forced elimination by going over a cliff.
Afterword
The game plays well, and the test session let me spot and put in plenty of quality-of-life improvements in the module. There’s a lot going on in some fairly simple rules, with the terrain being something that needs a lot of paying attention to. As you can see, I’ve got a display to automatically show the current stats of all the unit types, instead of referencing what can be a cluttered table in the rules.
Miasma conversion is an ‘x1’ attempt… which means it only has a 1/6 chance. It happened to us a lot more often than that. The string of miasma conversions I suffered near the end was very aggravating… but it helped keep the quality difference between us from growing larger as I picked off his other units and closed in on the necromancer.
Going first can be a big advantage here, here as getting off that first conversion can cause a massive traffic jam as units adjacent to the enemy can’t move at all. My initial plan was to basically sacrifice anyone converted, using the lowered unit total to get the edge in quality. The first batch of miasma conversions turned that around, and I had the larger army for the rest of the game (ending at 16-25 undead units, with the bulk of mine being zombies). I was worried that I’d end up bogged down on the slopes of that little mesa watching the sharp point of my force turned into a dull pencil nub, but I managed to get up the north slope fairly well, which allowed me to finish him off.
Being unable to retreat onto a slope hex turned those areas into deadly traps on occasion. I’m kind of wondering about an option to cancel a retreat by taking an extra loss, but it might turn things into too much of a battle of attrition. The other thing that takes getting used to is that the CRT is very aggressive, with a 1:2 slightly favoring the attacker. I’m sure the idea is that this is… thing-to-thing combat with each side getting its main strikes in on its turn, while the other side defends.
Discussion ¬