
1 Nightmarish Crossroads
The first actual scenario of Operation Dauntless stands apart a bit. It’s the only one to take place on June 16, it is slightly ahistorical, as it supposes the 12th SS Division fought in place instead of withdrawing to a better line, and the map has a special boundary printed on it for this scenario, as its considered a good small scenario that will see a lot of play. (I note that this is congruent with ASL scenario AP33 “Second Cristot” in Action Pack #4; I wonder if it would be possible to do a a scenario on the first attempt to take Cristot on the 11th—but perhaps much of the action would be off the map.)
Overall, this is a nice scenario, with all the different parts of the rules working at the same time, including one part that none of the tutorial scenarios use: purchasing reinforcements. The British start with a full battalion, and a Sherman squadron, and a few extra MG sections, a 6-pdr battery, and some Centaur troops. They also get a lot of artillery. As of turn 3 (out of six), they can start purchasing reinforcements, with another battalion, and another Sherman squadon on offer (and the points are such that you can only get one or the other), as well as some Achilles and AVREs. The Germans get a slightly reduced battalion, plus an extra recon company, an independent 75mm AT battery, some off-board artillery, and three strongpoints. On turn 3 they also get to start buying reinforcements, with a couple infantry companies available, and individual Pz IV and Panther platoons.
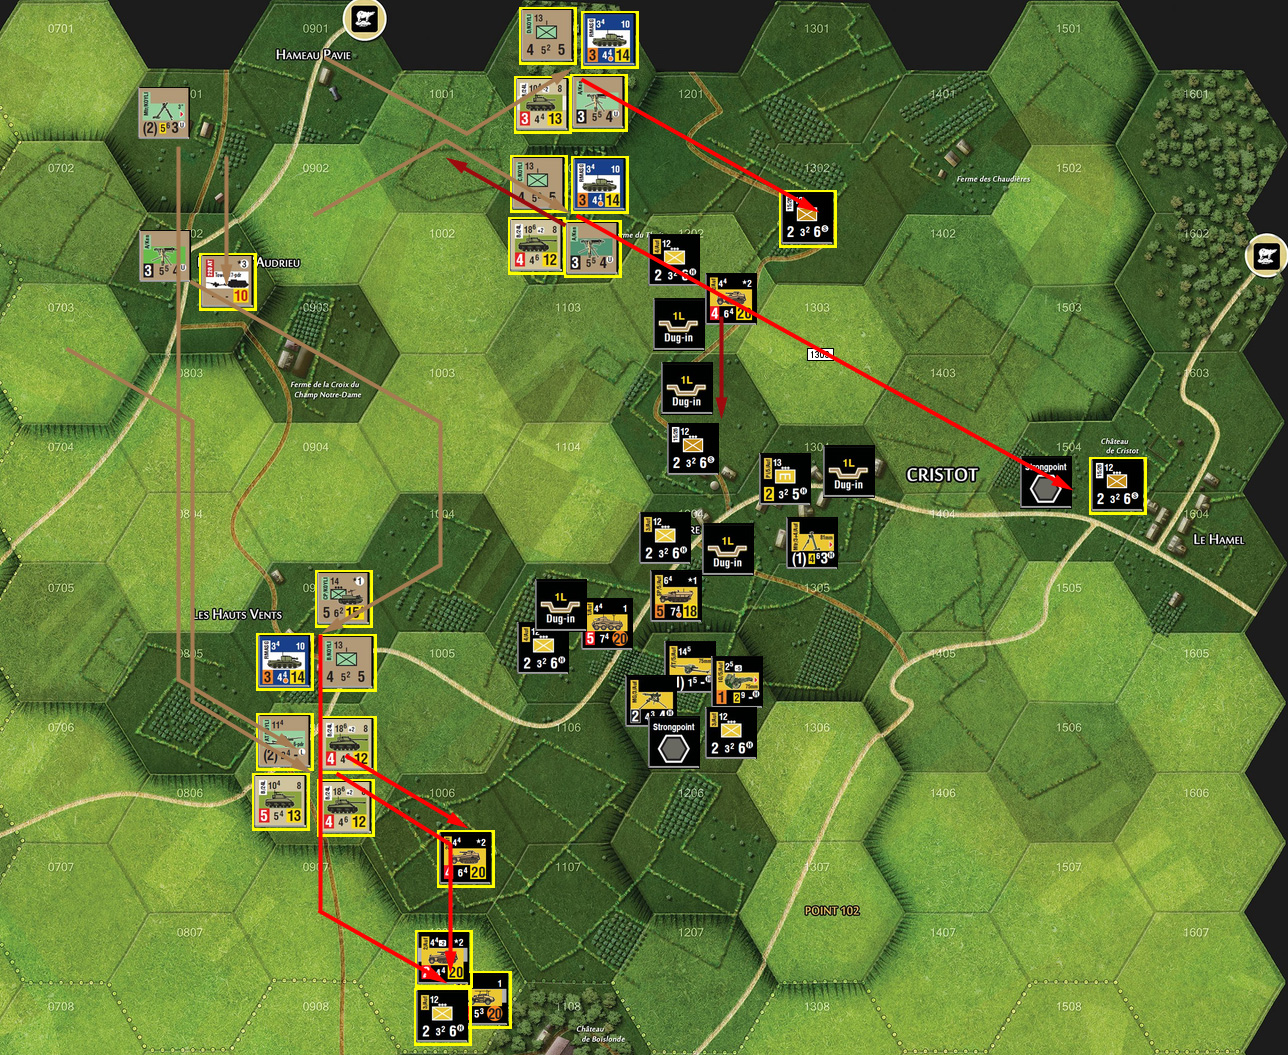
The British are generally trying to take the six village hexes of Cristot, but also get double the normal VPs for German losses. The Germans can also get VPs for some of the western villiage hexes; mostly to make sure the British don’t leave their line open there. Mark followed the general strategic notes and put a strongpoint in 1205, with a 75mm, while the other (independent) one went in a strongpoint in 1102, and an empty strongpoint was back in 1504.
The first turn has special rules to simulate the effects of a very heavy British bombardment with a lot of smoke. There is a ‘light fog’ for the first (noon) turn, the Germans can’t move much, and can only conduct ranged fire and AT attacks. The British get an extra column shift in any of their attacks, but can’t use the road movement rate. With all of this, I set up for as many assaults as I could manage. My first move was to assault the 1101 woods (after a failed AT attack on my Centaurs), with -0 Tactical Advantage (D) which failed to make an impression on the Shermans and resulted in a 0/2. (The 75mm managed to reduce the Shermans in reaction to the advance.)
The second move was to assault 1202 itself (with another missed AT shot on the way in, and a DA Tactical Advantage for a barely missed shot against the Shermans) which got a 0/6 (rolled 12 on a 4:1) for the infantry to barely survive a retreat all the way back to Cristot (1 loss negated by the strongpoint, 1 loss to kill the AT, just barely down to the retreat limit). Then, I went to disassemble the German left flank.
The next group hit 0905, and being in close terrain myself, finally had a good Tactical Advantage number (+3; AAAA), and managed to eliminate a SP halftrack step, and drove him off with a 0/3. Finally, I took on 0906, and my best Tactical Advantage draw was an A, for one shot to reduce an armored car unit. However, the assault itself went bad with a ‘2’ for a 0/2 result, knocking out the infantry company accompanying the Shermans. Down to just vehicles on both sides, Mark withdrew out of the hex.
By special rule, 1602 is not a British supply source, and 1207 and 1604 are the German sources.
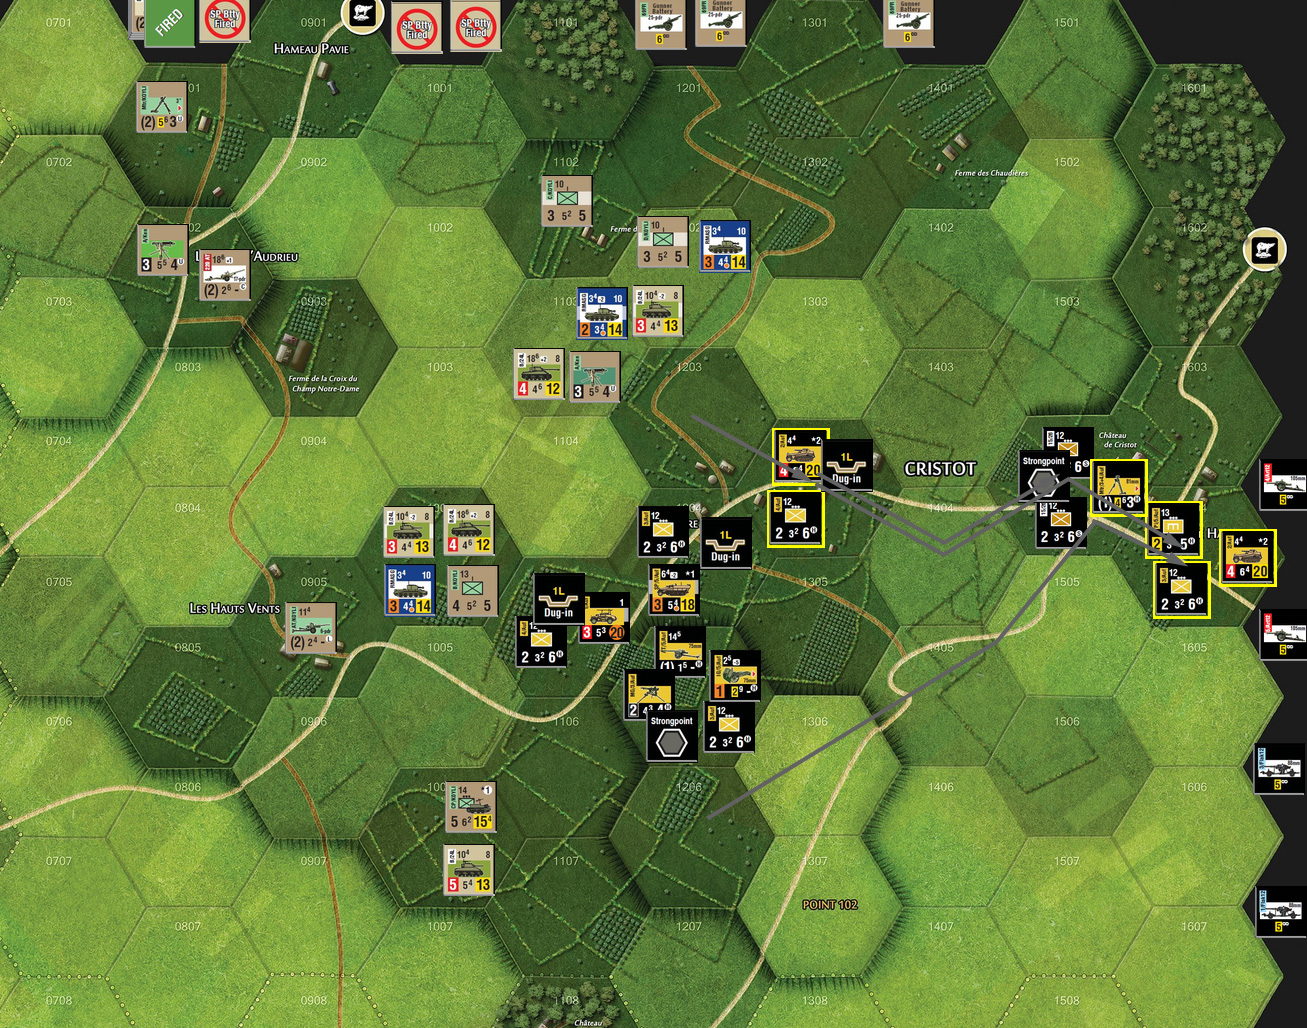
For the combat phase, I finished off the two reduced vehicle units, and attacked 1202. I supported with everyone in 1101 (whoops, we forgot about the ‘fog’ at that point reducing LOS to 1 hex; I could have thrown in the mortars back in 0801), and Mark supporting with his two indirect units. A 2/1 result caused Mark to retreat back to 1203 while I reduced a company and retreated to 1001. Mark pulled back his flanks on his turn, but friction fire kept his platoon from leaving 1007.
All the British assets are tied doing the barrage on the first turn, so on turn two they get The Essex Yeomanry SP artillery, and three 25-pdr batteries, and start drawing the normal asset chits. Meanwhile, the Germans get eight off-board batteries, of varying types.
My left flank rolled forward to engage the outskirts of Cristot, and the 75mm in 1205 eliminated a Centaur step as they came into view. On the right, I crept closer, the 75mm firing at anything armored, and thankfully rolling low. In the combat phase, the just-unloaded 17-pdr eliminated a halftrack step, but an attempt at an armored car unit took a step, but ended with me losing Fireflies to the 75mm AT. Combat in 1007 forced a retreat, but since you don’t project ZOC into close terrain, the platoon was able to get away.
The main effort was a combat against 1203. I threw in almost everything I had (all but the gunner batteries, including both assets), to get one suppression on eleven rolls. Mark supported with about half the off-board artillery, and anything on-board that could, getting three suppressions and a step reduction on the only infantry company involved (seven rolls). This ended up with a 1/1 result on a 2:3. Mark sent a platoon to the dead pile rather than retreat a hex (or more, as he’d have been overstacked), and I lost a MG section.
Mark pulled back again on his turn, sending the south-flank forces back to 1604, and an engineer joined them to dig in on the next turn. 1203 pulled back to 1304 with the mortar battery that had been there pulling back to 1504. Combat phase was the 75mm battery picking on the carrier platoon in 1005 for a transport loss.
For turn 3, the British get another six off-board 25-pdr batteries. I pulled some fighter-bombers and a ‘no asset’ for the assets on this turn. At this point the British also get reinforcement points, but didn’t have the point to get the second battalion, which was needed with one company gone, and two more reduced (and losing three companies from the same battalion is a German auto-win). The 17-pdr battery finished off the halftracks in 1204 (I had been surprised they didn’t pull out). A recovery attempt with one battalion failed, and the other pulled back to 0901 for better odds. The intact one circled around to 1106, where it was joined by the carrier platoon and Shermans already nearby, and a troop of Centaurs (with the 75 thankfully missing on everything but the carriers, costing another transport loss). I moved forward to 1203, and lost two Centaur steps in the process (lost a reduced unit, then lost a step on the unit sent in to replace him).
In combat, the new force in 1106 hit the strongpoint and I supported with the F/B, all three Essex batteries and six of the nine 25-pdr batteries, for two suppressions. Mark supported with his mortars and three off-board battieries (out of four, and nothing coming back until his turn 5), and got no results. This resulted in a 0/2 on the 2:1 column, and Mark lost his infantry gun battery (the strongpoint negating the other loss).
The Germans also get reinforcement points as of turn 3, and Mark took all three available Panther units. He pulled out of 1204, strengthening other positions, and the Panthers all went into 1107. In combat, the knocked out the Centaur unit in 1203.
For my turn 4, I drew another ‘no asset’ as well as a 5.5″ battery, and took the 7DWR battalion as reinforcements. Company D, in 0901 also recovered to full strength (C, in 1102, did not), and I maneuvered the new units up to the front, planning for a pair of concentric attacks against 1304 and 1205 (I lost one Sherman step to the 75mm in the process). First, the attack against 1304 went in, supported by both on-board mortars, the four off-board ones, and six 25-pdr batteries, for two suppressions. This resulted in a 0/3 on the 4:1 column, killing both German platoons as they would have had to retreat through my ZOC (he stayed in place, with the Stummels left in the hex). Against 1205, I used the medium battery, all the Essex batteries, and two of the three remaining 25-pdr batteries, while Mark supported with the two 88mm batteries and his mortars. I managed two suppressions, while his support (for once) did nothing, and then rolled poorly for a 1/1 result on the 3:1 column. I reduced another company from KOYLI, and the strongpoint negated his loss.
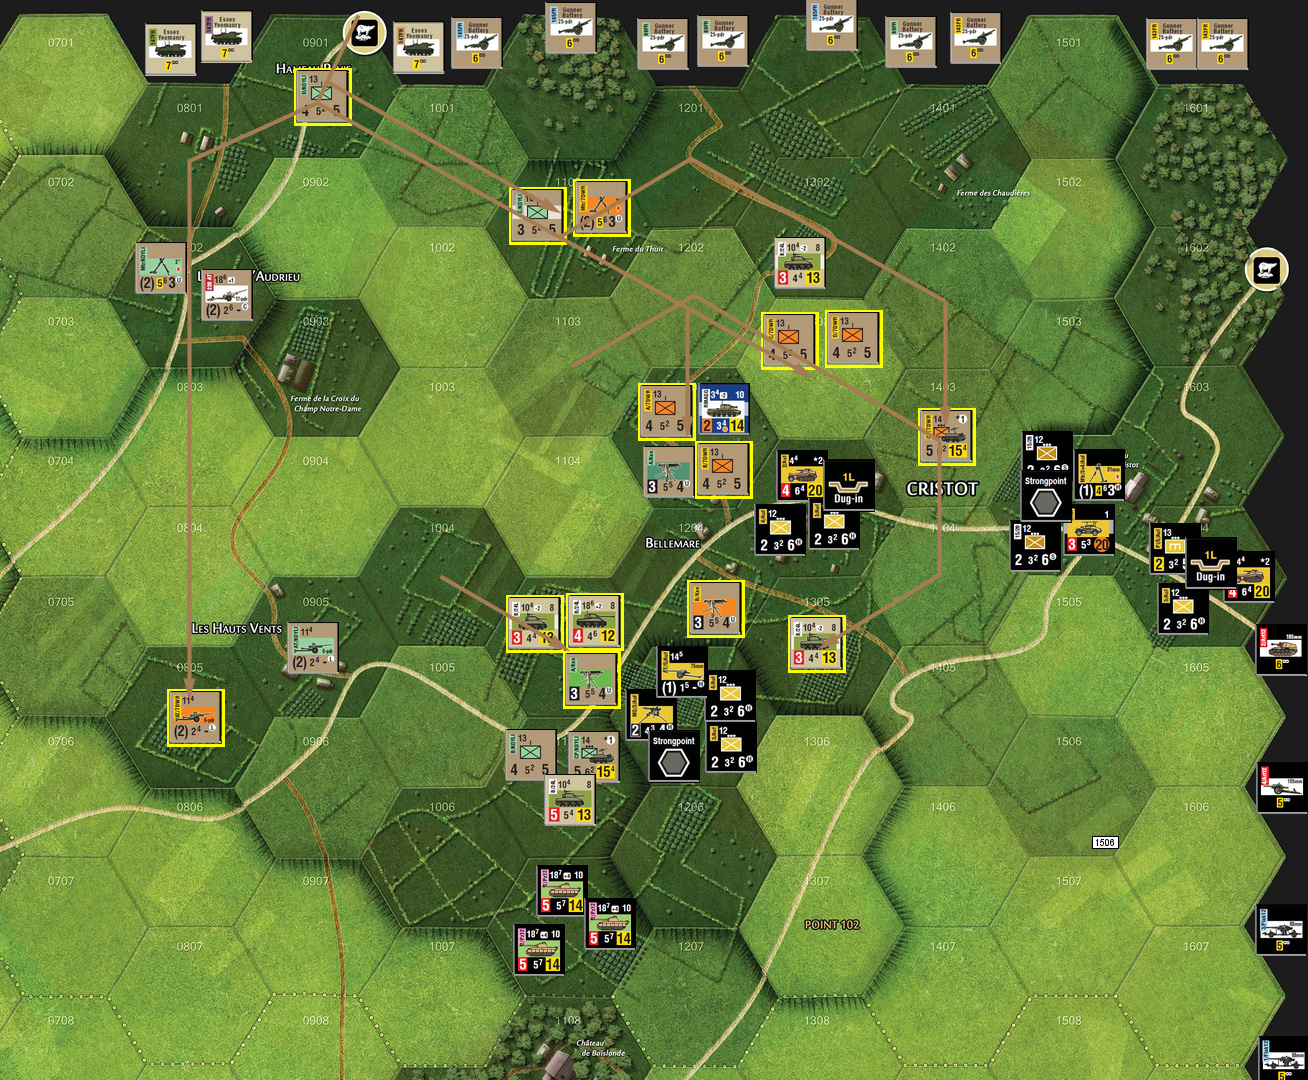
Mark bought a Pz IV platoon for his turn, and tried to assault my Shermans in 1305. However, coming out of light bocage put Tactical Advantage on my side (two draws, choosing DDDD), but did manage to hit, and I withdrew to 1204. Two of the Panthers took potshots at the carrier platoon (one hit, sending my transport points to negative). Then an infantry platoon pulled out of of 1205, and the third Panther unit took it’s place in the hex (sending the defense strength higher than I could deal with). The Stummel pulled out of 1304 to join the defense in 1604. The combat phase was a series of thankfully missed AT shots.
For my turn 5, I pulled a 5.5″ and a 7.2″ battery as assets, and bought an Achilles platoon as reinforcements. I assaulted 1305 (where the Pz IV and spare infantry ended up), destroying the Pz IVs (one shot was a record that will probably hold: infantry in assault with +12 modifiers and a 20 roll for a total 32 AT shot), and forcing the infantry back to 1606 (0/3 result). My reduced company in the back went to 0905 to help protect my AT guns that were discouraging any moves on the west-side victory hexes, along with the new Achilles. The recovered one went up to 1004 to block that hex. Two of the new ones from 7DWR went to 1403 and 1503 to prepare to try for the other half of Cristot, along with a reduced Sherman unit.
Combat was another try at the 1205 strongpoint (with almost 3:1 odds…), with the heavy battery, the Essex batteries, eight of the 25-pdr batteries, and all four off-board mortars in support. The heavy battery did its job, causing a step loss (the remaining infantry platoon), but the only other result was a suppression from one of the Essex batteries. Mark supported the defense with last two off-board artillery and his mortars, getting two suppressions. This ended up with a 1/1 result on the 2:1 column, to reduce one of the 7DWR platoons, and no effect on the Germans.
Mark took another Pz IV platoon for his turn 5. He moved a Panther around to 1405, and moved the retreated infantry, an armored car, and the new Pz IVs to join it, and I fired on the Panther while it was in the open, but only lost the offending Sherman for my trouble. His last Panther in 1107 circled back to 1504, making that strongpoint tougher to crack. In the combat phase, he took various AT shots, reducing my last Firefly-enhanced unit, destroying the last Centuars, and forcing a step loss on the 7DWR carrier platoon from a failed survival roll.
For my last turn, I took another Achilles and an AVRE (about all that was left), and drew bombers and a medium battery for assets. I tried relocating one of the AT batteries to… 1304? but it failed a survival roll after being shot twice. The AVRE went into 1204, and the Achilles went into 1203 (surviving a shot from the 75mm). I shifted around trying for a last pair of decent attacks, with a company going into 1603, and 1305 moving en mass to 1404, while the MG sections rotated one hex around 1205, and the companies that had been holding the secondary line moved up.
I could only manage 2:1 odds against 1504, supported with most of the heavier artillery (bombers, medium battery, all three Essex, seven 25-pdr, and all four off-board mortar)… and got no results. Mark had gotten three of his batteries back, and used all three in support, which did a step loss to a reduced company, and two suppressions. The end result was a ‘3’ on the 1:2 column for a 3/0, which I took with a one-hex retreat and reducing two more companies.
Mark’s last turn was an anticlimax after that disastrous combat, as there was no problem retaking 1603. He did attempt to get an Achilles platoon with a Panther unit, but it took a loss when moving adjacent, and then was destroyed in the assault. Potshots in the combat phase did another two transport losses to carrier platoons, but I passed the survival rolls, and a Panther step was lost to reaction fire from the 17-pdr battery.
I got 18 VPs for holding half of Cristot, and Mark got 36 for the other half. Losses were lopsided to the British side, only somewhat made up by the double VPs from German losses. After that and the transport losses, the grand totals were 54 to 85 for a very convincing German win.
Afterword
Despite wanting to not get too involved in 1205, it sucked me in, drew a lot of attention, and I never got anywhere with it. This started innocently on turn 1, when part of my forces headed south to drive off the Germans there, and secure the secondary objectives. However, a large part of the trouble is that its very hard to shift east later. The 0902-1104 area is open, and anyone crossing it is subject to getting halted by FF, or shot by the AT gun. The -3 of a strongpoint in close terrain meant it was nearly impossible for me to do anything to the defenders with ranged attacks (and pretty much literally impossible to hit the AT gun with reaction fire).
Which brings up one frustrating point in the system. The British can have up to eighteen off-board batteries, and generally almost all of them go into one or two important attacks, meaning over a dozen rolls for support of one attack, each turn, every turn. That’s a lot of wristage, and most of it very low odds (those mortars need a 12 on 2d6 to get a result against the strongpoints). I agree with the general point that they should have low odds of doing anything, and ‘more guns’ generally doesn’t help, but it was an excessive amount of die-rolling. I’m not looking forward to some of the scenarios that feature the printed strongpoints….
Mark made a point of going after the Centaurs, which was a little troublesome, as they have better armor than the Shermans, but it paid off, as I was out of them by the end of the scenario, and couldn’t use their shifts to help with otherwise long odds. He also made a point of going after the carrier platoons with AT fire, as that was generally safe for him, and eventually did lead to a step loss, but also hurt my VPs with all the transport losses.
It’s an interesting and tough little scenario for the British, who have a lot of tools, but digging the Germans out of the strongpoints is really tough.
Discussion ¬