
Lost Time
Mark and I have fallen into a bunch of fairly regular Vassal sessions over the past few months. Our primary slot has been our learning sessions with Operation Dauntless, and we had a few weeks of three-day weekends, so I proposed we start something a bit faster moving than our fumbling learning sessions, and well-known to the both of us, and we ended up going for A Victory Lost, doing one turn per session, and it (after a later schedule shuffling) became our Sunday morning slot.
Now, neither of us has ever been experts, and it’s probably been a decade since I last played, so expect a lot of sub-optimal play from us (moving HQs was a particular problem on a few occasions, espeically later, since the module, for all its great features, doesn’t mark the HQ as active along with everything else, so it can be easy to forget).
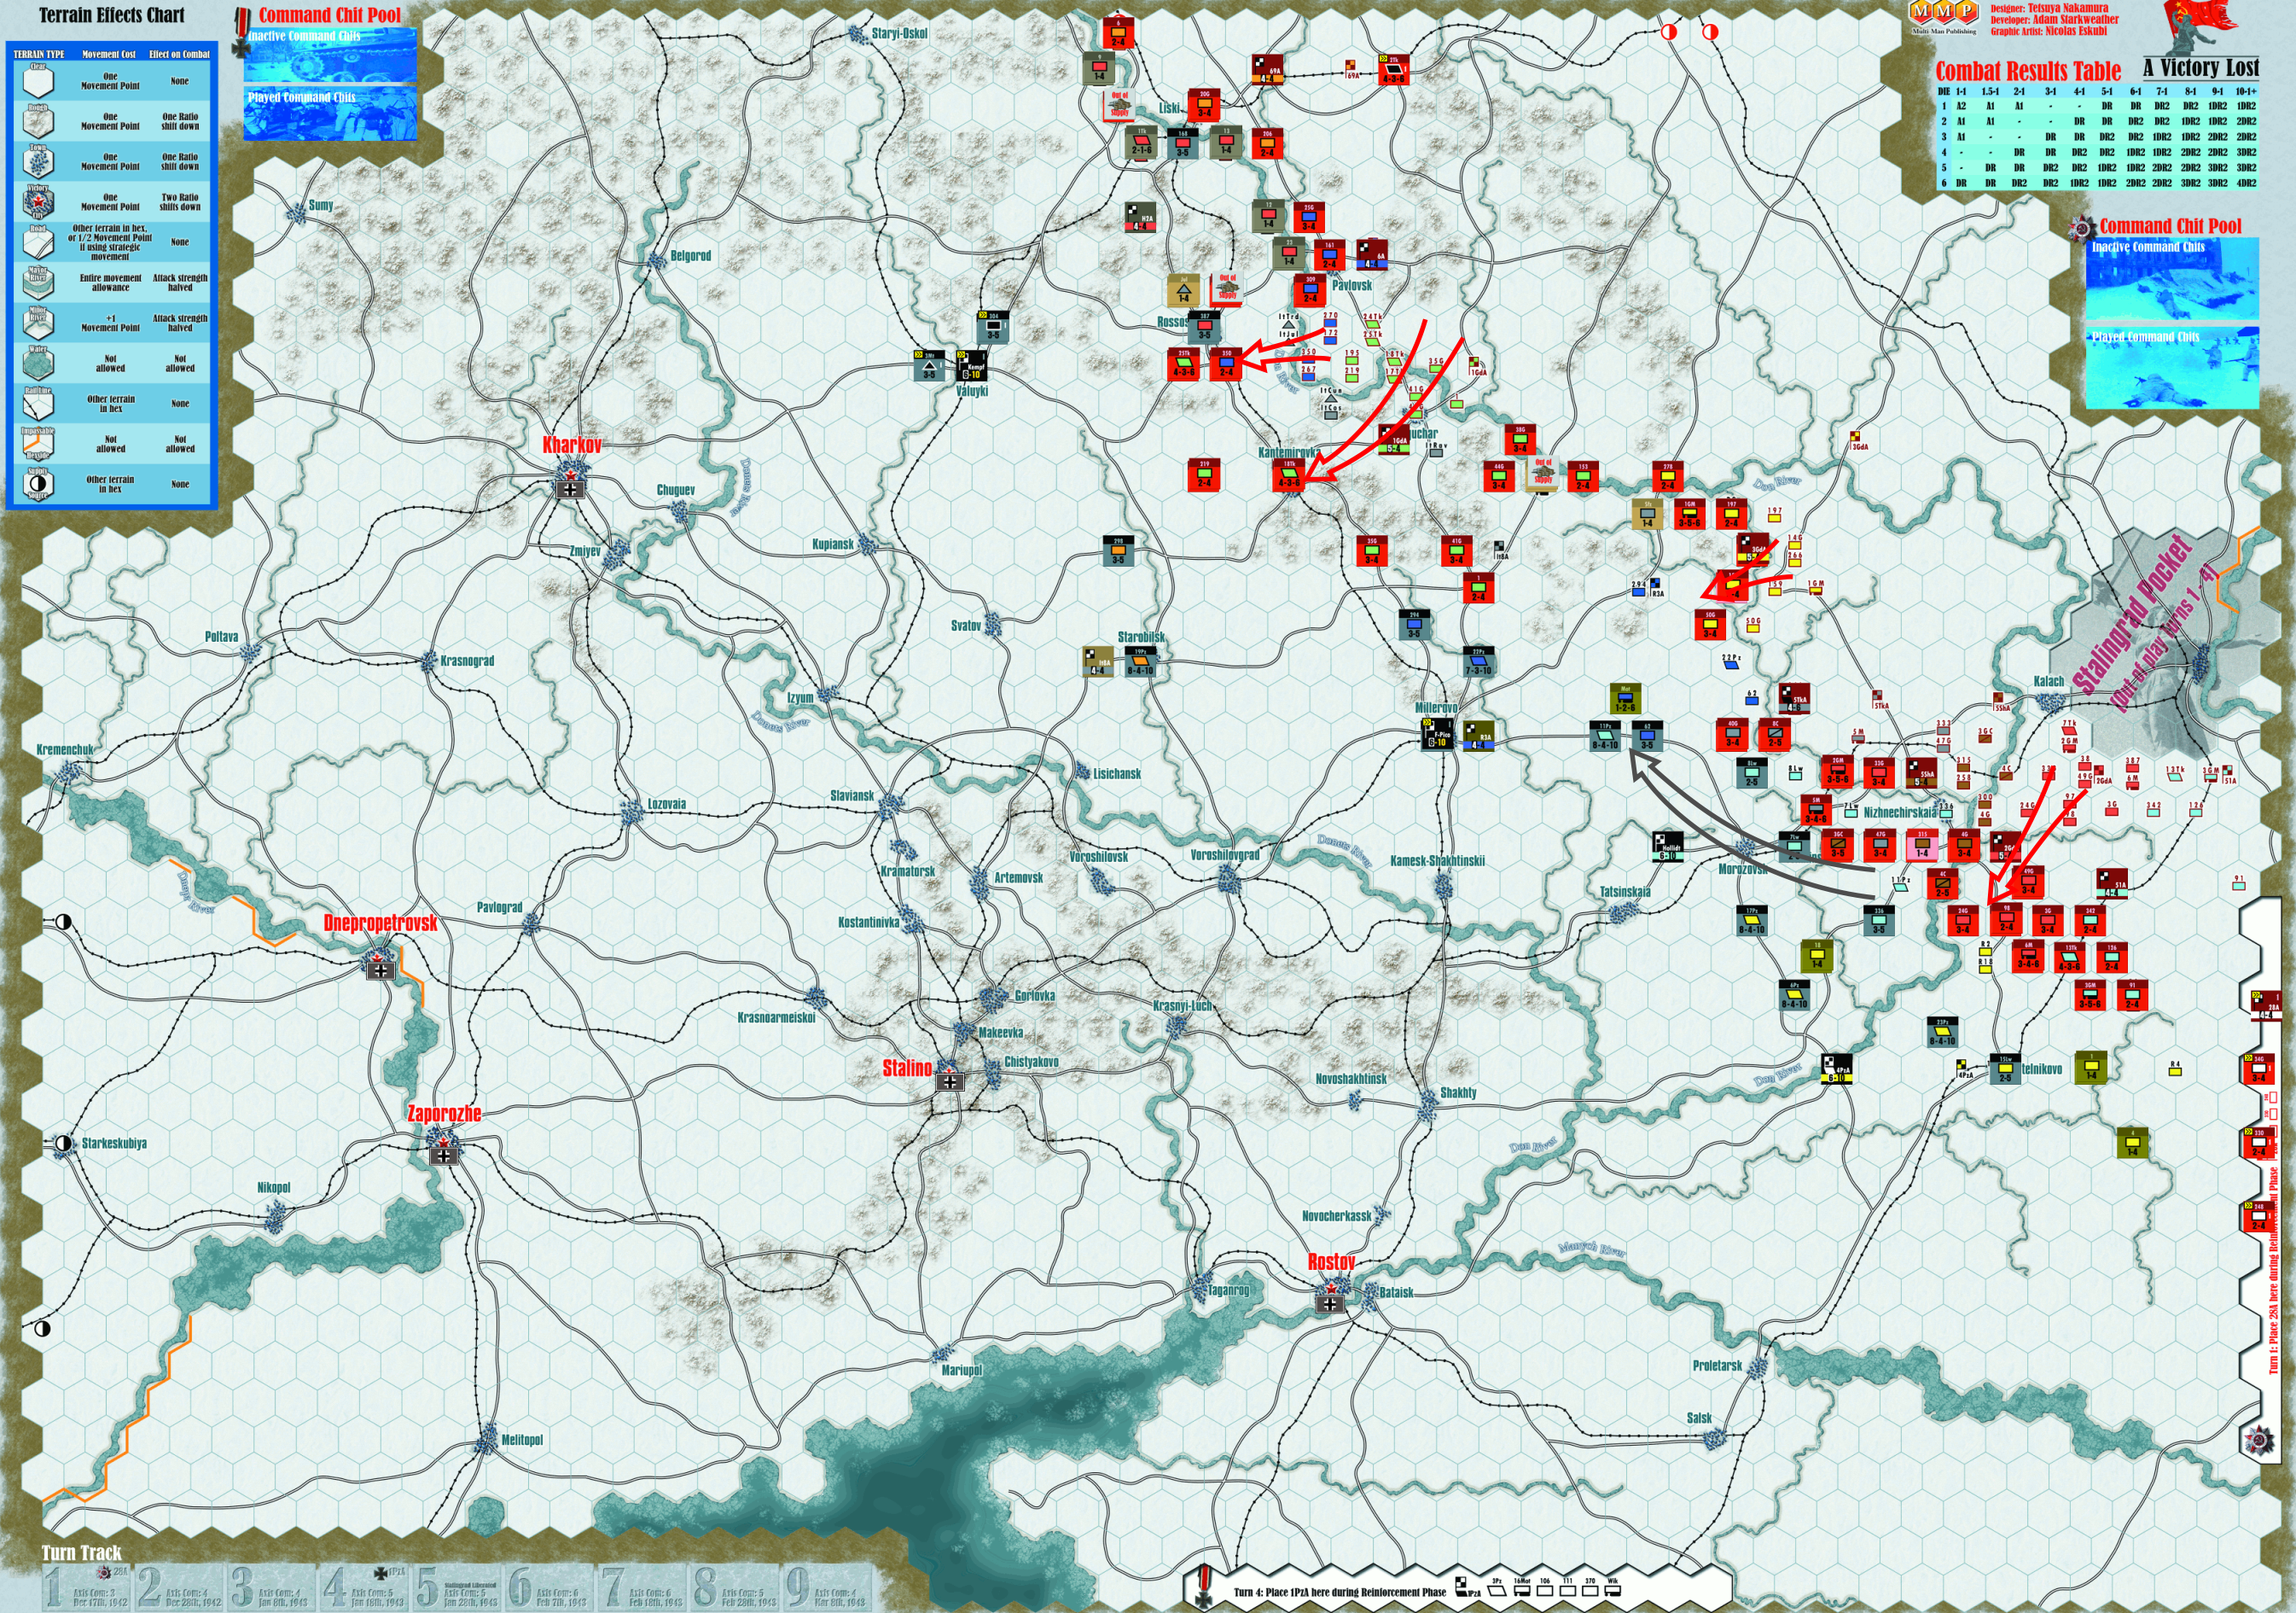
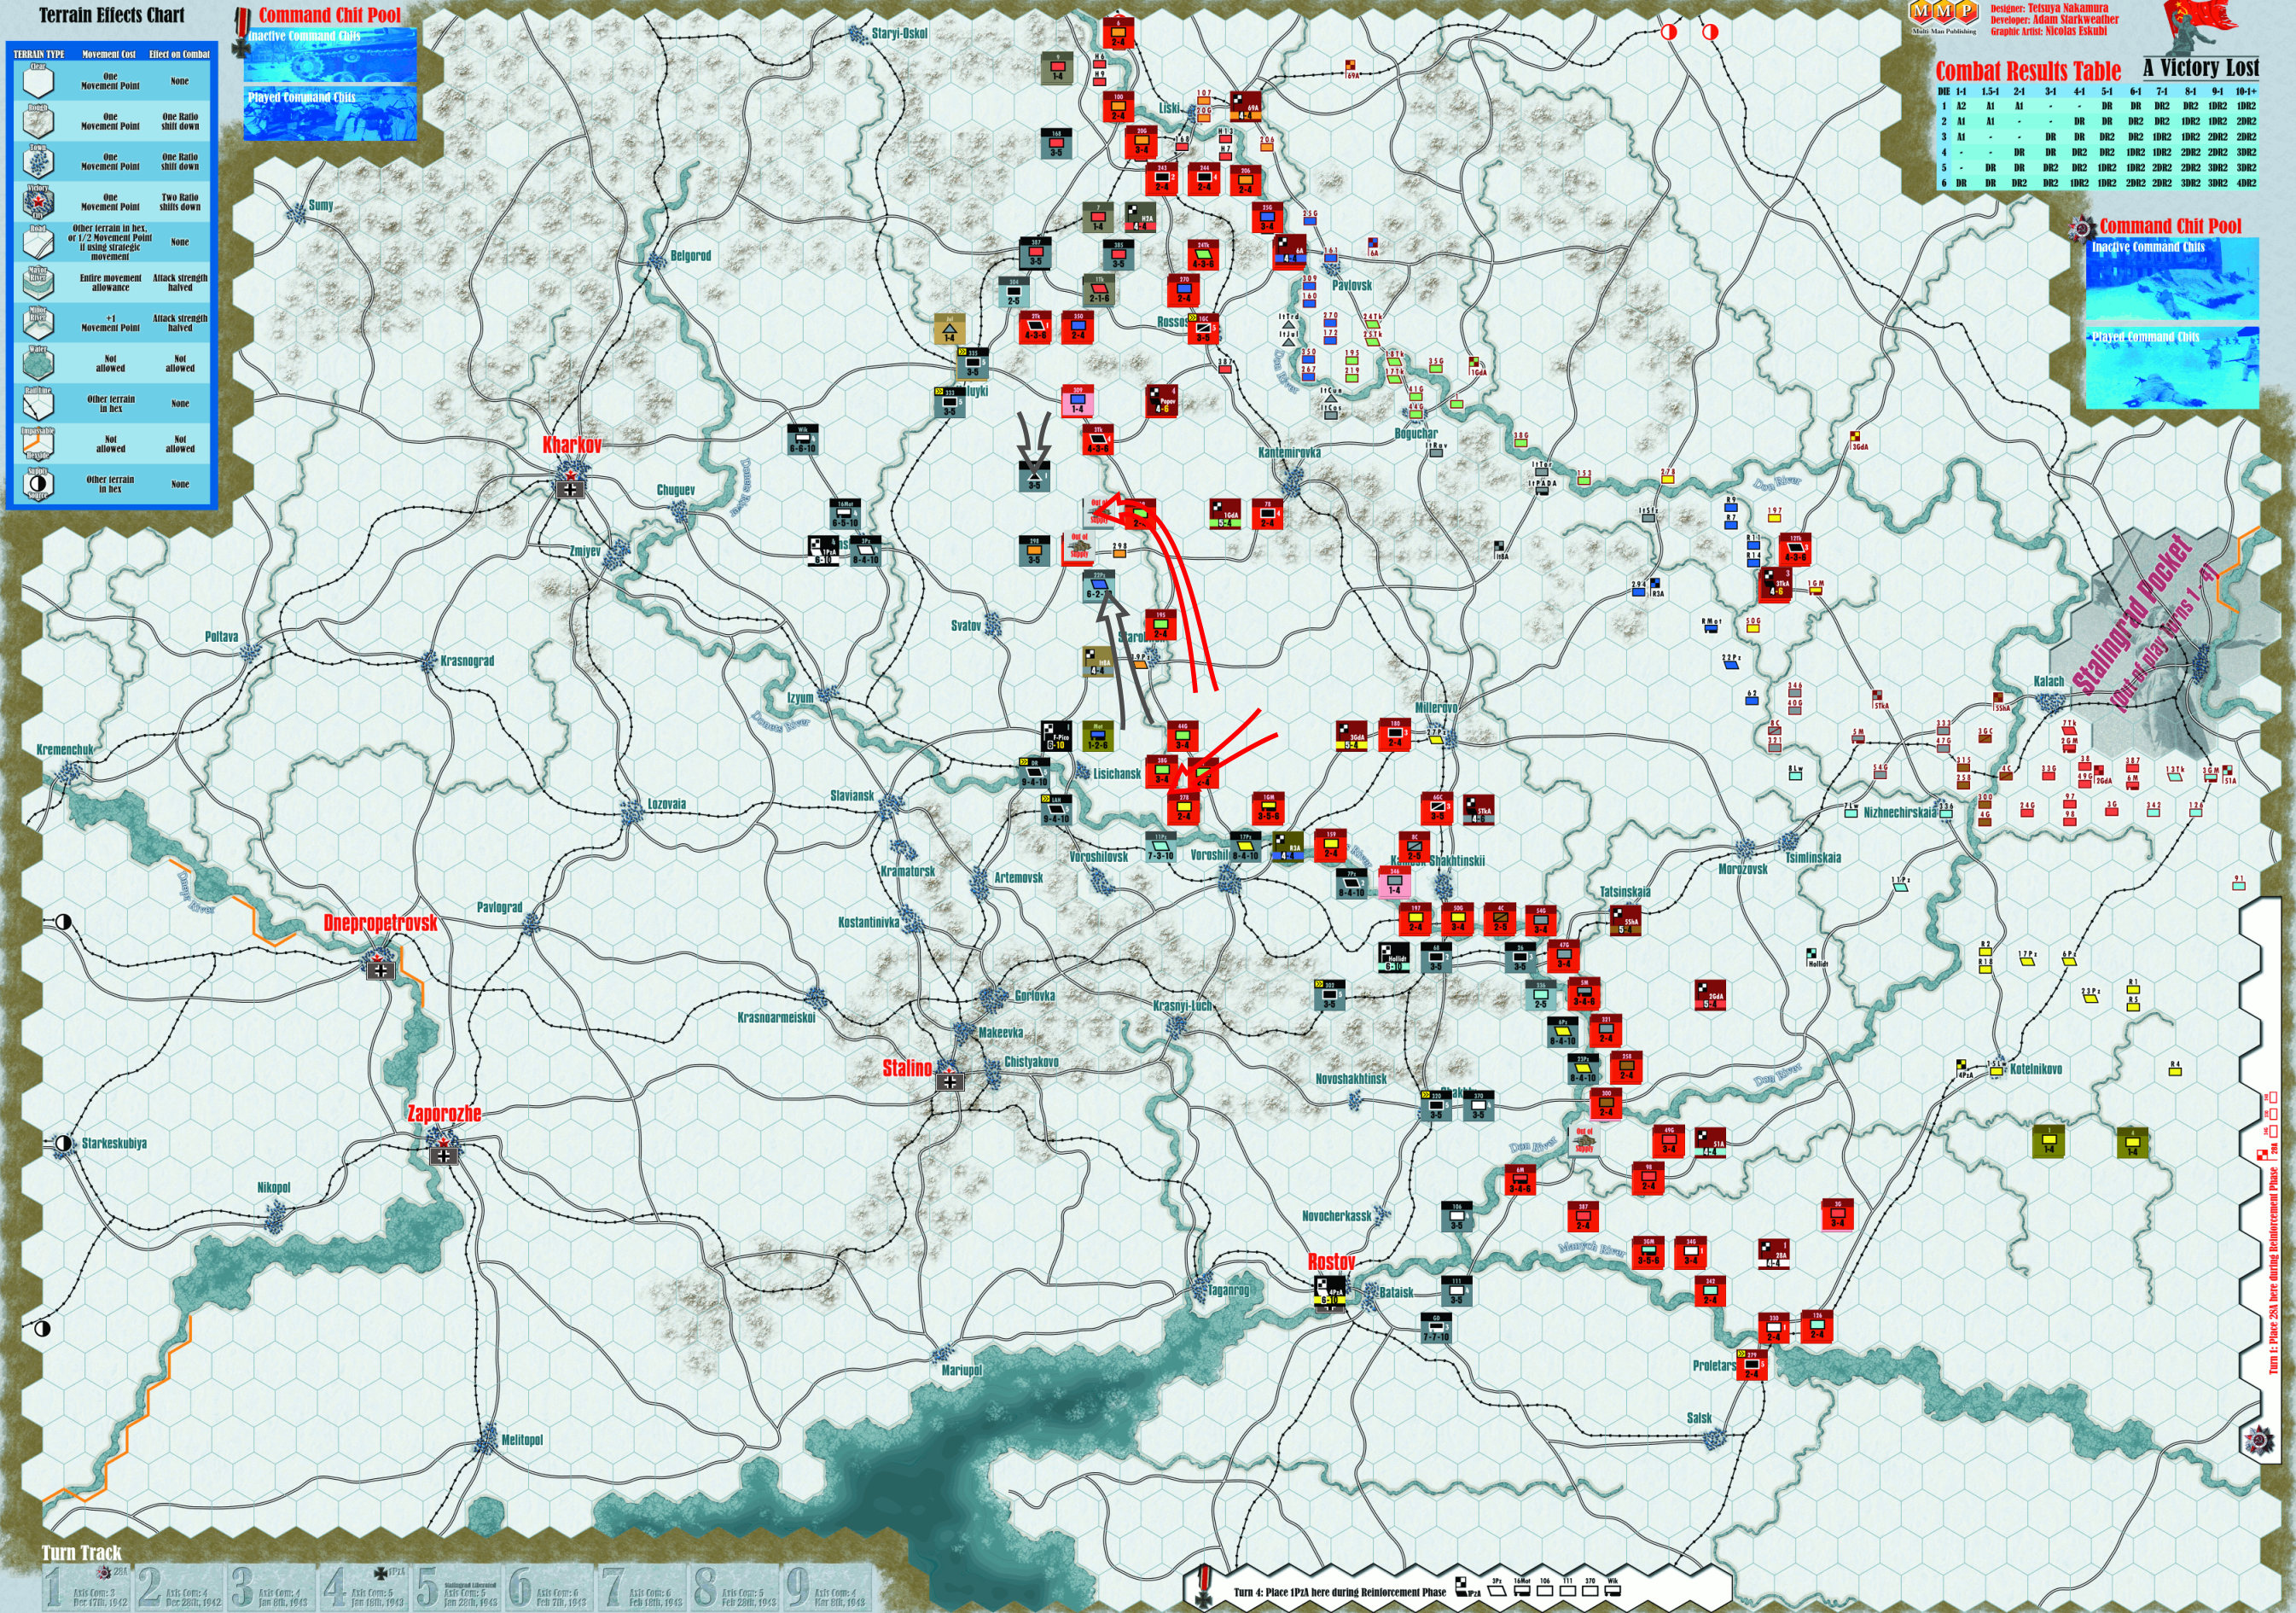
Mark wanted the Germans, so I started with a decision to mostly press in the center, keeping the 1GdA, 3GdA, 5ShA, and 5TkA chits (along with Popov who shows up at the end of turn 4), and of course picking 1GdA for the special combat segment, which eliminated the Ravenna division and retreated Julia and Tridentia, but got no effect on Cosseria and Cuneense.
Turn 1 chit sequence: 5TkA – 3GdA – 1GdA – R3A – Hollidt – 4PzA – STAVKA
My first chit draw also saw my first losses, as I tried a 1.5:1 and two 2:1s to get across the initial river lines (thought it was three 2:1s until I saw a town, which reduced it to 1.5:1), for a pair of A1 results, but I pushed the 7Lw back to break that line in the middle. I got a mechanized division across a gap for a second try to eliminate a pair or Romanian divisions, and then blew open the Italian sector (pretty standard stuff), to start heading west, with the 1st heading south towards Millerovo after bouncing the It8A HQ away from the remaining Italians. However, a 3:1 was NE, to keep a road clogged.
The Romanians ordered a fall back, with units heading to Millerovo, while the 62nd shifted to hold the flank of the southern line. Hollidt also fell back, with a thin line of infantry while the 11Pz headed northwest toward Millerovo. 4th Panzer Army sent two divisions circling behind the lines towards Hollidt and everything else putting up a light screen… safely away from the Russians. Stavka found that three divisions had been too eager, and were out of command range, so my tanks (most notably) didn’t roll any further forward. There wasn’t a lot of combats, and notably, the Hungarians refused to budge to a 2:1 in the north, even as the Italians next door ran for the hills.
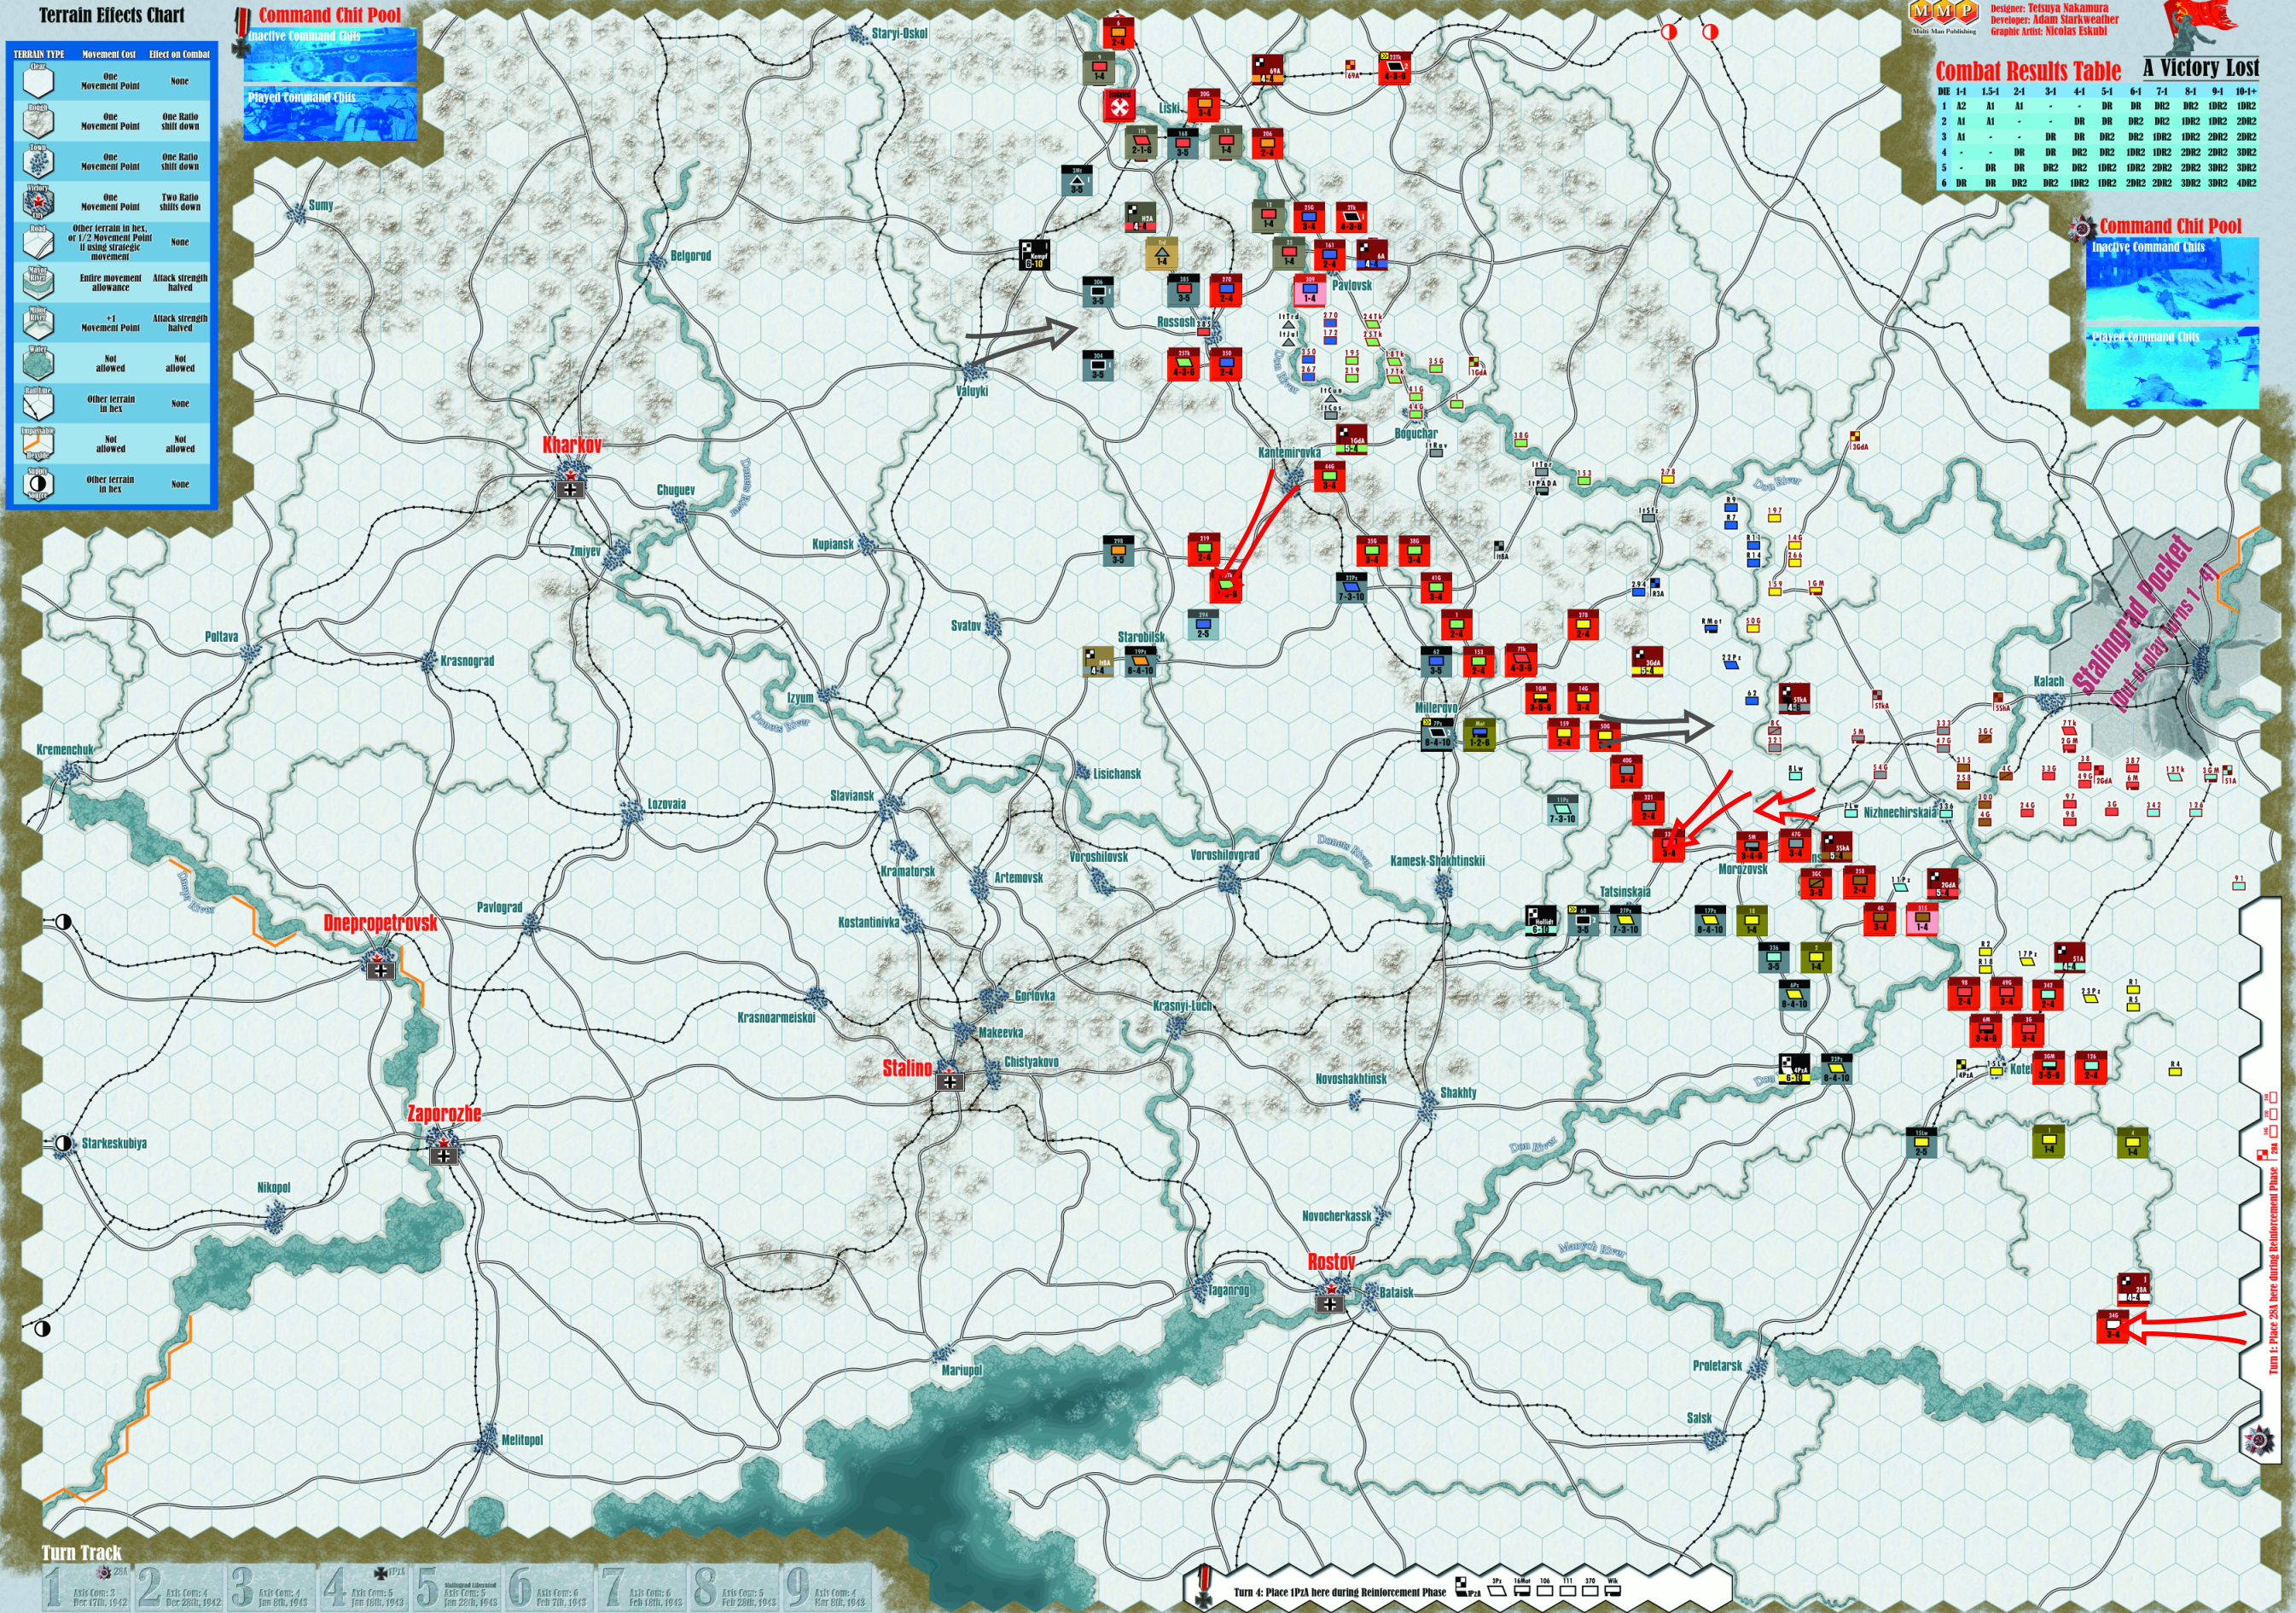
Mark put all three new divisions and Kempf in and around Valuyki, and F-Pico went to Millerovo, while I put the 2Tk a bit behind the 69A, ready to use strategic movement down into the fairly open center.
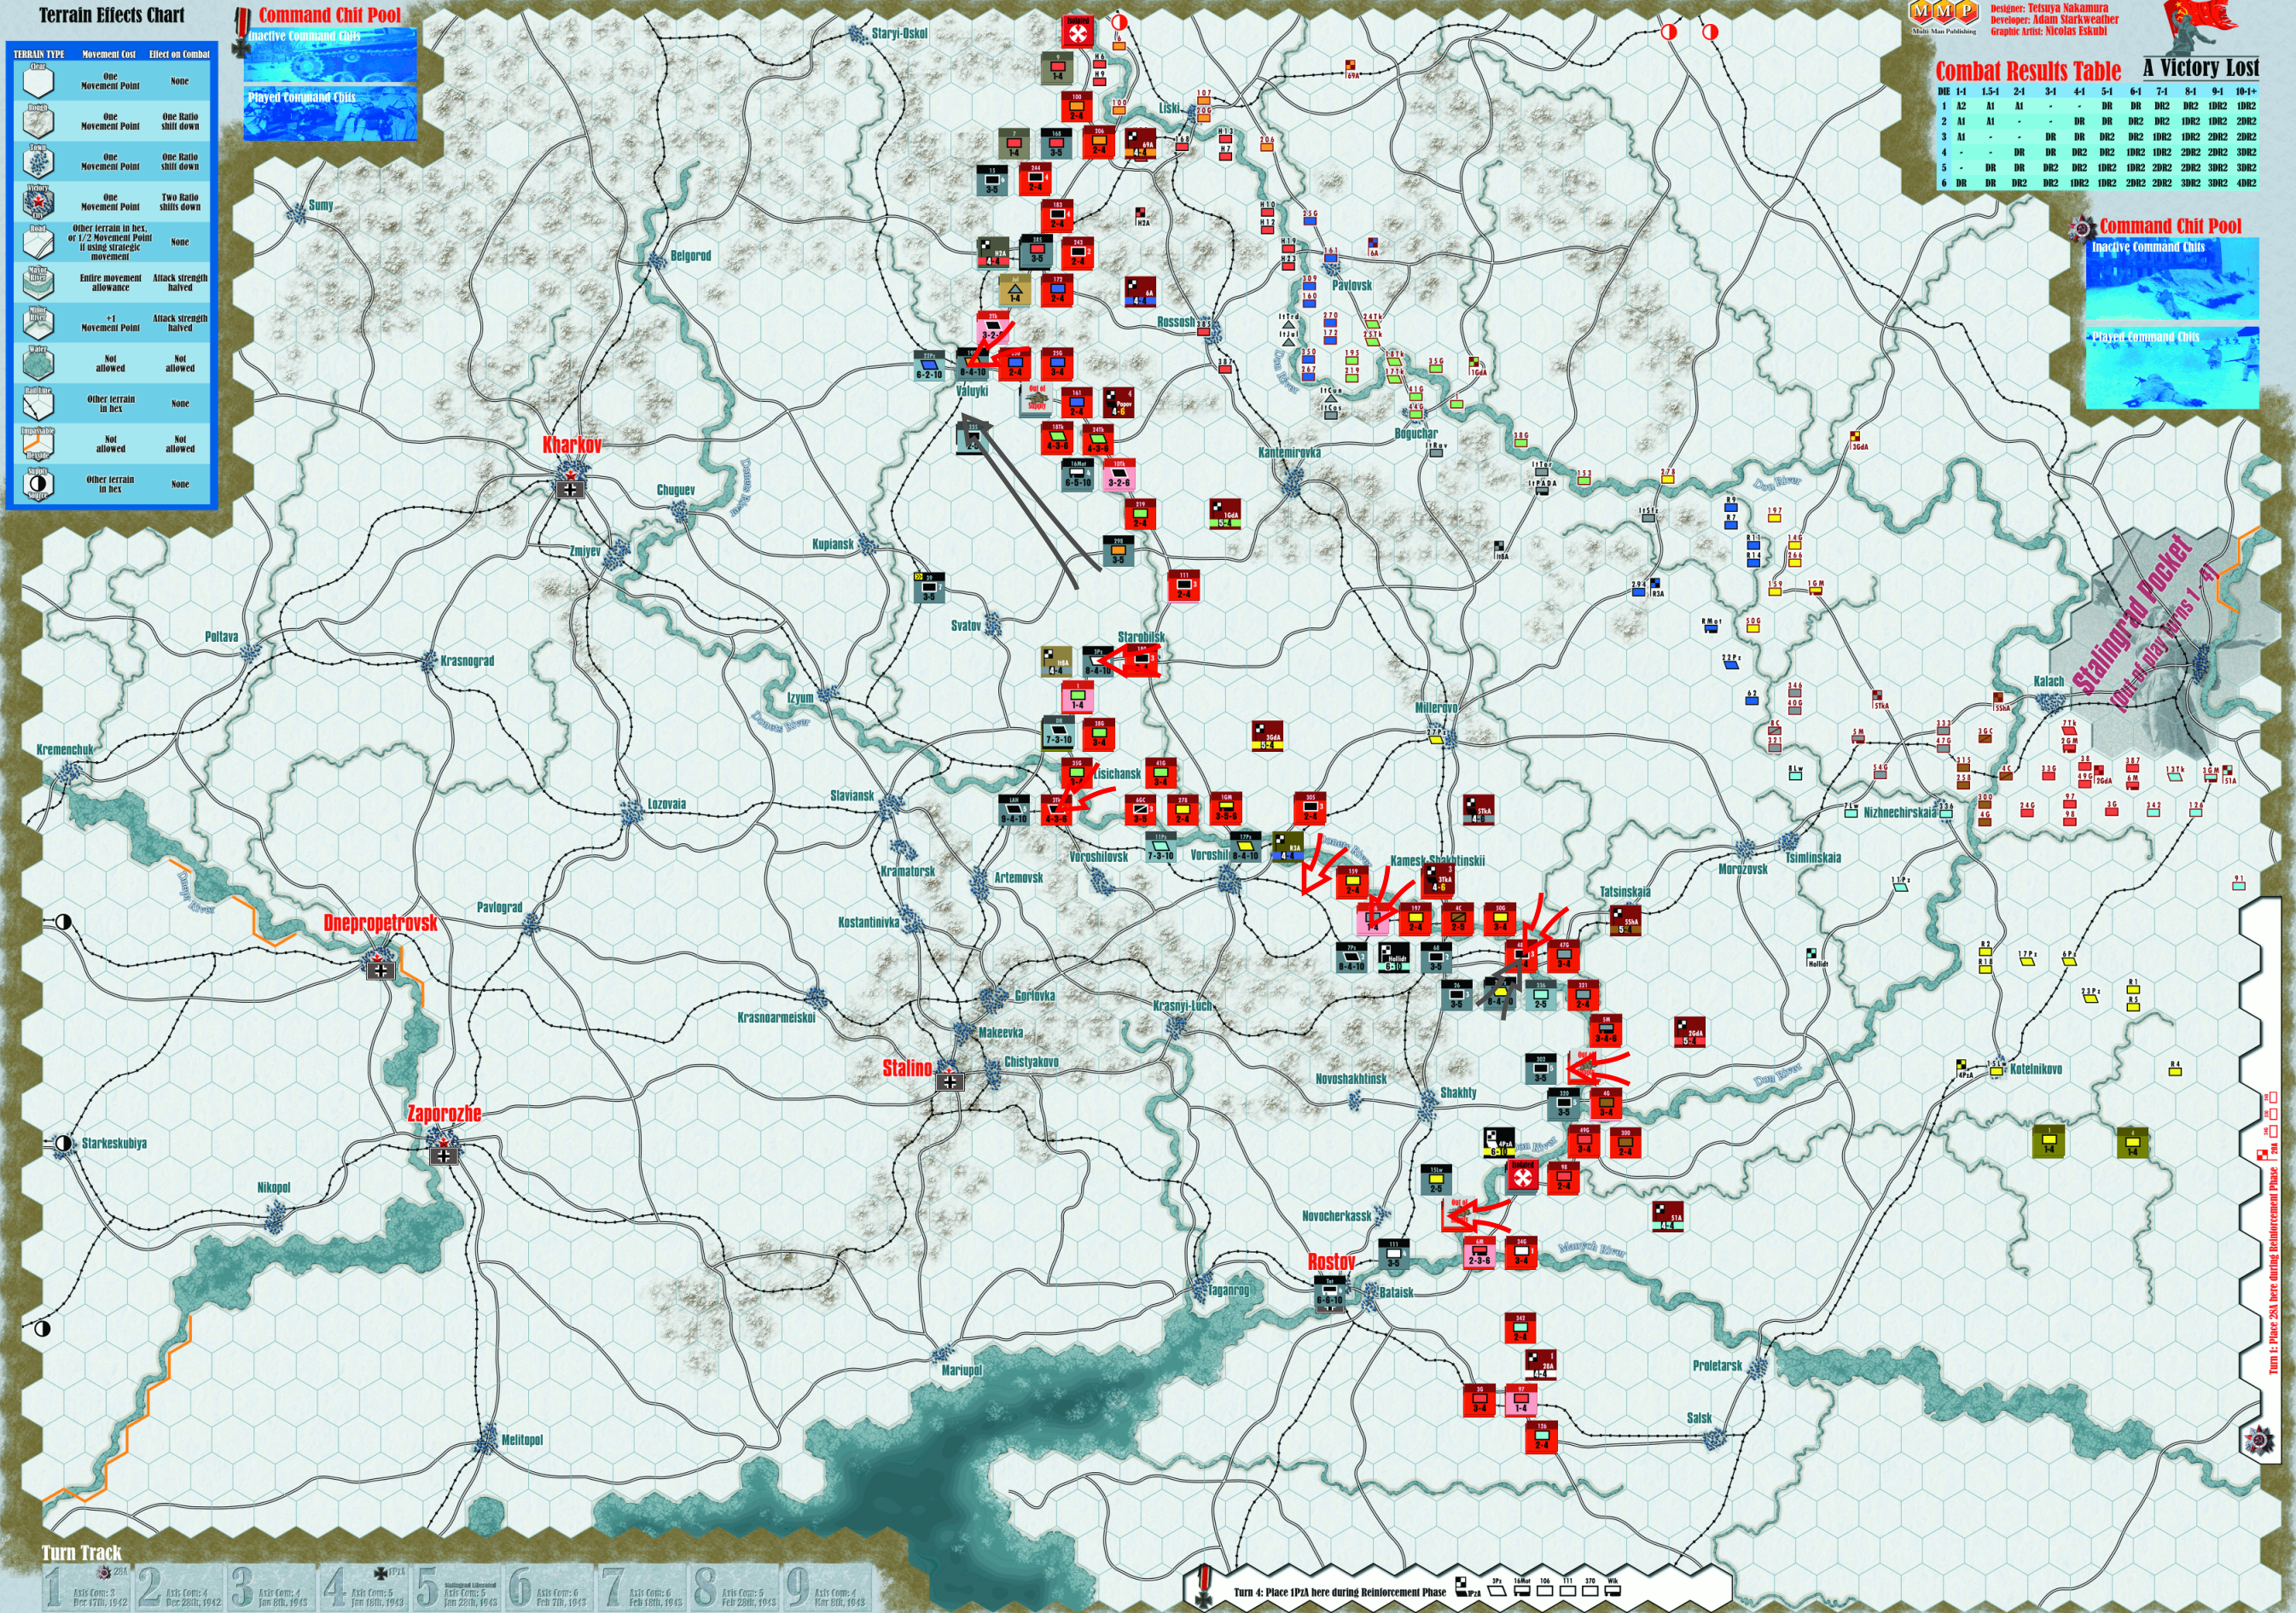
Turn 2 chit sequence: F-Pico – 1GdA – 5ShA – STAVKA – Hollidt – 4PzA – 3GdA – Kempf
Mark started the second turn by assembling a very lose line north of Millerovo, and sending two panzer divisions back east to shore up the crumbling line there, and a 3:1 counterattack got a Dr to move me back a little, but not across the river. I moved a spare division against the Italians, and cleared out PADA and Torino, and forced the 294th out of the new line with losses. Then, both the 7th and 8th Luftwaffe were forced back with losses (one directly, and the other from retreat through ZOC), weakening, but not quite breaking, Hollidt’s line just before STAVKA went off.
It proved to be the start of a few frustrating activations, as the lead tanks in the north were out of range again, and a 2:1 up there to move the Hungarians only produced an A1. The other lead units from previous were also out of command, keeping me from truly following up in the center north of Millerovo, though I finally eliminated the Sforzesca to clear that section and get it moving. But in the south, both weakened Luftwaffe divisions were eliminated, the 11Pz was forced to retreat through ZOC, and Hollidt was bounced further back. Less important, but annoying, a 5:1 on the Romanians holding the extreme flank only caused a Dr. Sufficient for my mechanized units to catch up to the Germans, but the annoyance (and ZOC) was still there.
Hollidt only activated four units (Romanian Motorized, 11Pz, 27Pz and 17Pz) after being bounced, but that meant they could set their thin line behind rivers. The 3GdA didn’t manage much more than trying to catch up to the Germans, who continued to fall back, and shifted forces north of the Don, with reinforcements going direct to Millerovo and and next to Tatsinskaia, while mine went to the same junction as before.
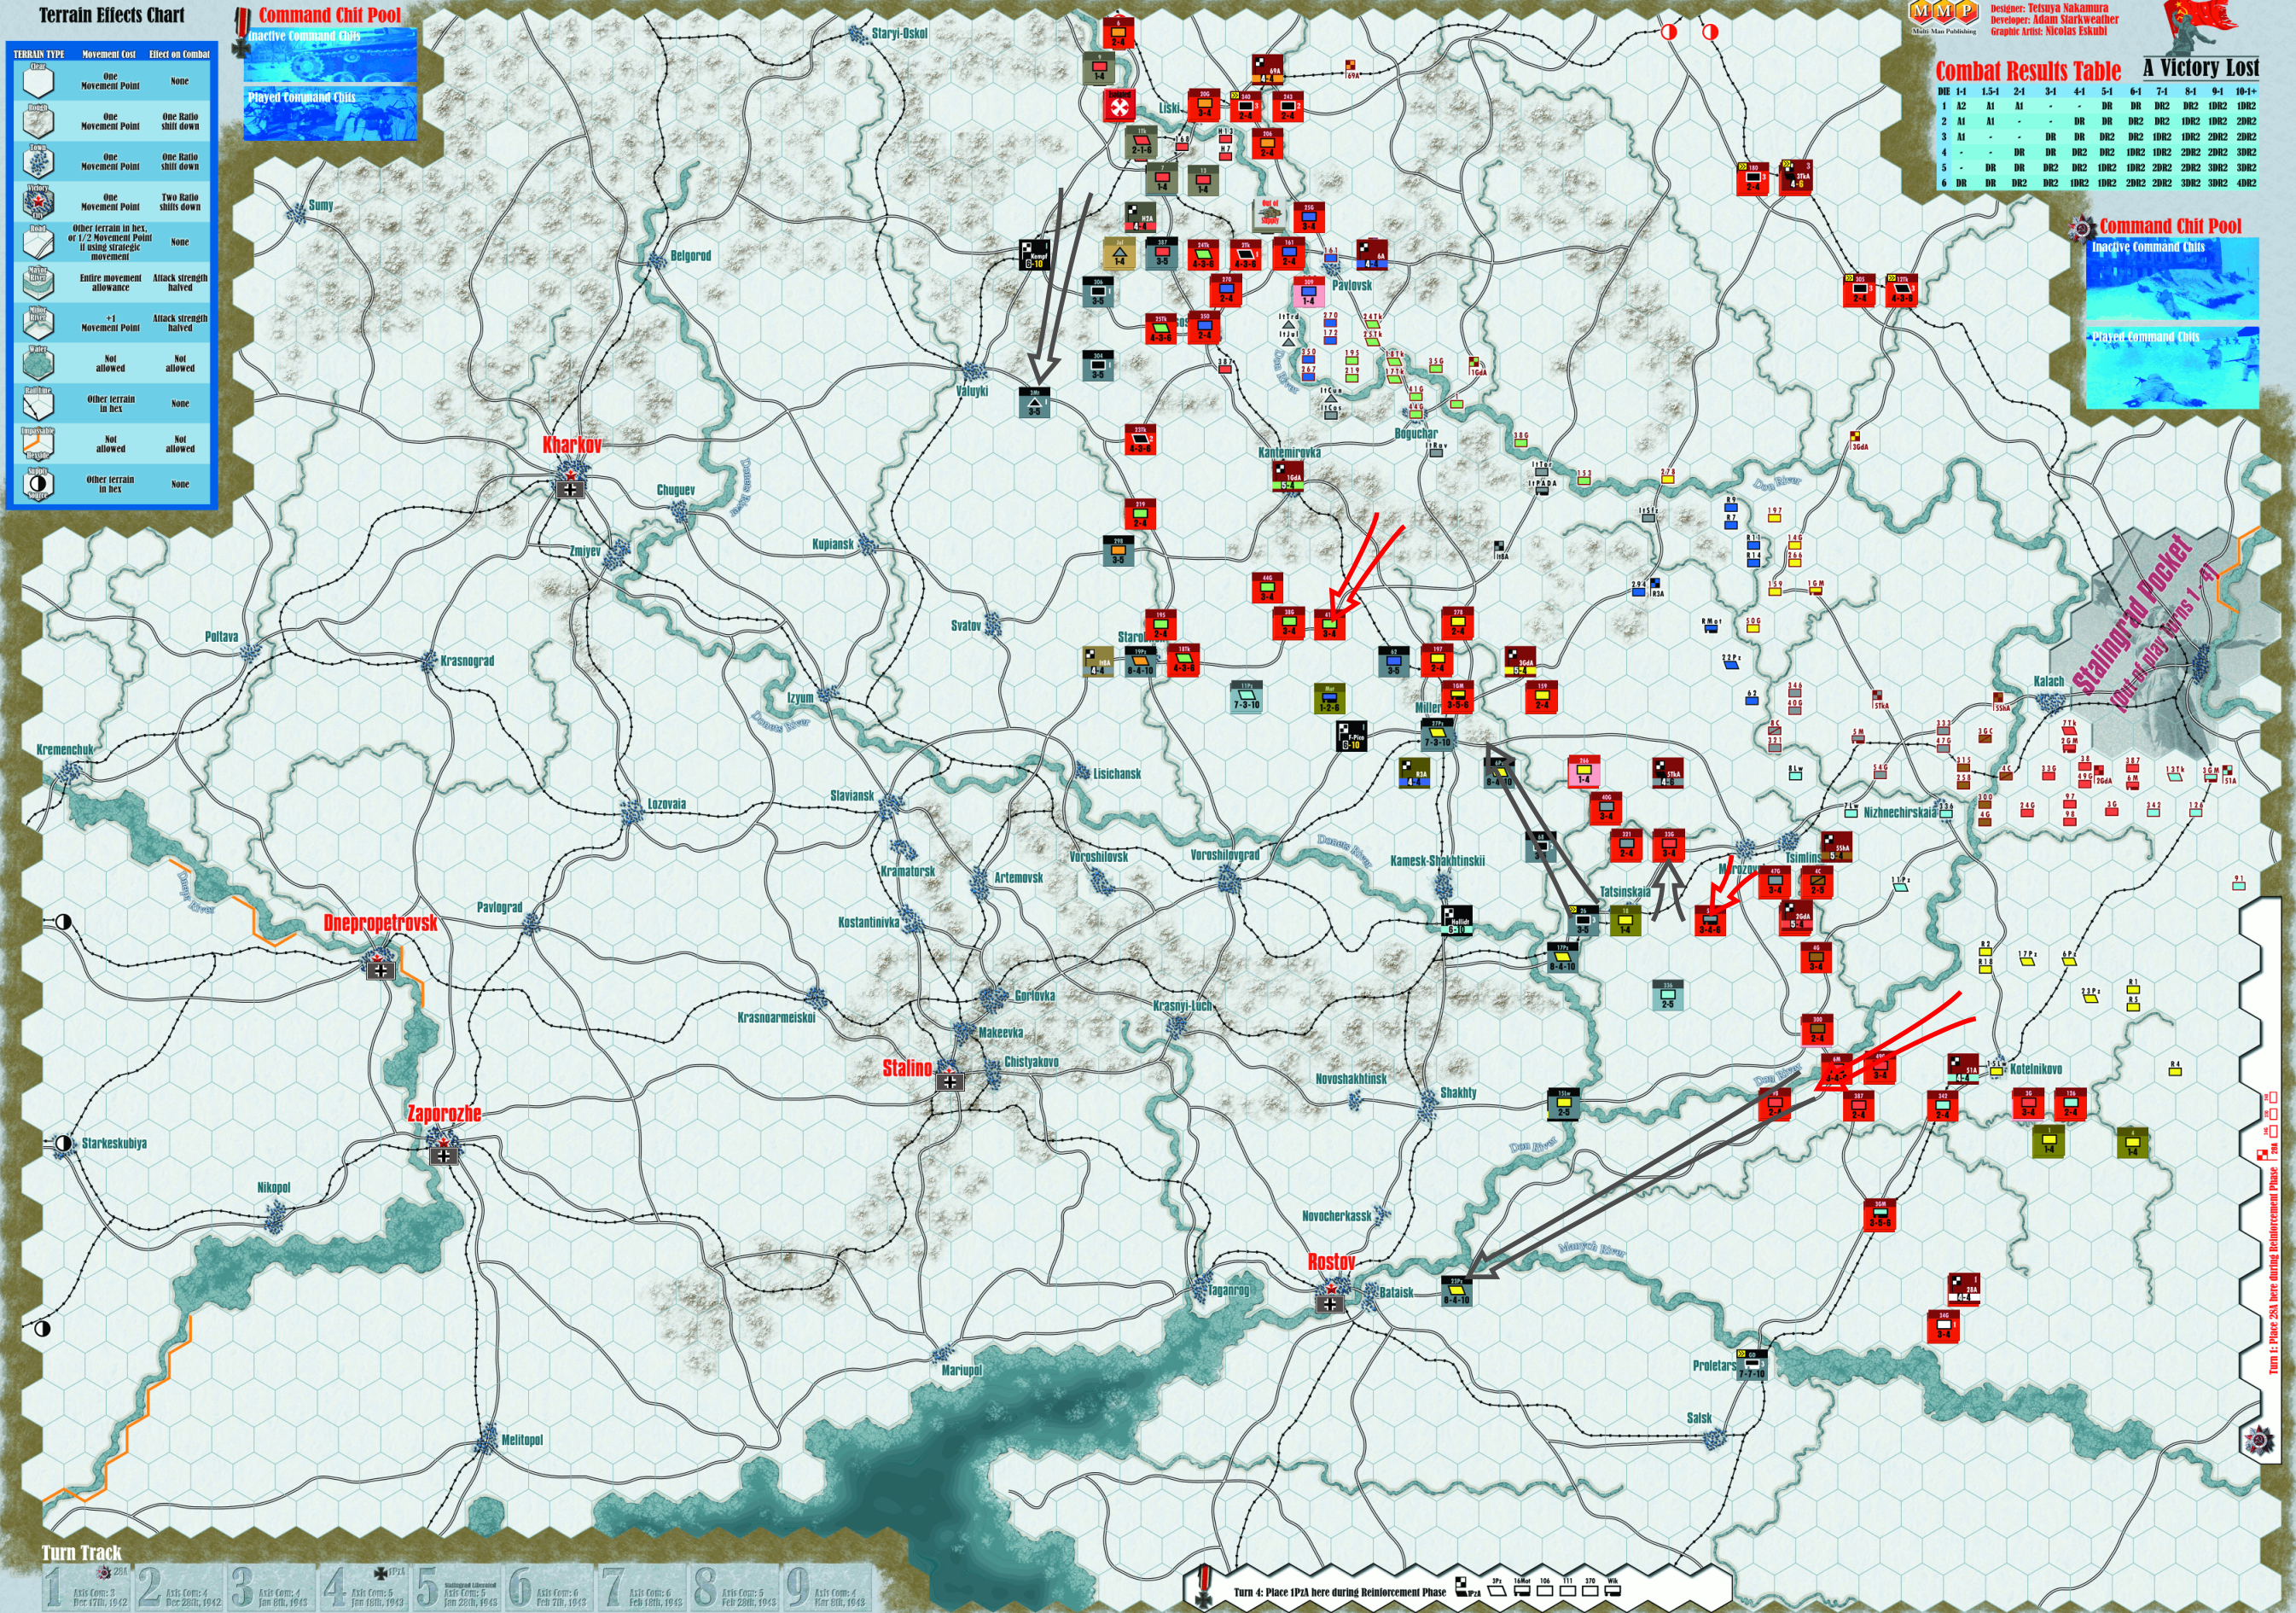
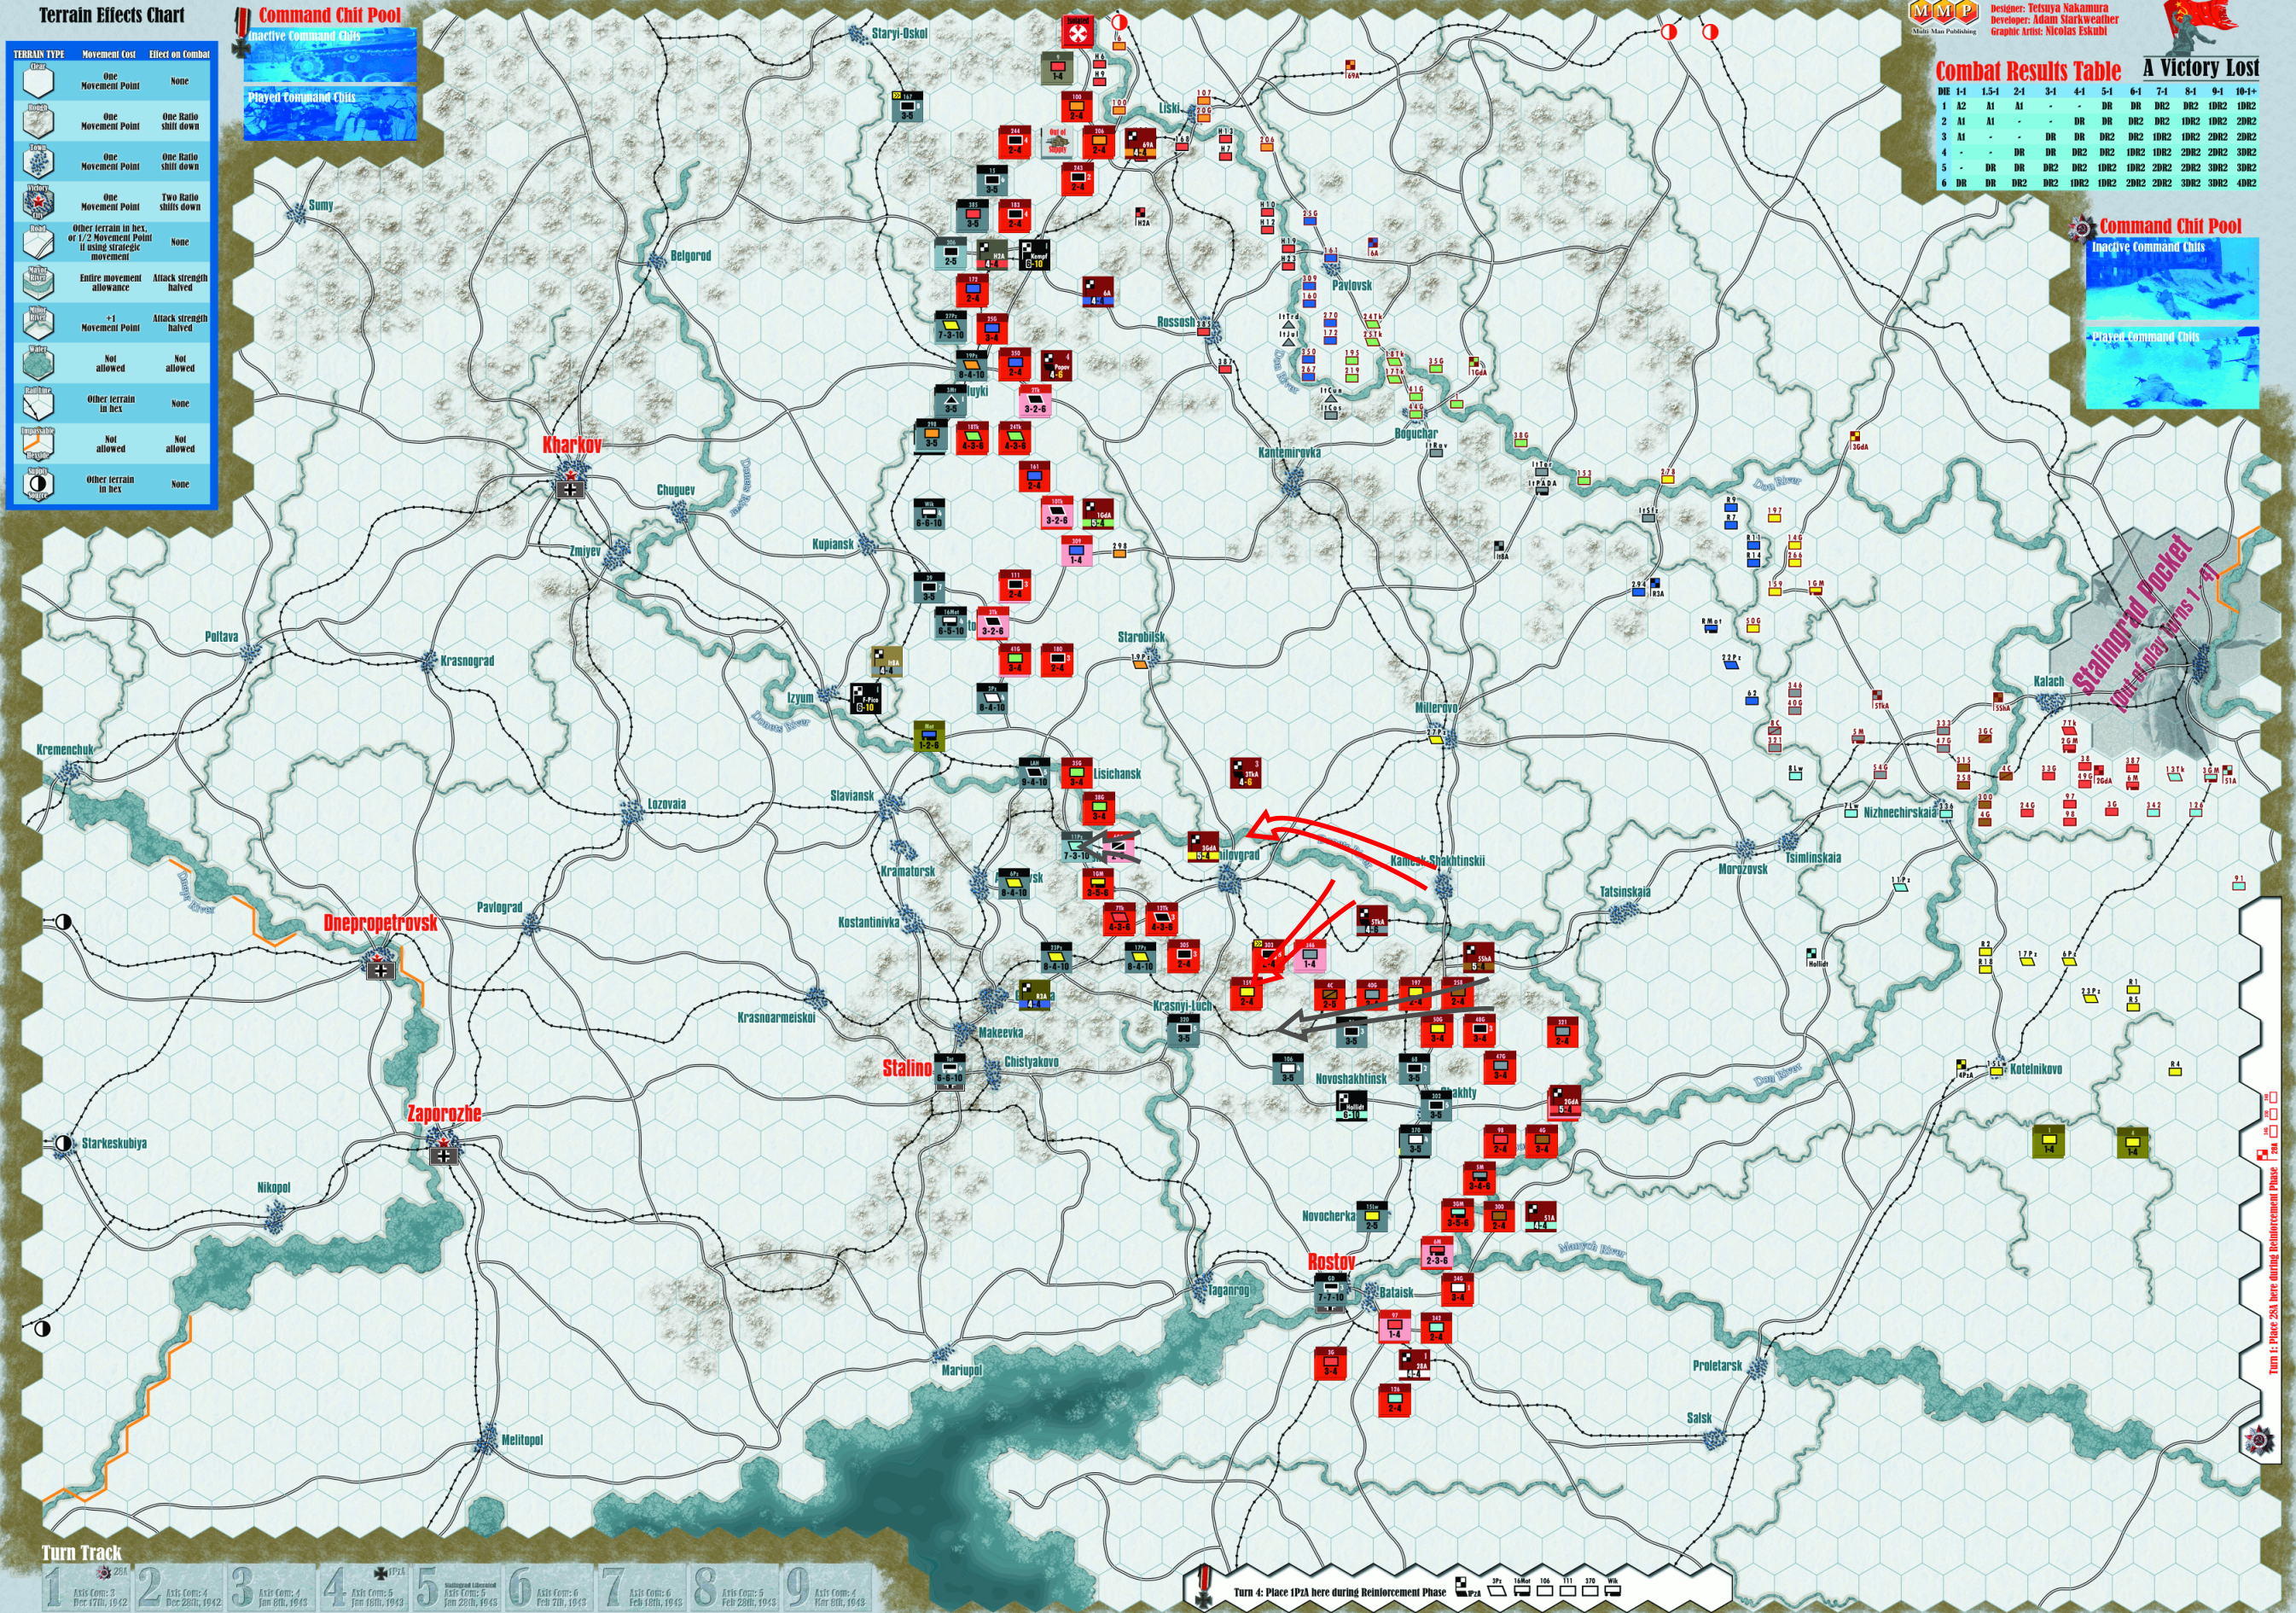
Turn 3 chit sequence: 4PzA – 5ShA – STAVKA – 1GdA – 3GdA – Hollidt – Kempf – Pico
To my surprise, Mark started the turn by evacuating 23Pz towards Rostov, as the 15Lw passed north of the Don, leaving a large stretch of area south of it without defenders. It was a pity I had not kept the 51A or 28A as possible HQ activations. Three other panzer divisions concentrated against the 33G and 2GM, forcing them back past a river. A counterattack by the 5ShA failed to have a result, along with an attack on the 336th, which would have forced a retreat through ZOC after I’d pushed a Romanian division back.
But STAVKA gave me a second chance (I’d rather have already been preparing to tackle the units behind the 336th), getting a mere Dr against both. The Romanian 18th held firm against a 3:1, while the 2nd was eliminated, and an attack on the extreme flank was an A1. I finally cleared the Pavlosk bridge in the north (partially, there were more Hungarians to the north of it), and in the center eliminated the 294th, while pushing the 22Pz back; Millerovo itself had more than I could tackle with the units on-hand, but I was definitely getting in behind it.
I was able to push the 62nd and Romanian Motorized back right after that, getting me fully across the river. Mark sent three panzer divisions over to the end of that line, and pushed me back across with a Dr2. He might have been able to do the same with my mechanized units at the end of the turn, but it’d take five panzer divisions to get a 3:1, and he opted for shoring up the area east of Millerovo. Grossdeutschland arrived to block the bridge at Proletarsk (putting it well out of command range, and beginning quite an odyssey), while the 26th arrived near Tatsinskaia. I sent my big set to the two junctions north of Stalingrad, where they could strategically move toward the front, another idea that didn’t pan out so well.
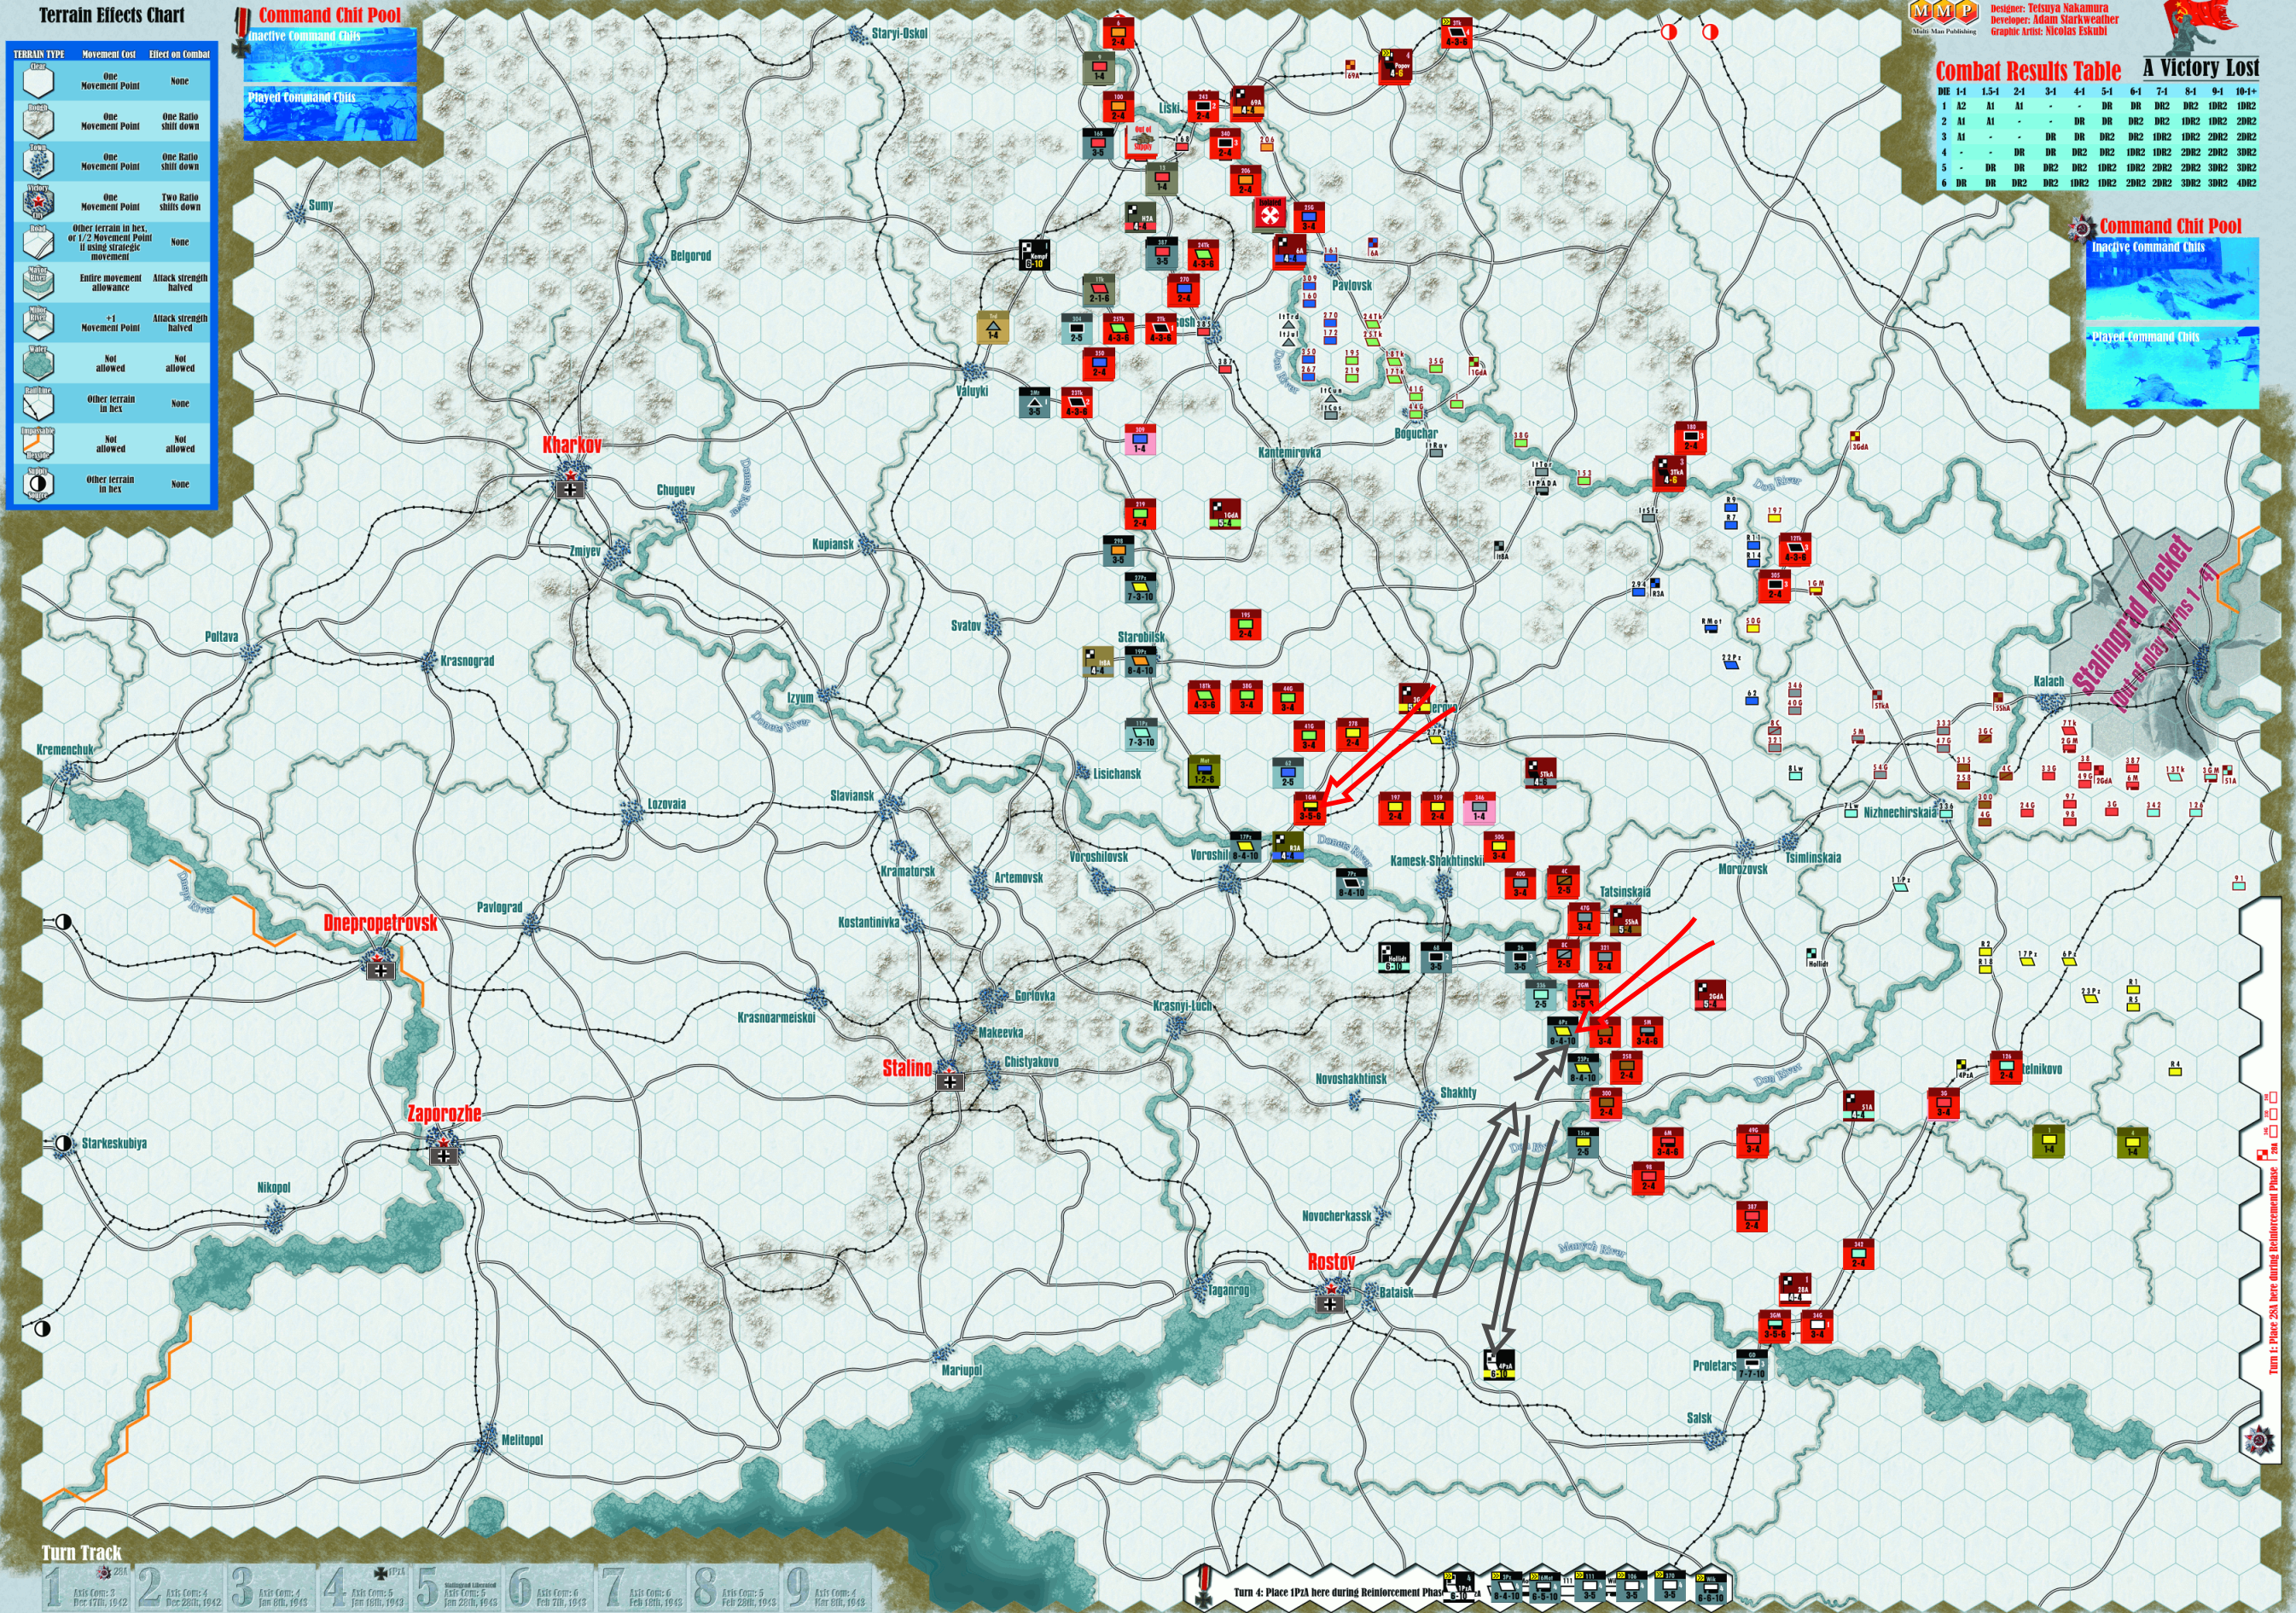
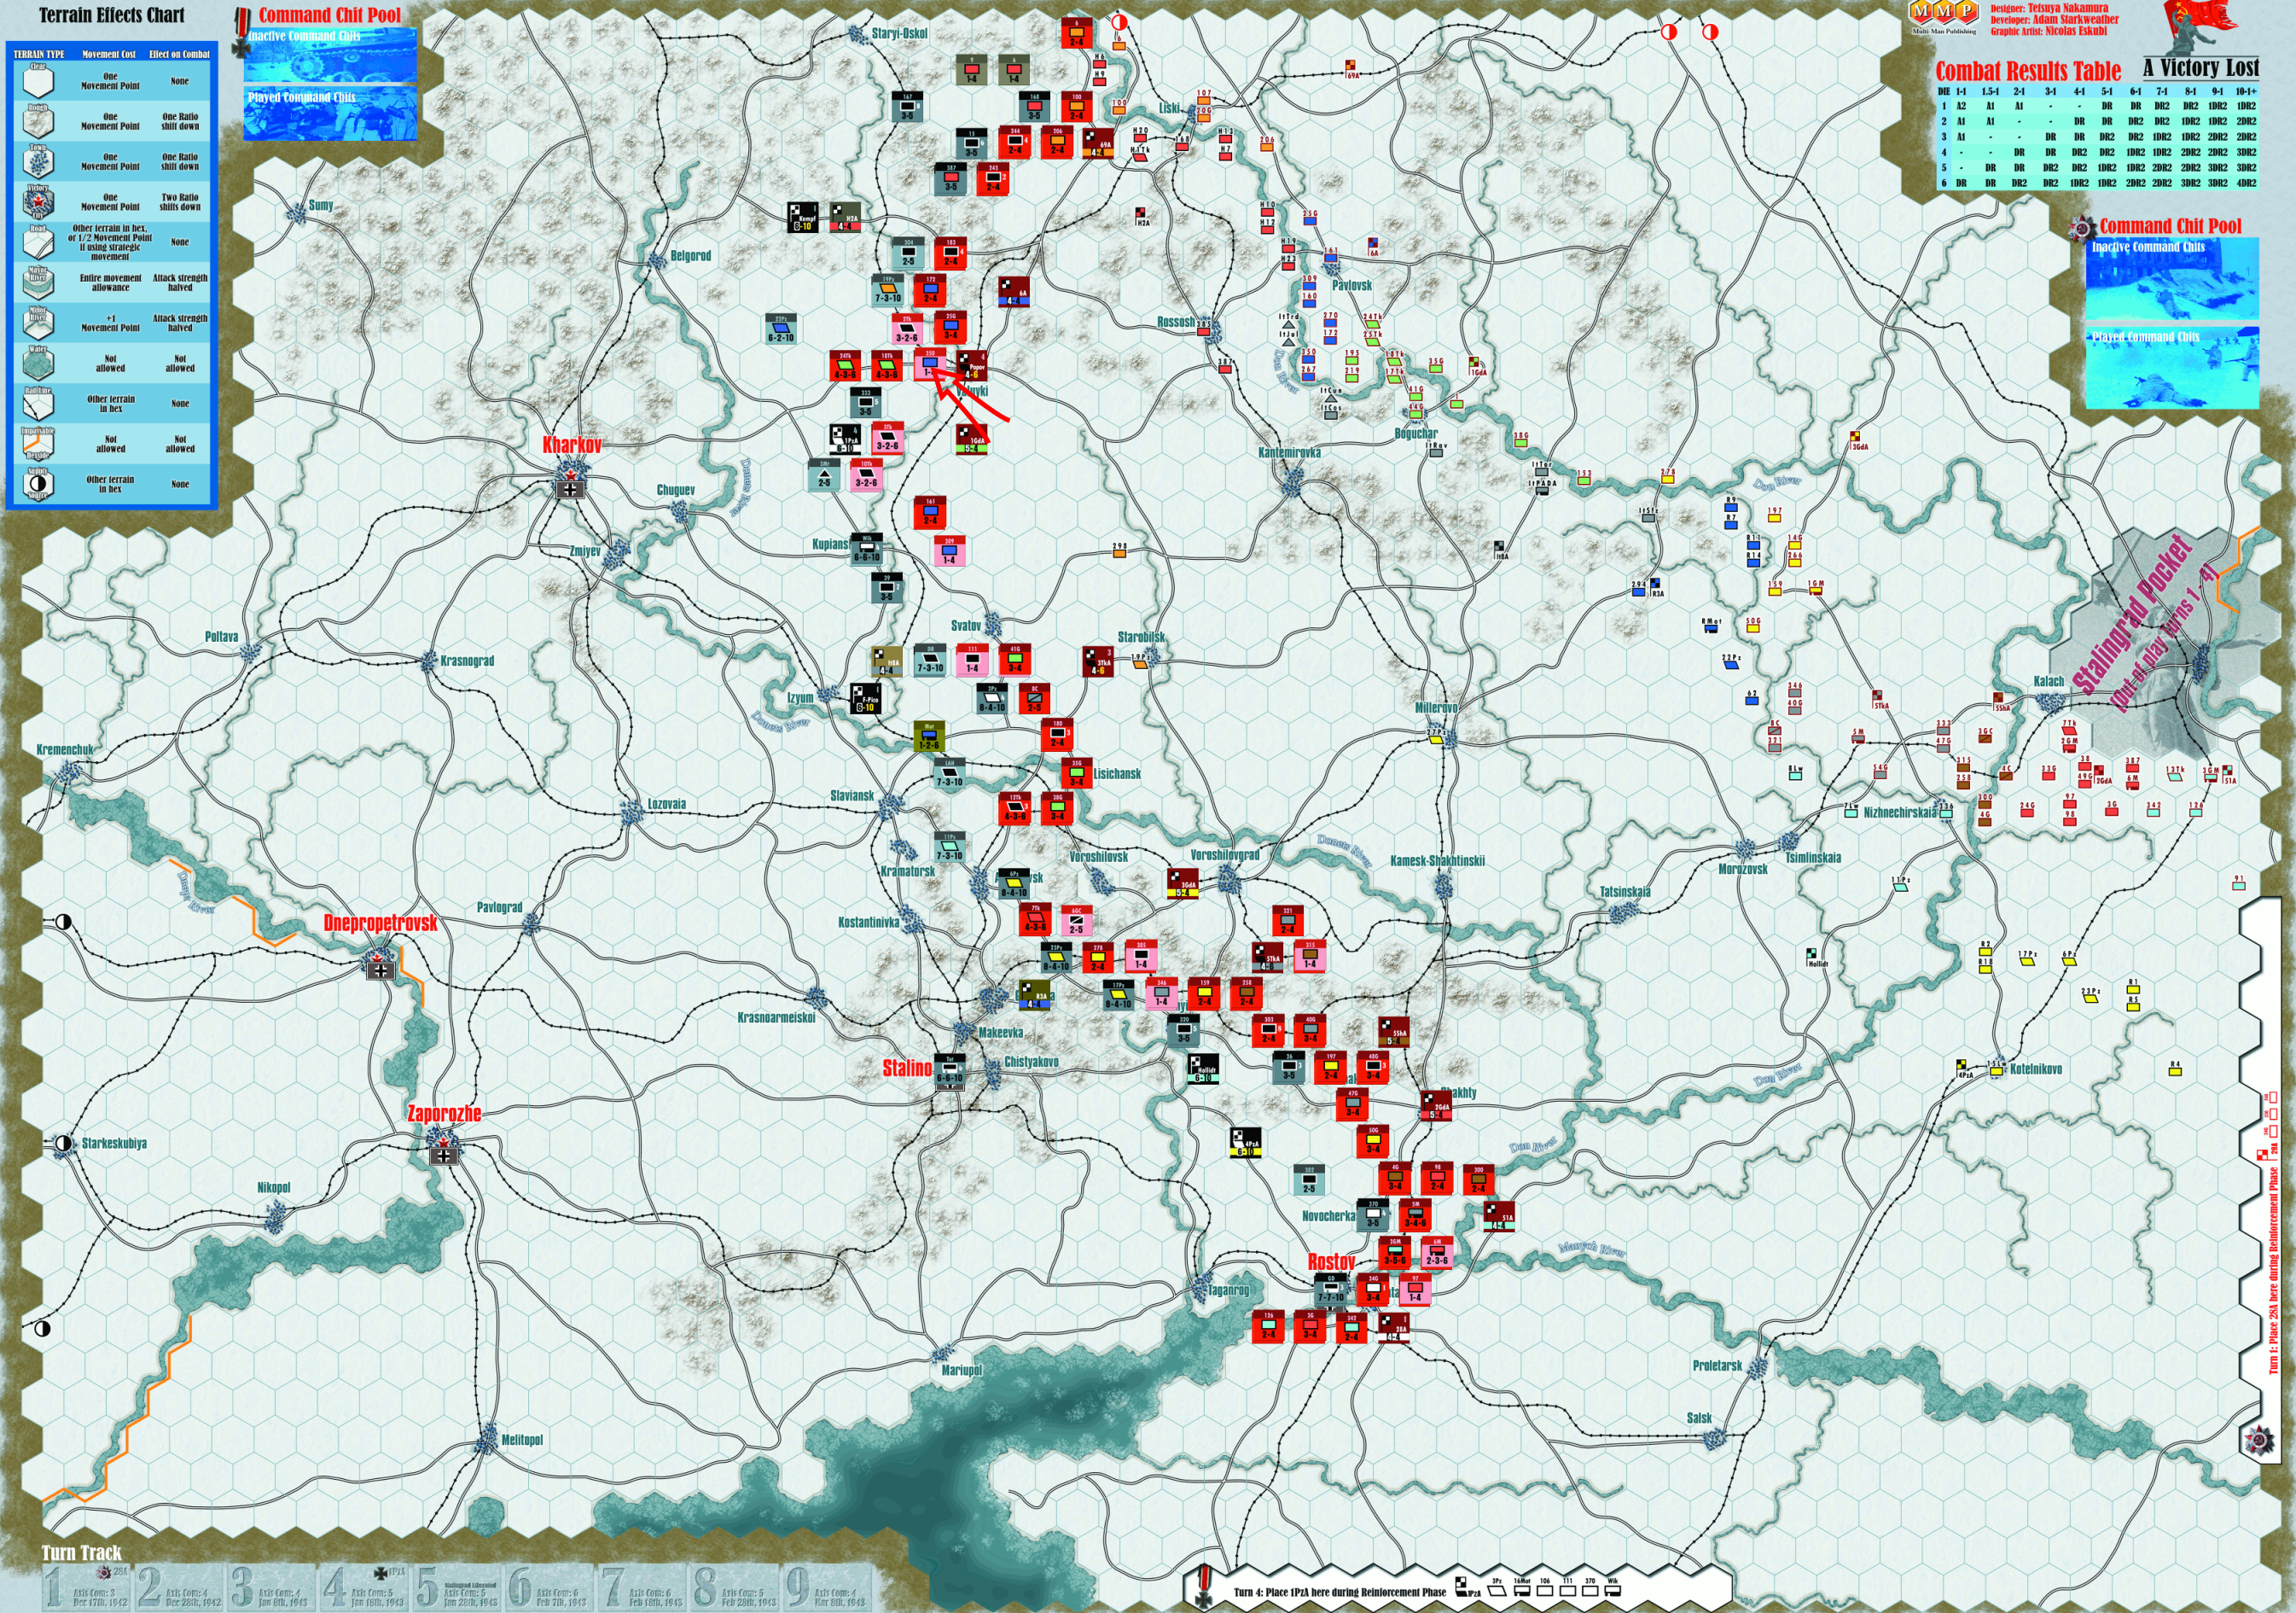
Turn 4 chit sequence: 3GdA – 1GdA – 4PzA – Kempf – 5ShA – Hollidt – STAVKA – Pico – Hollidt (Manstein)
The opening move of the 3GdA allowed me to reduce the 62nd on a retreat in ZOC, but a 2:1 on the south end of the sector ended with a A1, and I didn’t press as much in the middle as there were too many panzer divisions around. The 1GdA followed up, and reduced the 304, while pushing back the entire line west of Millerovo. Mark didn’t do a lot with his next activation, but 17Pz strat moved in a loop to Voroshilovgrad, and while the 23Pz moved from it’s blocking position (to one a little north and behind the Don), the 4PzA HQ moved to be able to activate Grossdeutschland. 5ShA spent about all its effort just trying to catch up to the Germans, but knocked out the Romanian 18th division, and the 5M got to the Donets, ready to cross unopposed. With things getting more desperate, Millerovo was evacuated, with the gathered panzer divisions all lining up behind the Donets.
STAVKA got the 5M across, while another eight started lining up, but the defense was already stiffening. Another Hungarian division was killed, but there was still a lot blocking the north. I had nearly trapped the reduced 62nd and Pico, but he went next, and squeezed out. He largely pulled out of the region, with panzer divisions pulled back behind the next river, while a couple others started guarding the Donets, and knocked the 195 division back. Manstein was the final chit, and Mark re-activated to Hollidt to knock the 5M back across the Donets, closing off that potential disaster, and establishing a solid line and the east bend of the Donets. I put two new divisions with the 69A, while the rest stayed further back with Popov to command them.
Turn 5 chit sequence: Popov – 3GdA – STAVKA – 1PzA – 1PzA (Mainstein) – 5TkA – Kempf – Pico – 4PzA
Popov spent his time just moving forward… and the 3GdA didn’t feel much different, though I did eliminate the reduced 62nd, and two divisions were set to cross the Donets. I had accidentally left half of the turn three reinforcements out of command, so half went forward, and the 3TkA went to go pick up the other half. I managed to cross the next river line in the center, on both ends, knocking the 298 from its starting position. A 7:1 finally cleared more Hungarians out with a Dr2 through my ZOC.
The 1PzA came on, and the infantry took up blocking positions ahead of my ability to get there, while the three mechanized divisions passed beyond the Don, and up towards the center, and then passed north of the Donets by the Izyum bridge. Two activations in a row closer to the front allowed him to surround the 17Tk and 18Tk, but got no effect on a 4:1 attack. And the end of turn with its massive German reinforcements came at the right time, with DR and LAH arriving at the ‘corner’ between the front on the Donets, and the line going north, two divisions plugged the hole near Valuyki, and two backing up the eastern bulge. I put my new infantry in the south, at the lead of the troops crossing the Manych, and cavalry in Rossoch.
Turn 6 chit sequence: 1GdA – 3GdA – Hollidt – 4PzA – Pico (Manstein) – 1PzA – STAVKA – Pico – Pico (Manstein) – Popov
With the bad situation near Starobilsk, I was lucky to go first, and maneuvered against the 27Pz. I drove off the 3Mt to cut it even further off, but my 3:1 on the panzers did nothing. Mark reshuffled in the east, and closed up the hole in the river line before I could get there. To my surprise, the GD advanced into my advancing horde, and was joined by the 106, creating a 10-defense stack that I was going to have trouble with, while reducing the 6M with a retreat through ZOC.
Mark got the second chance to attack in our swirling melee, and pulled the 27Pz out of danger, while surrounding my leading elements south of there with DR and LAH, but got no results again on a 3:1. A second attempt drove off the 3Tk, and allowed him to nearly surround four other tank divisions. STAVKA let my pull partway out of the noose, and launch a huge attack… which was still a 2:1 for an A1, which was followed by another German attack for a 1Dr2 to kill the 23Tk and reduce the 10Tk, with a followup that pushed the 17Tk and 18Tk back across the river.
I did finally get a solid enough line to attack across the Donets during that, and pushed two divisions over it. Totenkopf arrived in Rostov, and the 15th in Valuyki, while I put the 253rd near Rossosh, as I was needing a lot more punch in there.

Turn 7 chit sequence: Popov – Hollidt (Manstein) – 1PzA (Manstein) – 1PzA – 1GdA – 5ShA – Hollidt – 4PzA – STAVKA – Pico
At this point, the north-center was quite stabilized on the river line, and the focus moved a bit north into the rough terrain, where I finally knocked out the Hungarian tank division, and reduced the 306th, which was then obliged to retreat again from a follow up attack. My guards divisions were pushed back across the Donets, but GD turned out to be out of command, causing more maneuver to be needed to retrieve it. An attempt to re-open the north breach I’d had a turn ago generated a A1 against Wiking, but in the ‘corner’ I pushed back DR.
I got across the Donets in the same place again, and Mark pushed me out again. Worse, while there were some critically weak sectors, he was getting the activations to patch them before I could exploit them. Except… he uncovered one hex just west of where the main action (or inaction) was, which I used with STAVKA, and then crossed more by forcing the 7Pz back a hex. I also forced LAH back two hexes, and followed, getting the 3Tk across the Donets; but an attack on the Romanian motorized division was merely an A1. I got in Valuyki, and then forced out defenders I’d bypassed, destroying the Tridentina and reducing the 335th. Not only did I cross the Donets at the original crossing, again, but two other attacks succeeded, making that entire line not viable.
Mark sent two panzer divisions north to Valuyki and forced me out, reducing two tank corps on a 2:1 attack. On the other hand, he took an A1 on the DR as it tried to counterattack east, and cut off the bridge the 3Tk had crossed. The 39th arrived near Svatov, backing up the weakening line just north of the Donets.
Turn 8 chit sequence: Pico (Manstein) – 5ShA – Popov – 3GdA – Hollidt – 1PzA (Manstein) – STAVKA – 1PzA – 4PzA
Instead of pushing again in the corner, Mark fell back for another defense line north of the Donets, but LAH and 11Pz together could manage a 4:1 against the 3Tk for a 1Dr2, reducing the corps, and sending it back north of the river. Eastwards, the German position continued to crumble, as I knocked out the 336th, while bringing more units across. Meanwhile I was already starting to move units laterally west, behind the increasingly crowded lines, and forced a crossing at Vororshilovgrad.
STAVKA helped the line move up of course, and I eliminated the Julia, while working my way through all the cracks near the center. But three 1s in a row (along with some other unhelpful results) kept things from going very far. Then 1PzA pulled everyone out of immediate danger while putting together a thin line. Totenkopf fell back to hold Stalino, while GD and the 111th moved into Rostov (which pretty much shut out those cities to me, as I was not going to get enough there for any kind of attack through a two-column shift against high-defense units; it took me a while to really see that). The 167th went to the far north, where the Axis line was finally giving way, while my two divisions went to the small gap between Krasnyi-Luch and Novoshakhtinsk (somewhere near a road to Kharkov might have been wiser… but I hadn’t cleared anything useful).
Turn 9 chit sequence: Kempf – Popov – Hollidt – Hollidt (Manstein) – 5ShA – 1PzA (Manstein) – STAVKA – 3GdA
The north flank backpedaled into delaying positions, and a 7:1 attack thankfully was no more than a Dr2 to send a guards division flying back. I moved up, and got the 333rd out of line, getting behind the 19Pz. The south went twice, but both times were generally just adjusting details of the defense, and I knocked part of it back, reducing the 302nd in the process.
He also rearranged things in the north, and the defenders on the direct road to Kharkov got a bit thin. Despite spending some effort on it, I couldn’t find a plan that would get me in range of it though. (Assuming my last chit was 1GdA, which would have been smart—it wasn’t, but I couldn’t remember.) I had a small breakthrough in the south by destroying the 68th, but failed to also destroy the weakened 302nd on a 6:1. All that was really left was a couple attempts at VPs through eliminating units. But all I could do was reduce the LAH on a retreat.
Afterword
Final VPs were 26 to 6 – a very convincing win for the Germans, which is no surprise, considering I didn’t take a single victory city.
I’m not entirely sure what went wrong; one real possibility is that I should have done a lot more low-odds attacks in the middle game, and press a lot harder than I did. However, I got punished pretty hard by the bulk of the ones I did do, and most of what I skipped in the middle would have been 1.5:1 attacks, which are pretty deep in desperation territory.
The main problem is it just took entirely too long to get momentum going. I recall that I usually take the 6A as one of my HQ picks, and I can certainly see here just how much not having an extra activation up there really slows up the entire north edge. Another thought is to take the 28A. I had a nice plan of entering that south and pass behind a lot of the initial roadblocks, but they took way too long to get anywhere.
The drive in the center just never quite got anywhere… but there was a moment when it was looking pretty good. Going west was looking very open at the end of turn 5, and then the big set of German reinforcements came in and closed the door. That was followed a back-and-forth in that area, with missed attacks on both sides, that ended with me having a hard time getting past a river that I had breached a turn before. In the south, I eventually got across, and was making decent progress… about a turn behind where I needed to be. It had been a fairly close-run race for getting across without a major fight, and even after that, I couldn’t get the two activations I needed to exploit getting across until the entire line gave.
Discussion ¬