
Operation Dauntless T5 x 3
The last step before diving into armor in the Operation Dauntless tutorial series is “Let the Shells Fly”. It is recommended to play it twice, with the second play incorporating the Friction Fire rules; I was hesitant at first, with the alure of the second half of the tutorials so close, but I can say now that it’s worth doing.
However, the main point is to have a good integrated example of combat and assaults with ranged fire support. It really does showcase much of the infantry side of the system. Ranged fire the the third combat system of the game, and uses its own result table, which is just trying to get a 14 or higher on 2d6(!). The base ranged combat value of the unit is added to this (ranged combat is always per unit, never added together), with some modifiers: bulk kills, with a +1 to the result per company present in the target hex, and then there’s the normal terrain modifiers, degraded performance for more distant direct-fire weapons, and bonuses to indirect-fire weapons that can see their target (instead of needing a spotter). As heavy machine guns are enough to provide a ranged attack factor, almost every unit has some ranged ability.
The general result from ranged fire is suppression, which prevents a few things (notably Friction Fire), and causes a shift in any following combat/assaults (really good results can cause a step loss or two). However, suppression comes off at the end of the current phase, so suppression caused during the Action phase is of now help during Combats (but will help assaults). A wrinkle that defeated us for a bit is that while you can do ranged fire against anyone in either phase, if there is going to be a combat against a particular hex, all ranged fire against it must be part of that combat. You can’t do ranged fire against a hex, and then engage in combat with it. This turns into a sequence at the start of combat where you declare all offensive and defensive support right after the main combat is declared, and then resolve all those ranged attack rolls before going on to the main combat.
The British have two full battalions backed up by a heavy mortar company (who technically have transports, but are immobile in this scenario), and plenty of off-board artillery (which is just longer-ranged, heavier, versions of on-board indirect fire units; I was thinking them assets at first, which are more limited and hampered my use for a while). The Germans are trying to hold St-Pierre (/the ground in front of the bridge across the Seulles) with about three companies; six platoons, three pioneer platoons, a MG section, two IG batteries, a mortar battery, five off-board batteries (including one of nebelwerfers, my personal nemesis), and then roughly another company enter as reinforcements on each of turns 2 and 3. Some of the British start as loaded up MG sections and towed AT batteries, giving a chance to play a bit more with the transport rules.
We stuck with the same sides as before, and Mark set up the Germans in front of the bridge; half the British set up fairly close, and the other half is over on the other side of the map, and needs a turn just to get into range. There’s a couple of light bocage hexes on the fringe of the entire built-up area, one of which was left empty, so my first action was to move down the road into that and then assault a platoon in an open field.
An average roll got a 0/2 on a 3:1, pushing the Germans back into the village (we also forgot that he had a possible shot at my carrier platoon on the way in). The rest of the Lincolnshires moved up into 0508, while part of KOYLI went down the road to stop in 0706, preparing for a big attack on the other light bocage hex. Two more companies marched off-road, only getting partway to the action, while the MG section and towed 6-pounders motored to positions overlooking the village.
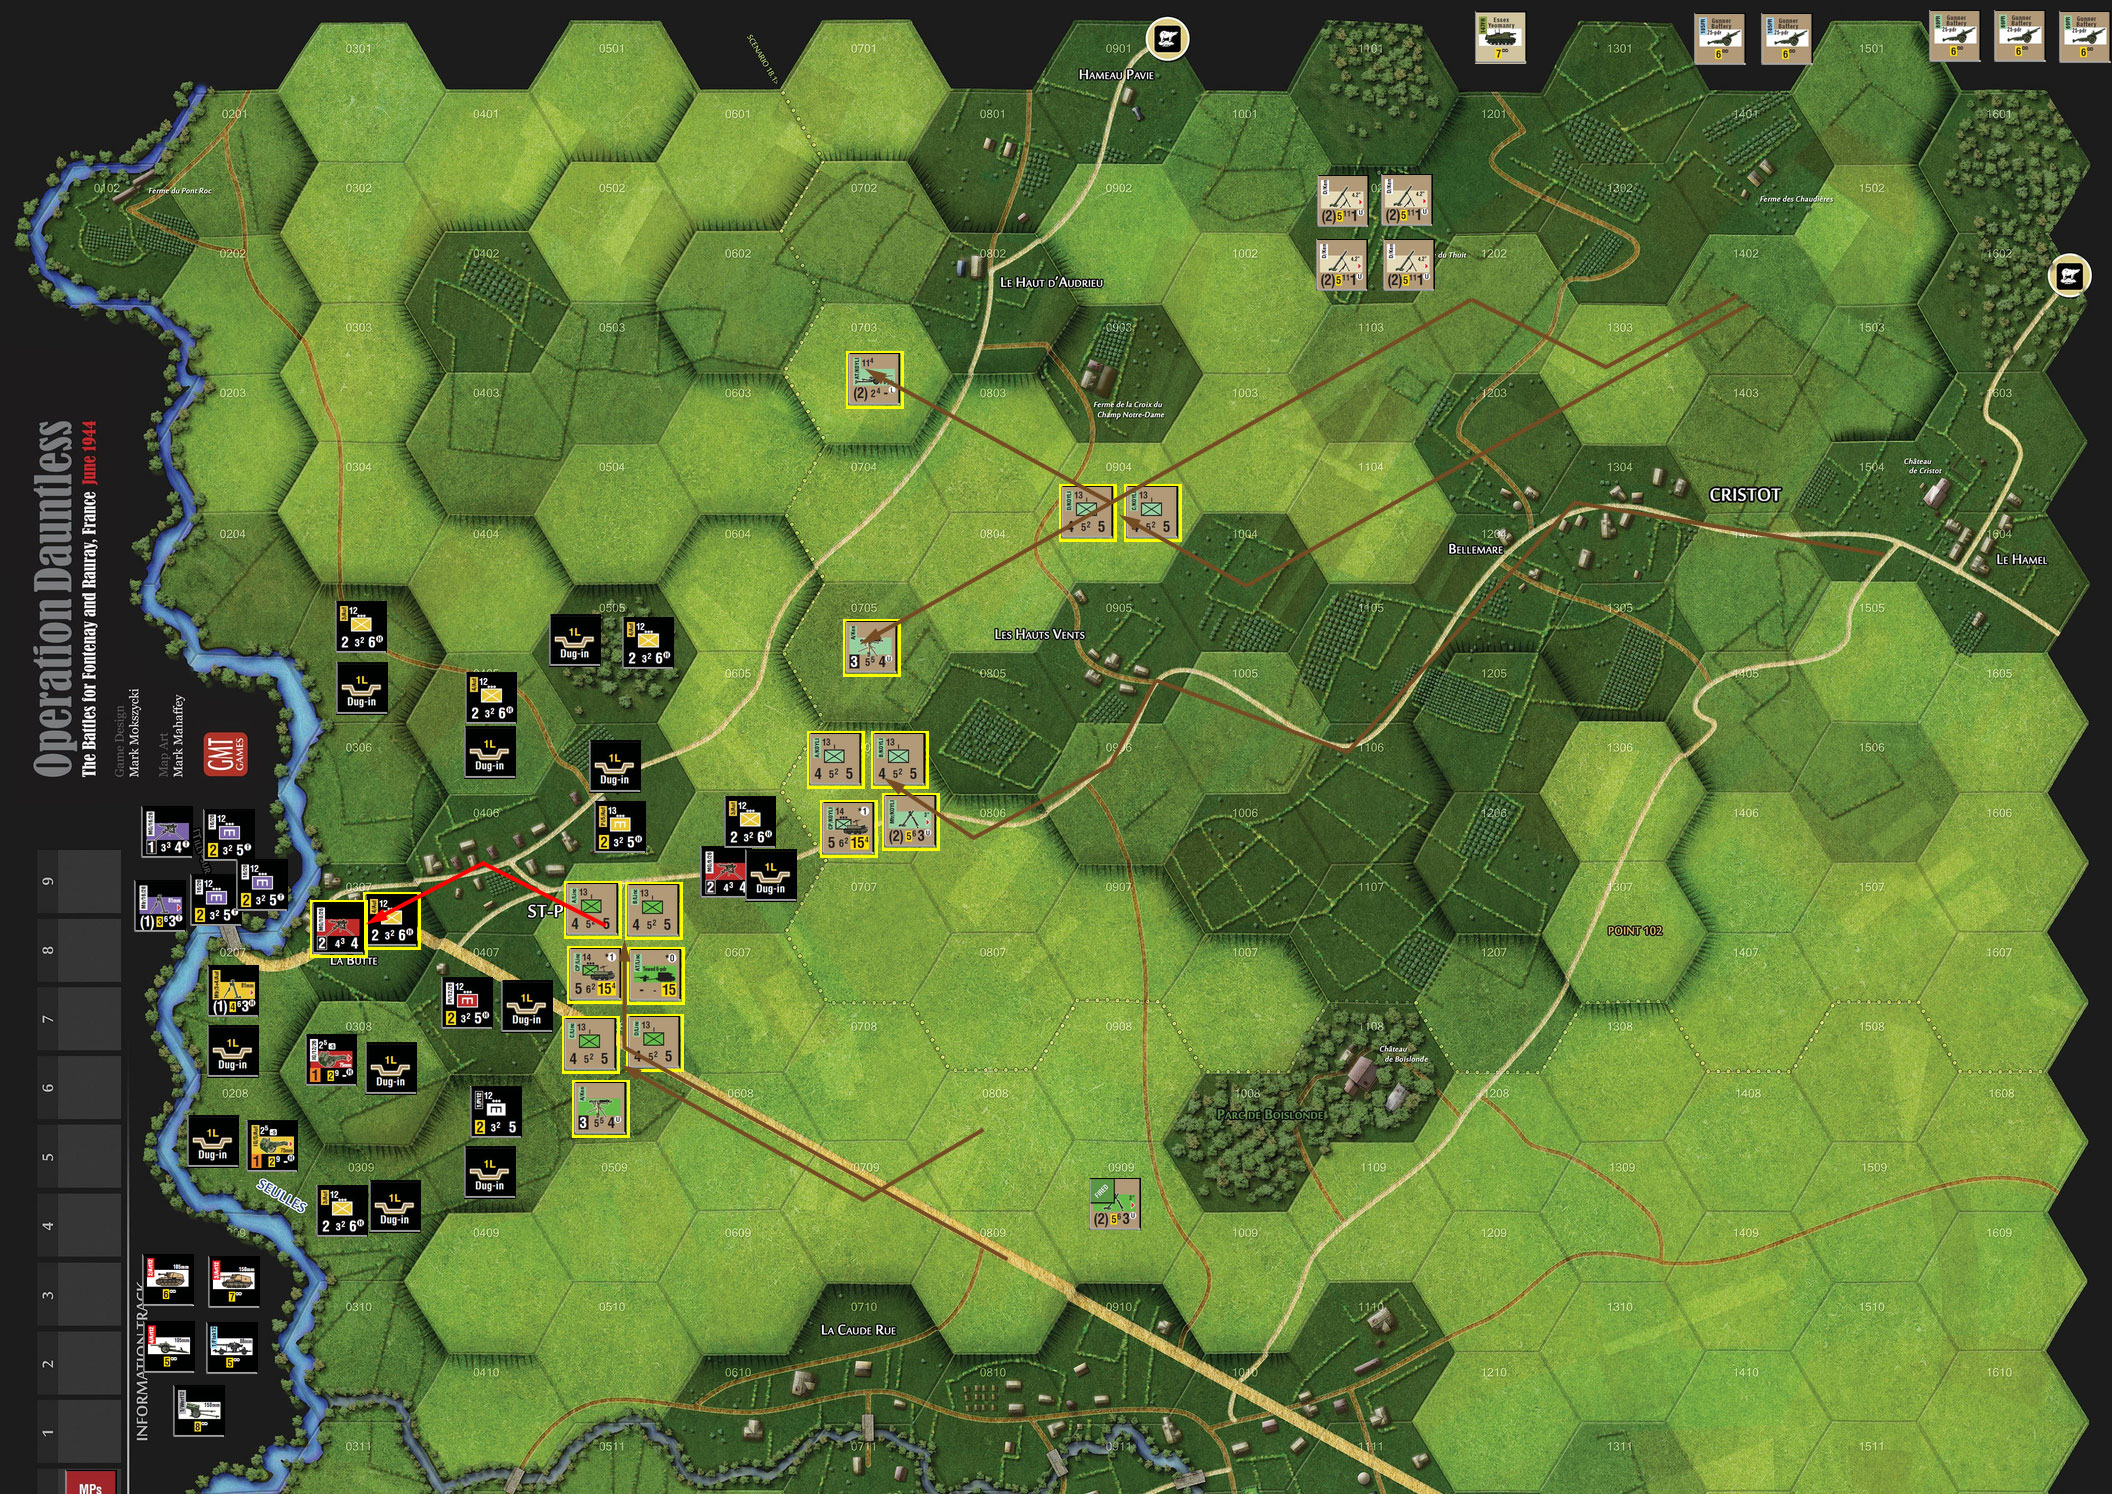
The entire heavy mortar company fired in support of my combat against 0506 with no results (nothing better than an 11; this was a recurring problem for me), and Mark’s use of an adjacent pioneer in support only failed because of an Original 2 roll (Final 10!). But with only a single platoon on defense, he was outmatched, and I took the hex on a 0/2. This left 0606 nowhere to go, but I waited for a bigger attack later, finishing up the turn with an attack on 0408. The IG in 0308 fired in support, and caused a suppression, and a final 3:1 attack with a 1/1 result, driving him out of the hex at the cost of a step.
Mark fired his on-board mortars, one IG and the Wespe OBA battery at the one company in 0506, getting a suppression against them before a desperate assault with 0606 which ended up at 1:1 with a 2/1 result that wiped him out (I retreated—illegally—to 0507, since that should have caused a step loss as well, but we weren’t thinking of the Germans on the other side of that hex at that moment). After that, he rearranged the deck chairs a bit, and occupied village hexes 0406 and 0506.
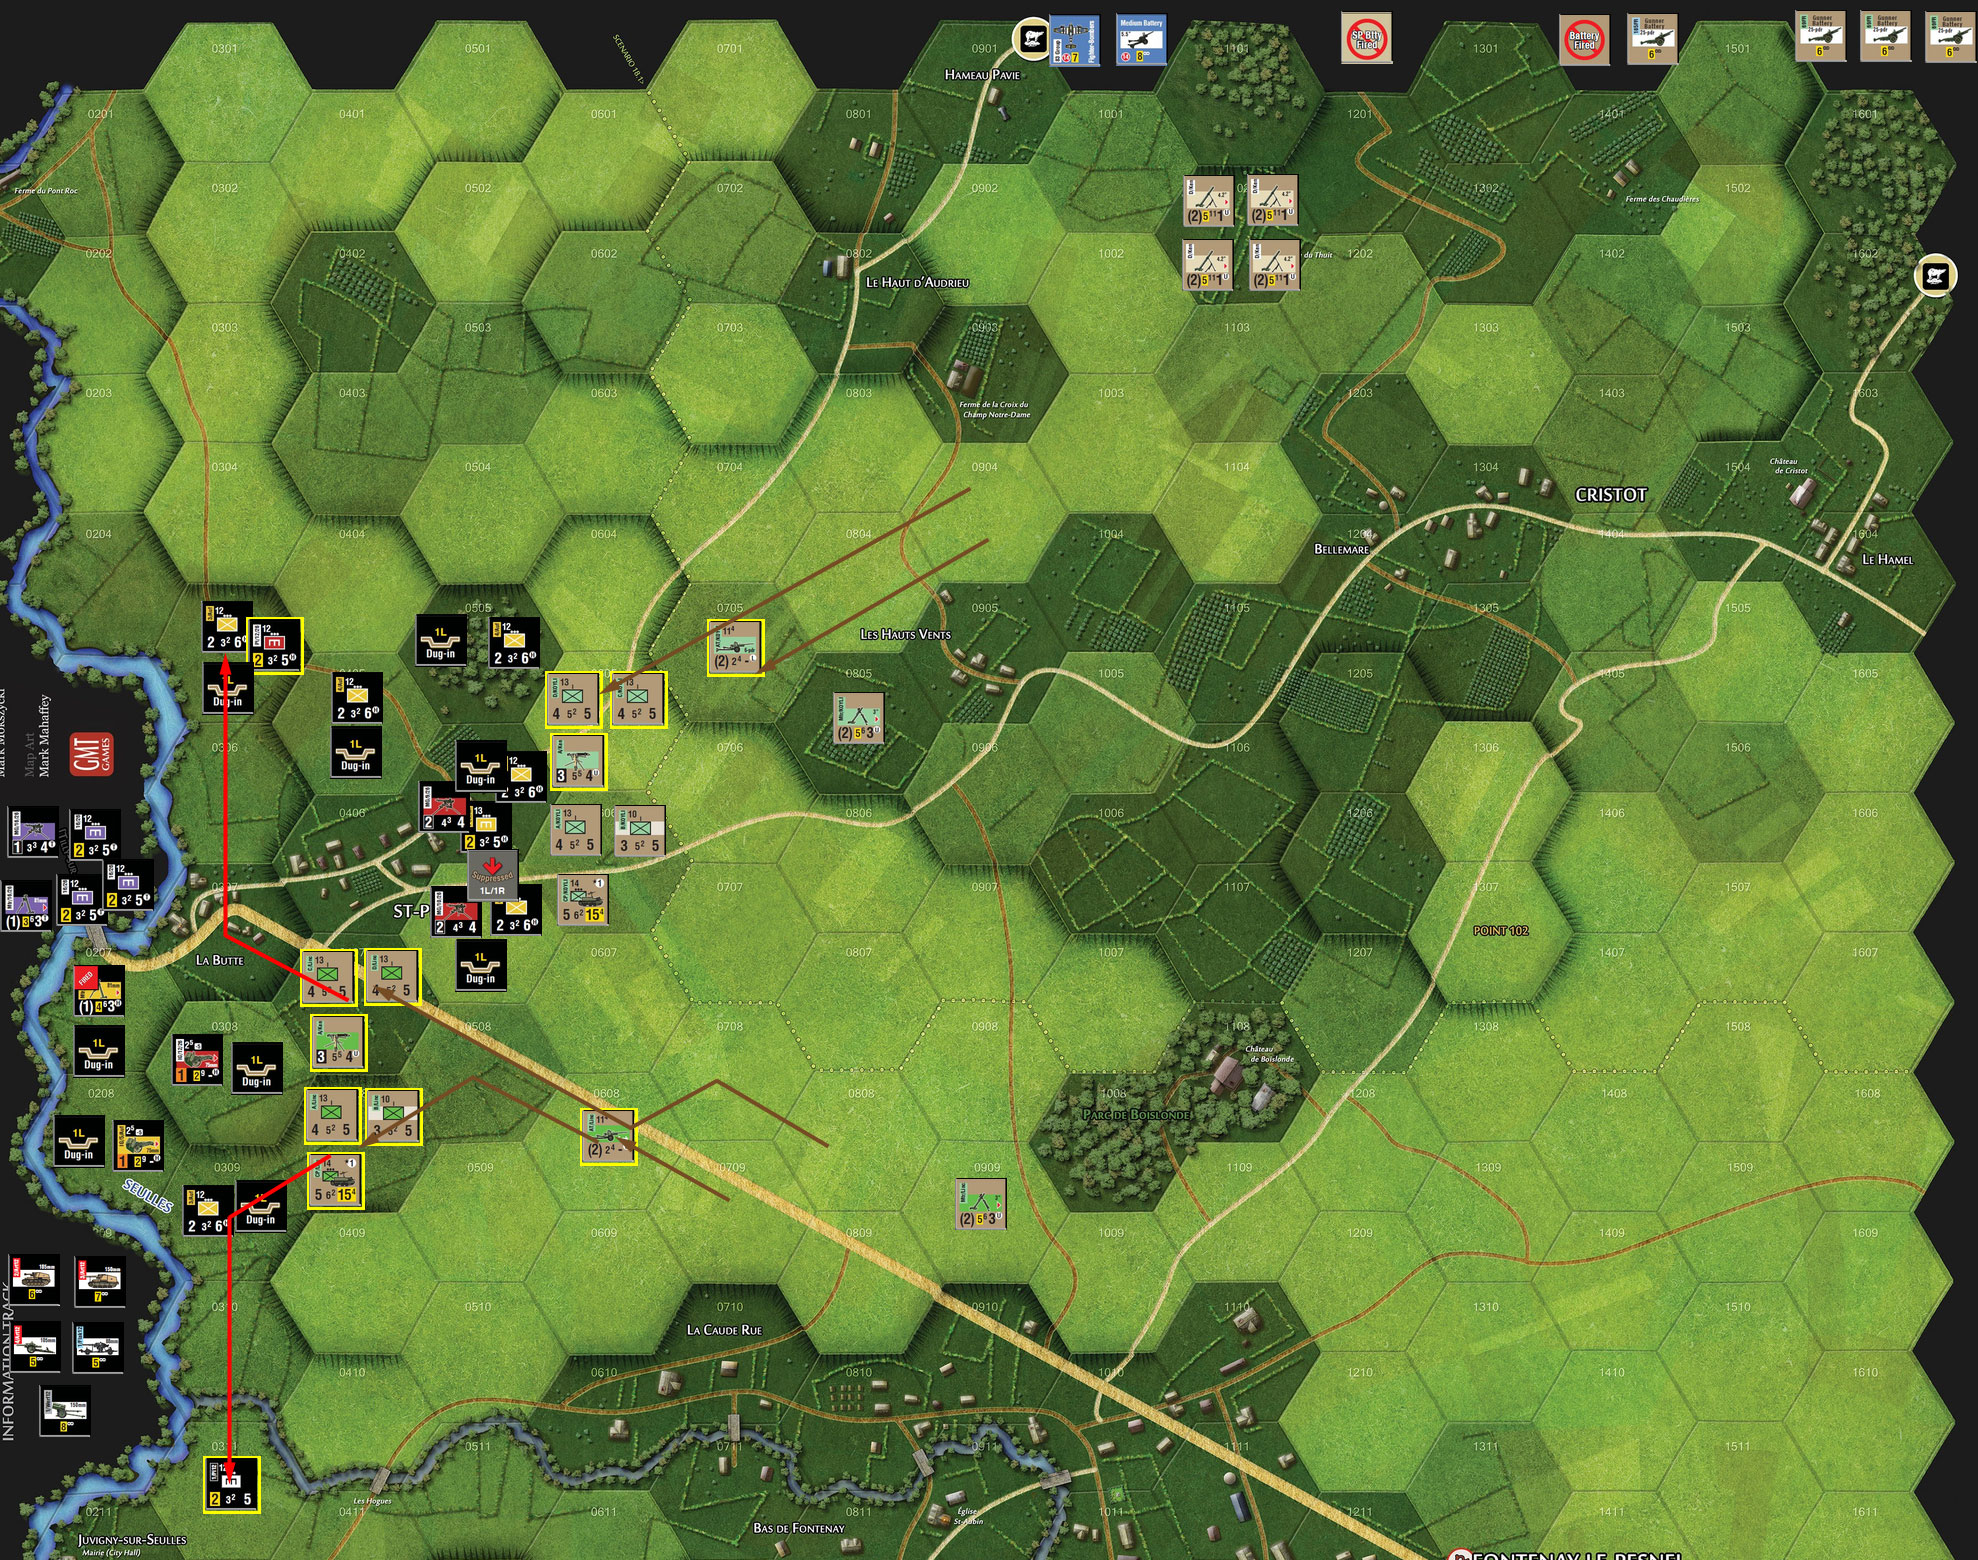
For my second turn, I moved into 0606 and assaulted 0506. This time we remembered Tactical advantage, but we hadn’t yet remembered/rediscovered the bit about range 0 AT weapons, so Mark had an easy time causing a transport loss to my carrier platoon (which doesn’t—usually—harm the unit, but is a VP loss; also the Brits can only take two such losses before VP costs are doubled for more losses in this scenario). I did have a +1 Tactical Advantage to get either D or DDA, both of which let him take a shot. If we’d done it right, there would have been four modifier chit draws for, say, Target’s Combat Strength (-5), Yellow or Orange CS (NA), Penetration (+8, the really bad one for me), and Friendly Inf/MG steps (+1) for a Final 17 (compared to 19 for the ‘wrong’ way). The assault was still a 5:1 for a 0/3 that sent him to 0204.
My trailing companies moved up, I failed to recover my one step loss (1/6 chance…), and I assaulted 0406. This was out of a field, so Tactical Advantage was 0, with the one draw being DADA, giving him a shot at the other carrier platoon. (This turn really drove home just how much the carriers can be a double-edged sword on the assault.) Again, we did this without the four modifier draws, which could have been No DRM x2, Flanking Fire (+1), vs Open Topped (+4) for a Final 13 and No Effect. With our mistaken version, Mark caused another transport loss, which also caused a step loss this time (1/3 chance), but the assault was a 4:1 with a 0/4 result, causing him to retreat to 0203 (this was one of his 6 MA infantry platoons; anything else would have been over the retreat limit and forced to take a loss).
I attacked 0407, with some minimal support (two mortars; I was still thinking all the OBA was one-use), while Mark used a IG and the nebelwerfers. Mine did nothing, while the IG caused suppression, and the nebelwerfers also caused two step losses (against a hex that was a one-step MG section, and a pair of companies, one of which was reduced from last turn). This forced me to eliminate a company, and the combat ended up at 2:3 (starting at 3:1, but the two suppressions were killer) for a 1/0 result that forced me to take another loss with a pair of one-step units.
Since the Germans automatically win if the British lose two units, that was the end of that.
After that fast end, we decided to re-play, but use the first variant of the scenario, which adds in friction fire, and gives the British a pair of assets, plus drawing a new one every turn. (This is where I started sorting out my confusion.) British OBA is just regular indirect fire units that can fire one a turn (the same as the on-board ones), while German ones have to roll to see how long before they come back (most are on d3), while assets are generally a bit better than the normal OBA and are drawn randomly.
Every time a unit/stack moves into or out of a field hex, the other player can make one ranged attack at them (and since direct fire units don’t have a ‘once a turn’ limitation, one MG section in a good position can try to interfere with a lot of movement). Instead of the normal suppression/step losses, successful Friction Fire forces you to stop or take step loss(es) to continue moving. The bad news is there’s fields between the British and the Germans they’re trying to come to grips with. The good news is the ‘bulk’ modifier isn’t used with FF (easier to hit, harder to break up the momentum).
I mentally locked myself into a bad plan, and paid for it hard, losing the game on the first turn with a pair of unit losses. But the road to get there was still educational.
It was a close replay of the beginning of the first play of the scenario. The initial asset draw was nothing (does that go back to the cup immediately when its a before-game draw?), and the first turn’s a Medium Battery. I moved the further units first (who were largely out of sight), and split off the MG section (and AT) to overlook the German positions from 0705, and the mortars went to 0805. Closer in, my initial group moved up to 0607, naturally taking FF all the way, but to no effect. The second group similarly moved into 0508 and assaulted 0507. Tactical Advantage was +3, and I chose AAA (with nothing to shoot), and got a 0/3 on a 3:1 assault, which forced him to lose a MG section and retreat a platoon to 0306.
I attacked 0407, with the support doing nothing, but still managed 0/4 to eliminate a pioneer platoon. But then I attacked 0606. My support did nothing, but the off-board Hummels suppressed me. I had already mis-identified the odds going in, and I ended up with a 1:2 for a 2/0. I decided to flip both companies that were in the attack, rather than take a chance on FF during a retreat. Mark fired the nebelwerfers at my reduced stack on his turn, and did two steps to force two unit losses.
So, we went for one more try, while I tried to figure out how to avoid getting slaughtered by rockets. An obvious solution is to break up the big two company groups (because that +2 DRM for two companies in one hex was a big part of the problem), but that makes assaults much harder to pull off, and they’re very handy for taking apart an enemy position, as an assault followed by a combat can have a dramatic effect, not to mention diluting attacks. I settled for trying to get out of the fields (which are also +1 on ranged attacks) as fast as possible.
This time, my initial asset was a Medium Battery, and the first turn draw was Fighter-Bombers. My initial move got halted in 0608 by FF just before they could leave the fields. The second group got halted before they could even move. The AT/Linc tried moving up separately, but also got halted after one hex. The ‘fast’ part of KOYLI (going down a road of of sight) got to 0706 and halted. They were the only ones who could manage a combat (vs 0606), but I could throw a lot of support at it… including the Lincolnshires, who, despite being halted earlier, were largely in range of the combat. I also used some of the heavier mortars and a little OBA, and the Medium Battery asset, which was one of two suppressions I got (the other being from a Lincolnshire company; they’re only range two, but 5 RA is just as good as most anything else). Mark just supported with two nearby platoons, and didn’t get any results, for the final combat to be a 1/1 to just push him out of the hex, which I advanced into (after failed FF). Mark’s activity was fairly minimal, but various units tried ranged attacks on mine, and he got a step loss against my group in 0608 with an pioneer platoon.
I drew another Medium Battery for the second turn, and a couple of tries suppressed 0507 (Essex Yeomanry, SPA, was what did it), and the lead elements of the Lincolnshires got into 0508 to assault 0408. Tactical Advantage was +2 for me to pick AA, and I forced a three-hex retreat to 0311. Then the other half moved into 0508 and assaulted 0407 to force a retreat to 0305. KOYLI moved up, and the one reduced unit in 0606 tried, and failed, to recover.
Action phase of the second turn.
Having surrounded 0507, I did a concentric attack on it, hoping to cause actual casualties. OBA did a suppression and step to make things even more lopsided, and mortars did another suppression, while Mark did two with Wespes and towed 105s (on-board mortars did nothing), and we ended up at 7:1 and knocked out the defending MG section on a 0/4. I also attacked 0505, and drove his platoon out of the woods on a 0/2 from a 2:1 attack with no effective support. A final attack on 0308 ended up at 11:1 (!) with no support from either side, and the infantry guns there were knocked out (being immobile).
Mark sent two platoons down to defend 0307, and his southern retreat up to 0309. He also shifted his remaining IG to 0307, instead of defending alone in 0208 (since they use halftracks for transport, at the points they were entering enemy ZOC, they were armored, and ignoring ZOC, which was a bit of surprise). And of course, the first round of reinforcements came into 0207. He pounded 0606, and managed a couple suppressions in each phase, but couldn’t do more.
I drew Bombers for the turn 3 asset (9!). 0505 assaulted 0405 for a 0/3, both of my reduced companies tried to recover, and failed. Past that, I shifted units around a bit, and tried to cover more ground. This led to a concentric attack on 0506, where I got one suppression (from OBA, everything else missed, including the Fighter-Bombers), and Mark only used the nebelwerfers… who did two steps plus suppression, to flip everything in 0606. Thankfully, a good roll on 2:1 generated 0/3, and he lost a platoon and retreated to 0504 (otherwise, the MG section would have over the retreat limit). Then everyone else hit 0307, with the SP guns in support (who did get a suppression, but used the rest of his OBA, and the Hummels also got a suppression), and a final 4:1 generated 0/3, forcing two losses (the IG couldn’t retreat, one was lost going through my ZOC, and the last retreated over the Seulles to withdraw). After going back-and-forth, I tried bombing 0504 to knock someone out (I had a +3 for ranged attacks from them being in a field and having retreated already), but a poor roll only suppressed them.
Mark moved last turn’s reinforcements up to 0308 (I had advanced out of it), and moved a platoon there from 0309, while the new set came in to 0207. 0203 moved up to 0305 and the MG section in 0504 tried to do the same (my FF halted him in 0304), and the engineer there was halted before they could leave the hex.
My turn 4 asset was another Medium Battery, and the entire contents of 0506 tried recovering, with only the carrier platoon succeeding (rolls: 1, 1, 6…). My other reduced company also recovered (on a 6…). Two companies moved out from 0406 to assault 0309 for a 1/1. And I finally remembered to have anyone not otherwise occupied start digging in. I went for an overwhelming combat against 0308, hoping to force actual losses on the position. To my surprise, my on-board mortars caused a step loss, though I got no other results on four tries. The Wespes were back, and fired in support, for a step loss against 0309. A 7:1 generated a 0/6, which indeed wiped out the remaining units (without the step losses, it would have been a ‘mere’ 5:1, the actual top of the table).
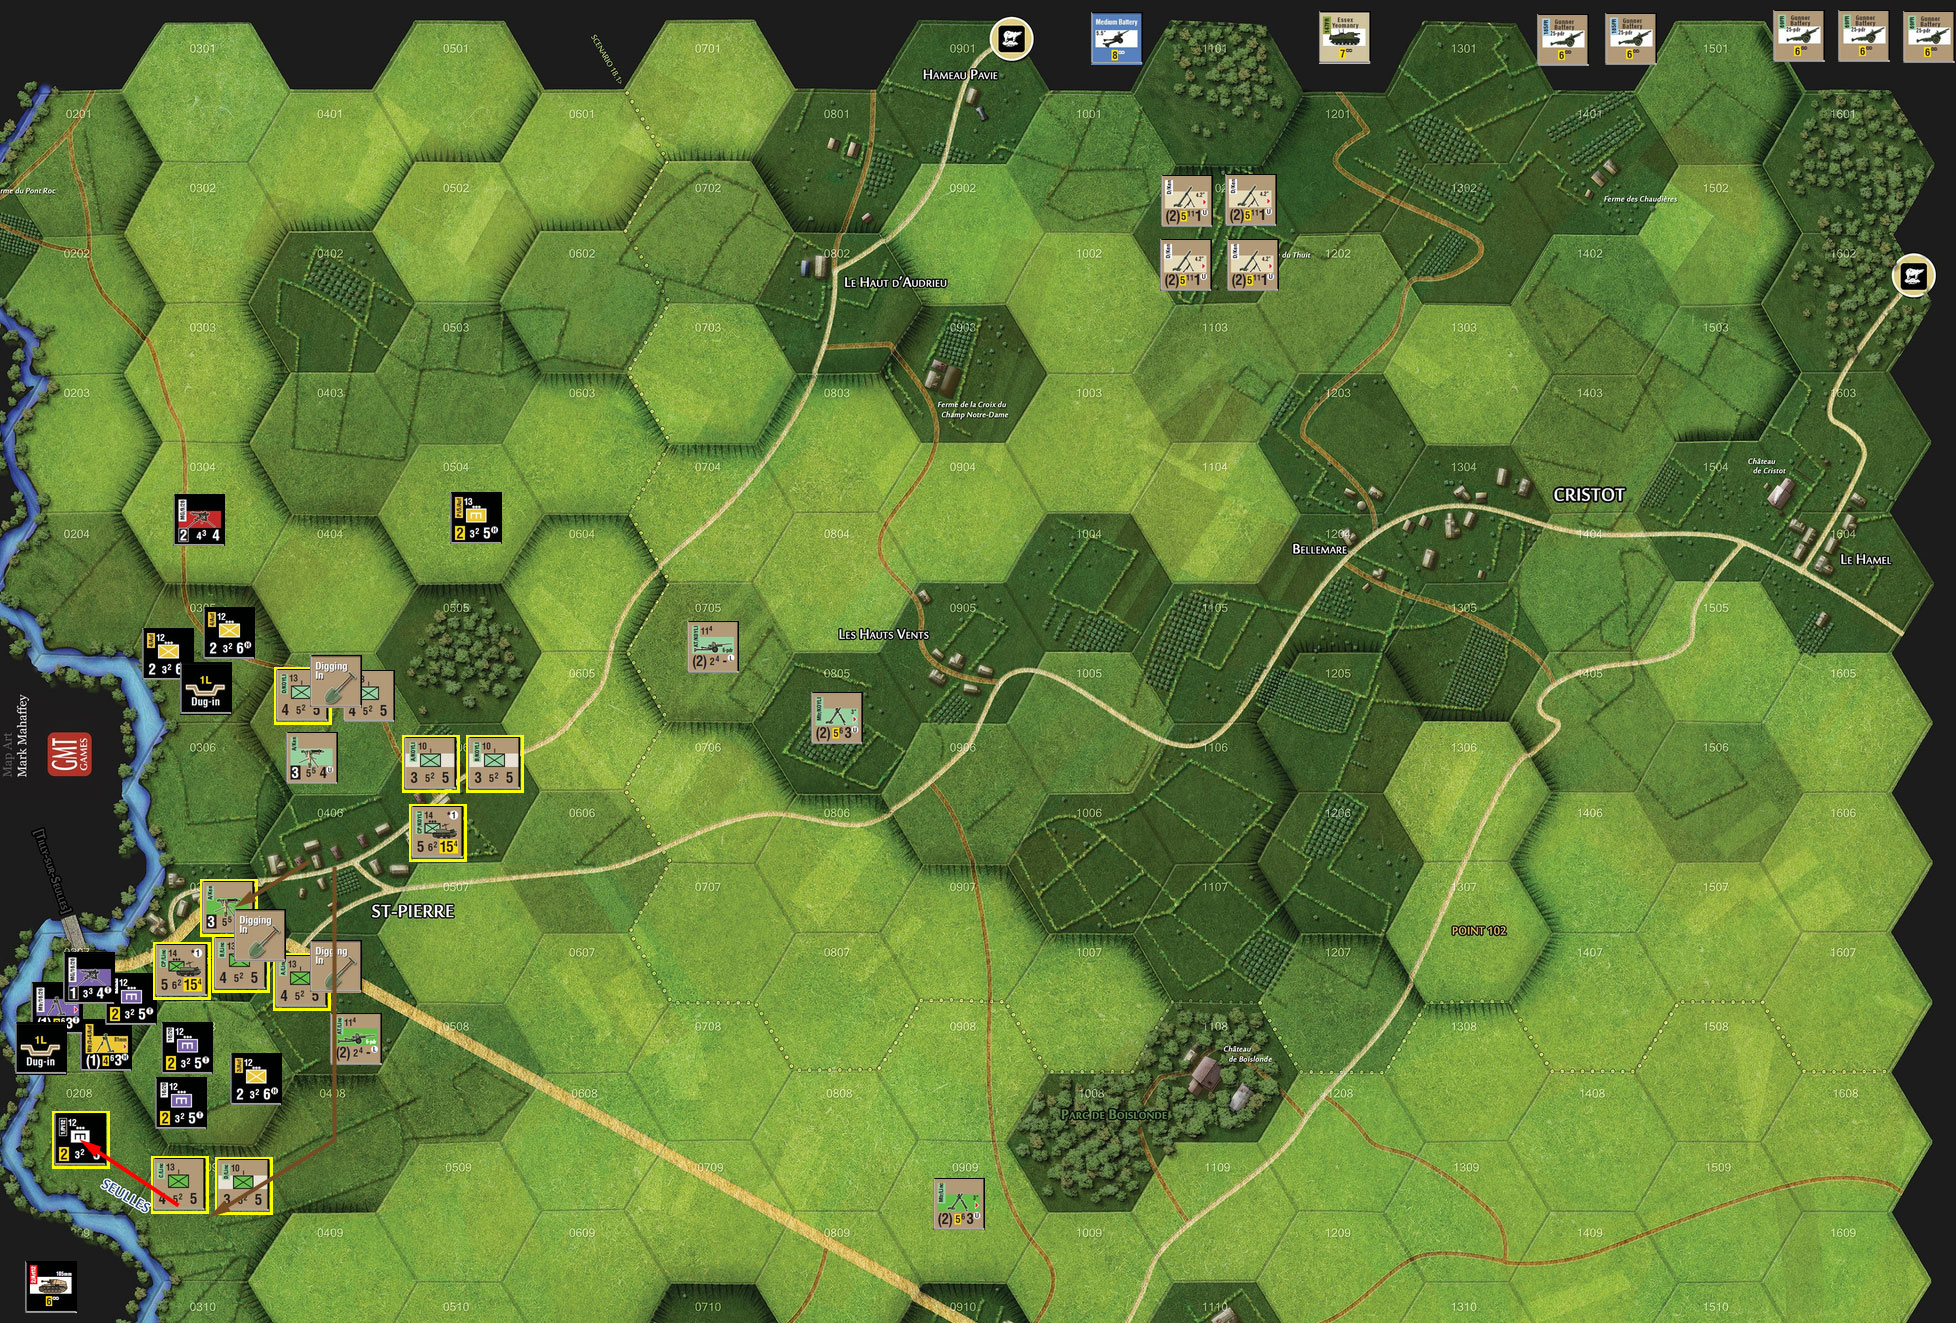
Mark withdrew his two mortars (the most vulnerable units), and consolidated in 0207 and 0305. The pioneers in 0504 headed to engage my unprotected AT guns in 0705, and I failed to stop them through FF, and he got a 0/1 on a 1:1 assault, which eliminated the immobile guns (I was hoping for something at least a bit more mutual at those odds).
My last turn saw the Fighter-Bombers return, and I moved up into 0208 while 0506 recovered (with one company succeeding), while the carrier platoon moved to engage the pioneers in 0705. Much of the available support was thrown at the 0207 combat, with no results on either side, and a 1/1 caused Mark to lose a platoon (better to lose a VP for that than the one-point swing of me taking the hex). On-board mortars were used in support of 0705, getting two suppression and a 0/4 (over the retreat limit) on a 5:1. And I didn’t bother with attacking 0305.
Afterword
I was down a step on four units at the end, and lost one unit. The Germans still had control of about six bocage hexes for 11 VPs. (VPs are by the normal ‘loss’ schedule, and one point per woods/bocage hex near 0207, and 2 per village hex.) The Germans had lost ten units, and I had control of the entire village, plus another seven hexes, or 25 VPs.
So, a very convincing British win, but it took three tries to get even close. The nebelwerfers still caused havoc, doing two steps to me, but that time, I could take the steps.
Meanwhile, I had problems getting my support to do anything. It got a lot better at the end, but with dug-in (-1), and terrain of +0 or -1, my 5-point mortars were pretty much useless until the second half. The Gunner Batteries were a little better, but the Essex Yeomanry SPG were the only thing really helping out at the start. I probably should have just thrown more of the batteries at combats, but I was trying to make sure I had something with some punch on hand if the Germans found a counter-attack opportunity.
Friction Fire is interesting, and certainly does its job of making progress over open ground uncertain. I was in a big hurry to get under cover, but FF made that more difficult. Once I had Mark backed up against the river, things were very bad for him, since I could concentrate on a few targets at a time, and could pick which ones I wanted easily
Discussion ¬