
J184 Dayan to Meet You
ASL Journal 12 features a number of interesting scenarios, one of which reuses part of the Journal 2 Kakazu Ridge HASL map for an action in Syria. After our latest game, Patch and I were kicking around ideas for DTO or French, so it was pretty natural for J184 “Dayan to Meet You” to come up. The scenario uses a bit under a third of the original map, and has one overlay to add a stone building to the mix. Several ‘debris’ hexes are treated as hammada (the art used isn’t bad for that either).
The scenario goes 5.5 turns, with both sides getting reinforcements for the bulk of the game. Also, there’s a +1 LV for the first two turns of the game. The French have an 25mm AT Gun in the stone building, with a light MTR on the roof, and then also have three green squads in the main victory area. On turn two, they get two first line squads in trucks, on turn three, they get an AMD 50 AM armored car and two and a half elite cavalry squads with an 8-1 (their only leader with a negative modifier).
The British are trying to either take all six buildings on the board (the stone one, and five wooden ones in the French setup area), or take a bridge slightly behind the French setup area in GG8. They enter with two elite squads and two HS, with a 9-1, hero, and a DC (possession of DCs also make British troops Fanatic by SSR). On turn 2, they get another two squads and 8-1, on turn 3, a squad and a half with an ATR, and on turn 4, a squad, hero, and DC.
Patch took the Vichy, and setup in his assigned area, using spare “?” to create a Dummy stack, and fill out another to look equal to his main 8-0+squad+LMG stack. I contemplated a rush down the east side, towards the bulk of the buildings, but went with a center advance with the idea of most of my troops being out of sight of the main village while getting closer to it, and also being able to support a quick rush on the separate stone building in Z13.
With my guys only visible to Z13, Patch didn’t have a lot of fire against my advance, but what he had was effective, pinning a HS in AA15 (and keeping it from advancing adjacent), and his MTR broke the LMG squad as it stepped onto the map. I ended up grouping everyone for large firegroups against Z13 without doing much else.
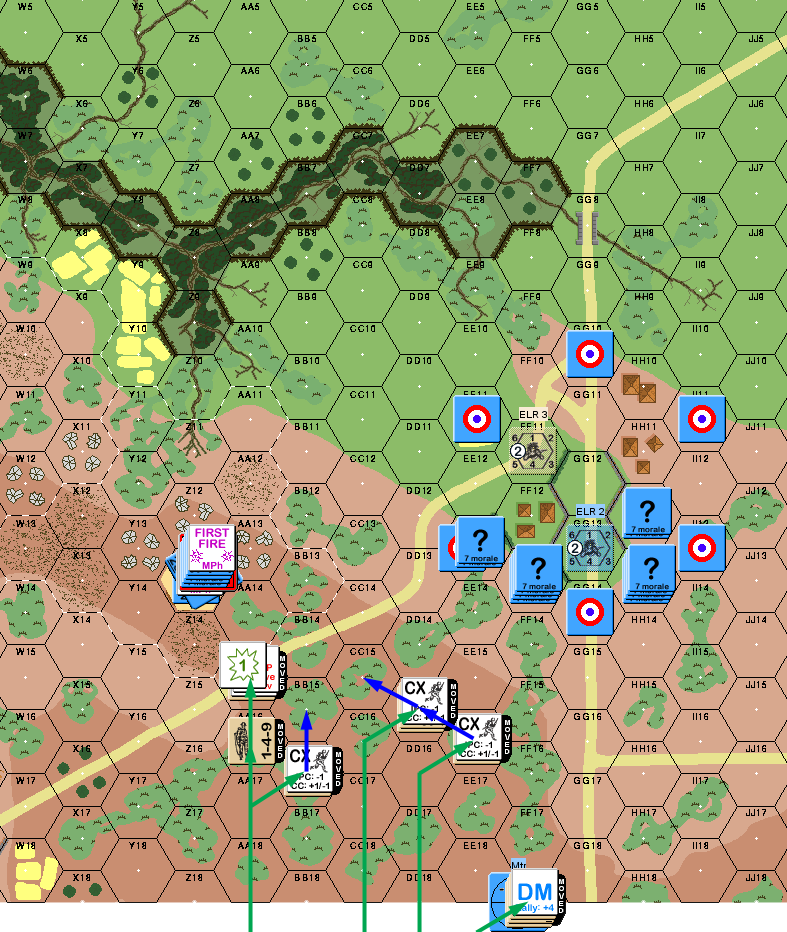
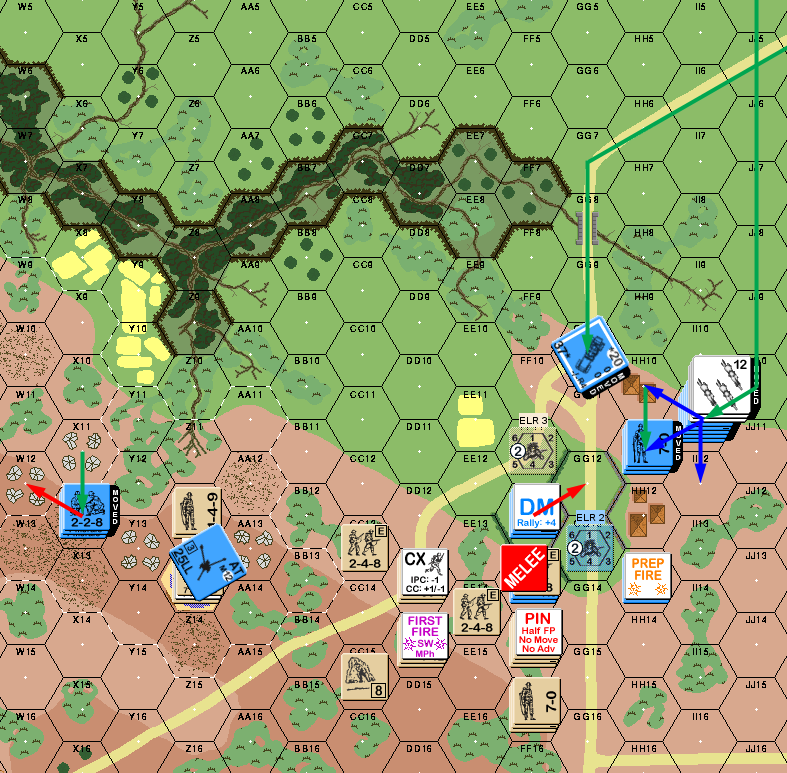
Situation, British Turn 1 showing the full board. The roundels are the limit of the French setup area.
My squad rallied immediately on Patch’s turn, and his defenders Prepped without result (his MTR missed a shot at the dispersed firegroup, and his ATG crew rolled a ’12’; if only they’d been reversed). Patch moved one stack to complicate things near Z13 (it soon came under suspicion, correctly, of being a Dummy), while another shifted to the west, preparing for my advance. My fire had no effect.

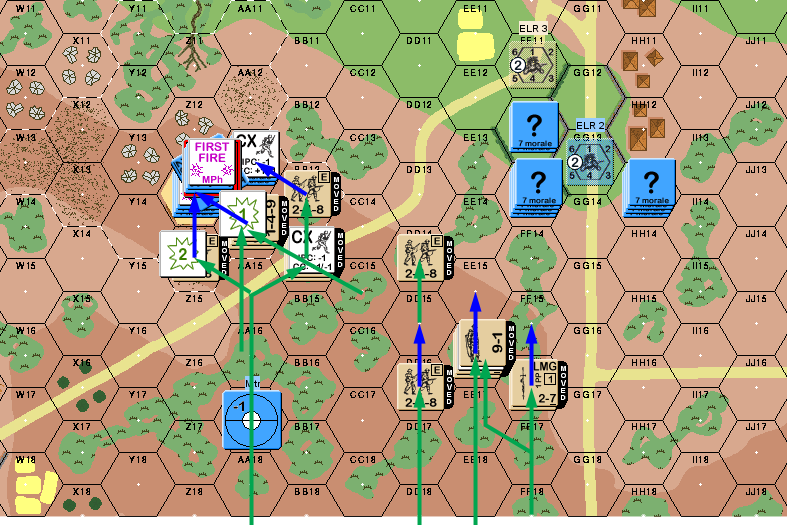
Situation, French Turn 1.
For my second turn, I lined up a HS and the 8-1 to support the assault on Z13, while the other squad and a half went to start putting pressure on the village (where they’d be close to where the 9-1 entered last turn). My lead HS moved adjacent to Z13, and took a NMC without flinching, and then the DC HS moved into a different adjacent hex, and a third HS moved adjacent to the “?” stack in AA13. The Hero moved in to help the second HS, and thankfully passed a 1MC from residual, from one Patch’s better rolls so far.
I DFPh, Patch revealed his main stack in the village to take a shot at the single HS that had come into view, and I passed the NMC that resulted. My massed firepower on the doorstep of Z13 had no effect. I advanced up to the ridgeline overlooking the village, and into CC with the defenders of Z13. The stack that he’d sent over proved to be a Dummy, but the French got an Ambush in the building itself thanks to the 7-0 leader there still being concealed. He took the opportunity to Withdraw the leader and crew, leaving the MTR HS Encircled on the roof.
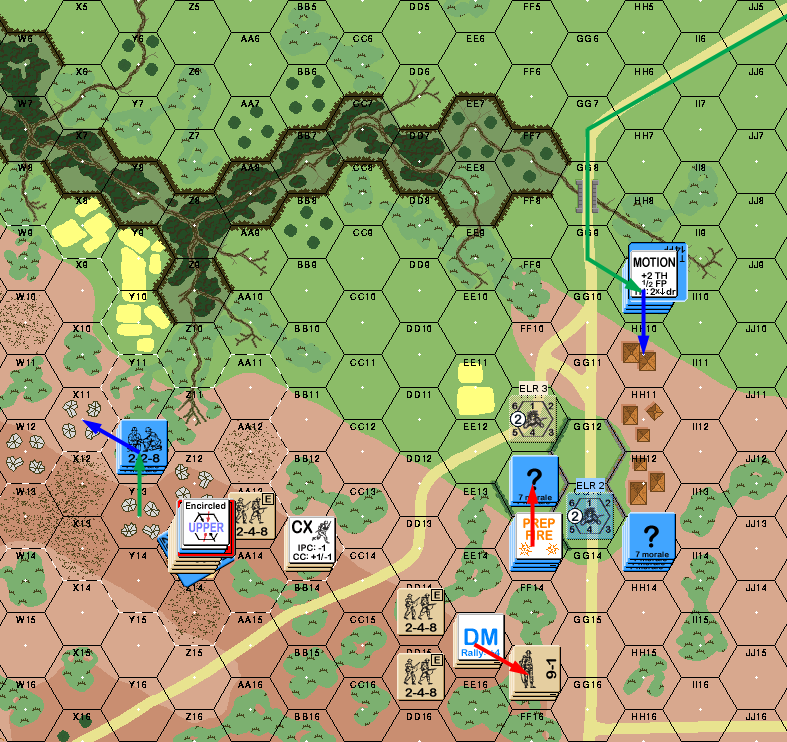
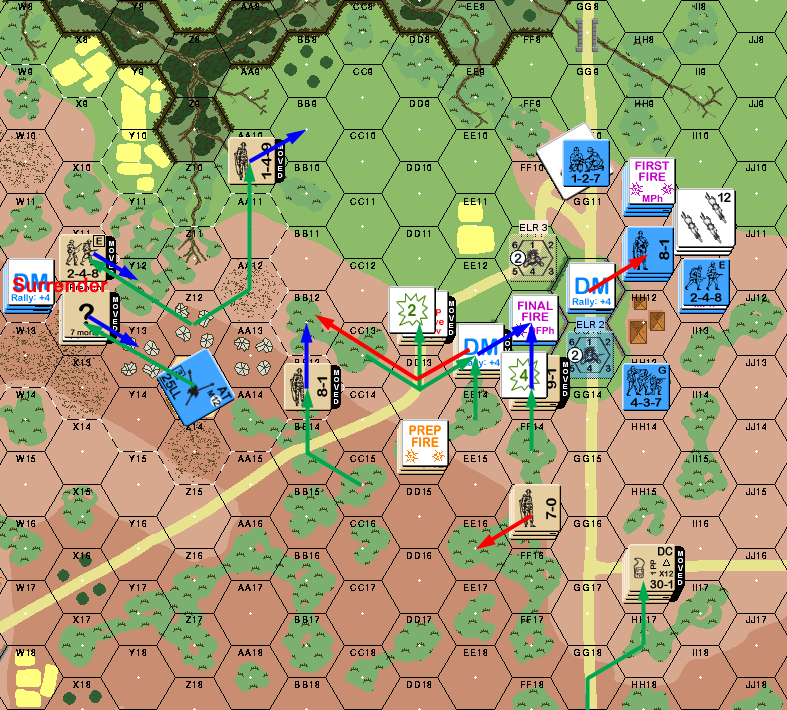
Situation, British Turn 2.
Patch spiked his MTR on his turn, and contemplated that it might be best for the MTR to run out of the building so they can’t get trapped like this. Patch’s main stack prepped, and reduced the squad in the middle of my FG line to a broken HS when they rolled a ’12’. Despite wanting to, I couldn’t really reach the French trucks as they entered and unloaded their cargo behind the ridgeline behind the village. My fire pinned the HS on the roof of Z13, and a lucky shot got a 1MC on FF13, but while the 8-0 broke, the squad only pinned.
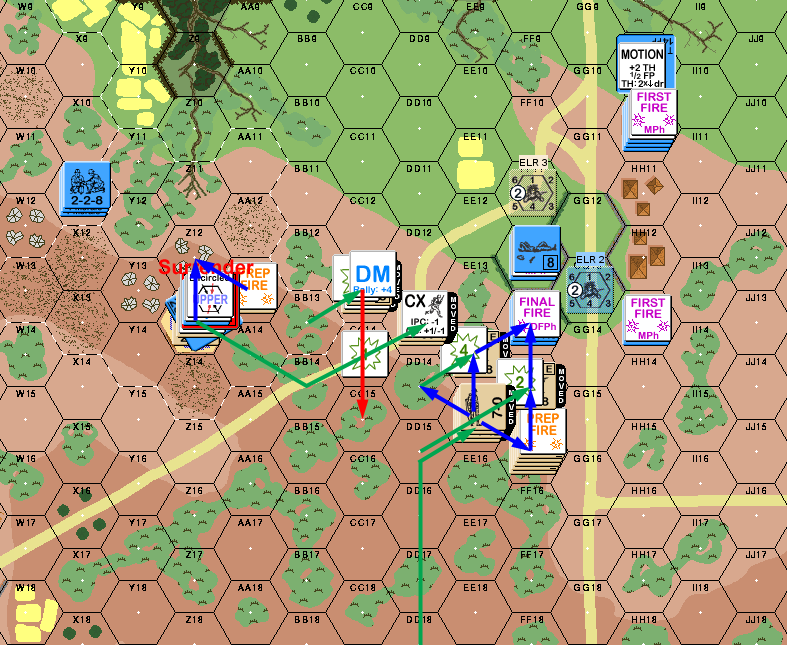
Situation, French Turn 2.
I set up the next group to go reinforce the main force headed for the village, and nothing rallied for my turn 3. A couple more shots finally broke Z13/r, leaving me free to move without fear of them getting lucky. The big push this time was to clear out FF13, finally giving me some real cover, and allowing me to force Patch out of FF12, leaving the three buildings on the east side of the road to take. The first two HSes got into position, with poor rolls from Patch keeping them out of trouble, but the advance of a HS+8-1 was halted when the leader broke and the HS pinned (they were due to go into EE13). He also tried for a FL at one point (to my surprise; there wasn’t much left to move at that point), but only malfunctioned his LMG.
My advancing fire pinned the squad in FF13, and my two HS advanced in and got Ambush… and still managed to do nothing, while the pinned French squad knocked out a HS.
Situation, British Turn 3.
Nothing came back for either of us on Patch’s turn 3 RPh, and my big problem was that I had no way to prevent the entering cavalry from just going down the east edge and entering the village from the rear again. The AC parked on the main north-south road, and I took a shot at it with the ATR, but missed. On the other hand, a shot at his crew and leader lurking on the west edge broke both of them (ELRing the leader to 6+1). I also got a PTC on the turn 2 reinforcements, who’d just advanced to HH11. Thankfully for both of us it wasn’t anything more, as the 7-0 rolled a ‘2’, and the first squad rolled a ’12’ (the second squad also pinned to it). The AC fired on the ATR squad and just barely missed (3 + 6). (“Yikes!” “Yeah, wish that was HH11 vs FF14″—and then he rolled another ‘3’ for that attack. Thankfully I did no worse than pin on the resulting 1MC.)
The Melee in FF13 wrapped up with both sides killing the other. (I had figured my HS wasn’t going to live, and had even fired into the Melee as I had higher morale. No effect, but taking the squad out with the HS was going to have to do.)
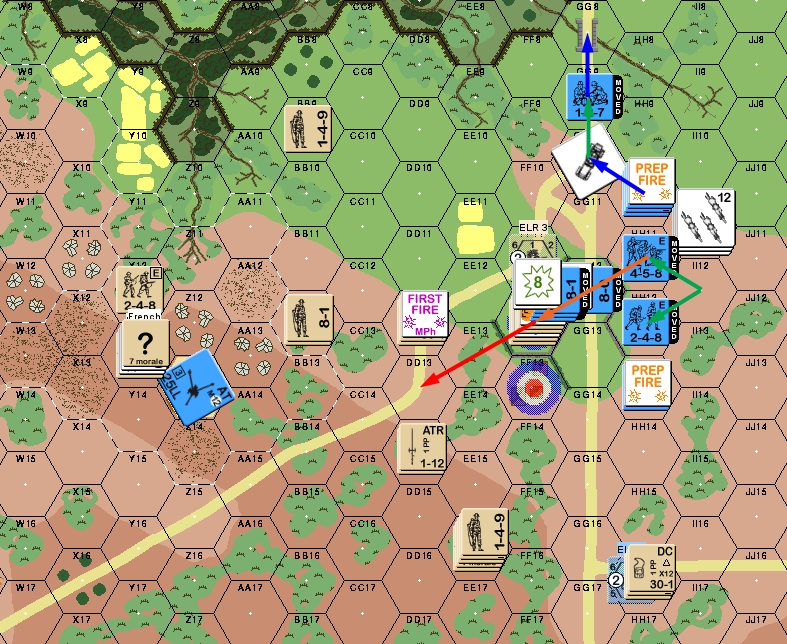
Situation, French Turn 3.
My 8-1 self-rallied for my turn 4, but nothing else did. The last set of reinforcements set up on the north-south road, with the idea of getting putting pressure on the east side of the village in a turn, while the rest continued driving in from the west. I was a little nervous about this, as there’s no leader with this set, and if the squad broke there went the entire movement. The ATR connected with the AC this time, and killed it, with the crew bailing out. The squad then got a 1MC on HH11, but everything there passed.
I pressed in on FF12, getting the 9-1 and a squad and a half adjacent (another HS broke as it moved in). One long-term idea had always been to try and swing someone wide around the village to threaten the bridge in GG8, and now the first-turn hero started heading that way, but a HS I was planning on moving to join him pinned in DD12, cutting his movement short by a couple hexes. My Advancing Fire managed to pin the squad in FF12, but at the cost of Patch’s Sniper going off and killing the turn 4 hero in HH16. This also delayed the HS there, as they stayed to pick up the DC the hero had been carrying.
This time I got into CC with a squad and a half plus 9-1 vs a squad, and took out the defenders for no losses.
Situation, British Turn 4.
Patch’s 8-0 went berserk in rally. …This was a problem, since he was in one of the main stacks of defenders, and sent the 8-1 and two squads berserk with him. My HS in EE16 rallied, Battle Hardening back into Elites, and generating a hero. Patch took a shot at FF12 in Prep (the destination of the Charge), but couldn’t get an effect.
Unfortunately for me, the Charge was directly across a road, and there was a wall in the way. As I was in buildings, I didn’t have WA, and the shot would be at +1 (+0 if I used my leader) and half FP (for Dashing). I decided to take a moderate shot, and just used the squad; saving everything else for a TPBS. A ‘2’ generated a 2MC that everyone but the 8-0 passed (wounding him and leaving him out of MF in the hex. The 16FP followup only did a NMC that everyone passed, and the final shot broke my squad from FPF.
…And that let all the steam out of my attack. Patch’s fire did nothing, and facing 3-1 odds, the HS self-broke, and everyone routed out of FF12. That left out of position to win. Moreover, Patch moved his vehicle crew to the bridge, showing that he hadn’t forgotten it, and even if I could get to it, I’d have a fight on my hands. I conceded near the end of Patch’s turn.
Situation, French Turn 4.
Afterword
I’m not sure either of us has seen such a large berserk group before. If it wasn’t for the keeping me from getting the -2, that probably would have ended they way you’d think. From there, I’d still need to get into the final three buildings (or take the bridge if he felt he couldn’t send someone there), but it’d have been a lot easier. As it was, if I had time, the plan would be to draw the ‘zerkies into an actual Open Ground charge, and try to shoot them up so I could retake FF12. And then deal with the rest.
Before that happened, I was well aware that I was short on time, and facing too many French troops. I had early on considered going up the east side and trying to mix it up in the buildings before the reinforcements could consolidate. But, I wanted to be sure of Z13, and not have it be a thorn in my side because I couldn’t dedicate enough effort to it. That worked.
Either way, this was a fun, and surprisingly fast-playing scenario. It also seems popular, as Patch and I had a number of watchers on our on-line VASL sessions, and we usually don’t see that many.
Discussion ¬