
Two Rounds of Cronium
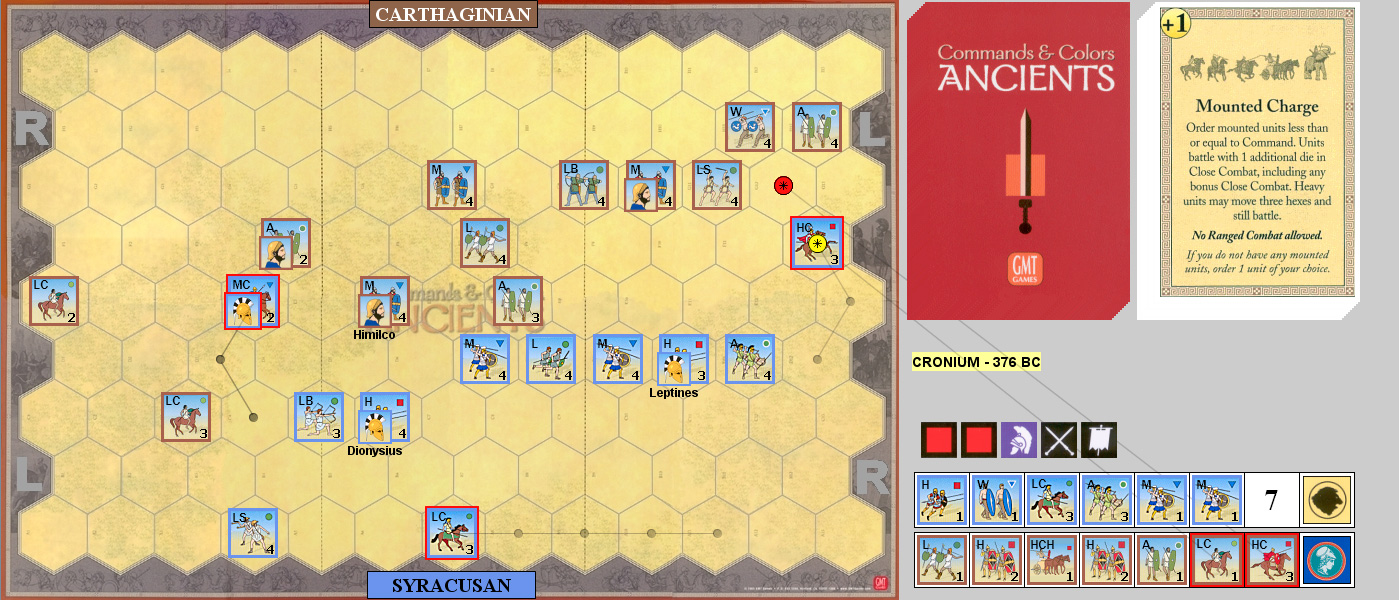
Patch and I did our usual pair of Commands & Colors: Ancients games between bigger things recently. This time was the Battle of Cronium from the second bonus pack from GMT. Set during the Tyrany of Dionysius the Elder of Syracuse, it’s very different from the Greek/Spartan contests we’ve gotten used to lately. There’s no hoplites (possibly this should get an Ex6 update), but there is a wide variety of everything else. Both sides have light, medium, and heavy units in both infantry and cavalry, and both have a unit of Warriors, and the Carthaginians have a Heavy Chariot unit. There’s a lot of units, and the goal is seven banners, so its a pretty big scenario as well.
I had the Carthaginians in the first game, so Patch went first with Order Three Left. Both of us then used cards that could order units all over to bring things up and dress the line. I used Move-Fire-Move to move light units up, and got my LC into archery range before pulling them back a bit, but did no damage. Patch used Coordinated Attack to move forward two Heavies, and got a LB into range who then did a block to an Aux on his first die roll. I used a second Move-Fire-Move to do a block to a Heavy, and forced his LB to retreat, taking a block in the process. Patch moved forward with a Line Command, burying his LB behind the rest of his line in the process. I then Darkened the Sky to do two more blocks to the same Heavy, a block to another Heavy, and two hits to a Medium.
Our armies finally came into contact as Patch Ordered Four Left, wiping out a Light and reducing a Heavy to two blocks, while I was only able to take a block off a Warrior and force them to retreat. I Ordered Four Right in turn, knocking out the weak Heavy and forcing his LS to evade out of line. Patch continued with Order Three Left, doing a block to my HCH who forced his MC back to the baseline in turn. He also did two blocks to an Aux, but they did two in return to his Warriors. And I continued the action with an Order Three Right, finally getting my leader on that flank in play, but my weakened heavies muffed their roll, and were wiped out by battle back from the Syracusan Warriors. The Leader-led Heavy forced an Aux to take a block and retreat, and used Momentum to finally knock out the Warriors. Patch used Order Lights to order two of his remaining four units on the flank, and moved his LB over there. An attempt on my HCH backfired with them wiping out a LC, but then they were eliminated by the LB. While his Aux did two damage to my remaining Heavy, they in turn the Aux out, forcing his leader to run back to the MC still on the baseline (and that leader’s third change of command). On his right, he did two blocks to my LC, who forced one of his to run back to the baseline. I continued the main confrontation with Order Two Right to use my LC to pick on his LS, but but while I forced an evade to the baseline on the first, the only damage from the second battle was a hit to my LC.
Patch used Out Flanked to continue switching the action to both flanks. He knocked out the Heavy and the Aux left on my Right, forcing my leader to run towards the baseline alone, but couldn’t finish off the wounded LC on the other flank. I used Order Three Right to move the leader up the remaining center line, and my LC made another attempt to knock out units, but only managed to take a banner in battle back with one of them. Patch Ordered Mediums to make his center active, and did two hits to my newly-led Aux, and forced them back two hexes, though they did do a hit to a Medium in the first combat. I then used Double Time to get most of the center in action, forcing his MC to evade, and knocking out two Mediums, while one of my units was forced back a hex. Patch then mopped up with Mounted Charge, knocking out my weak LC, and then using momentum to take out my HC. 7-6
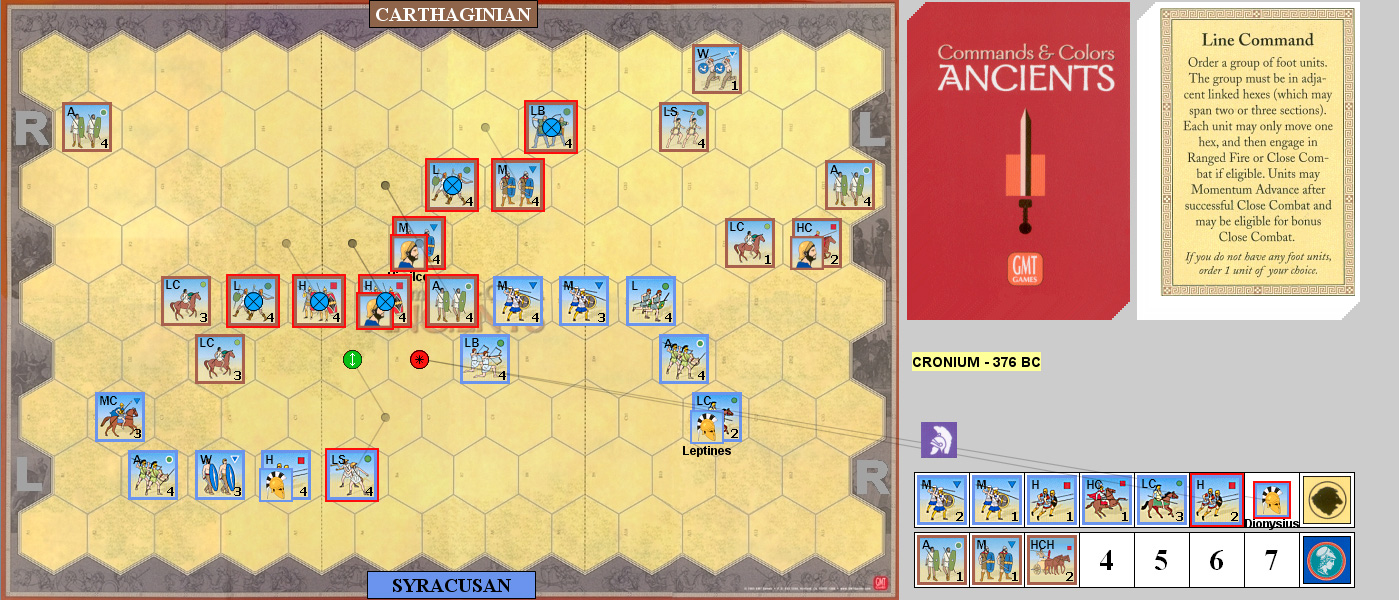
In contrast to the first game, when I started as Syracuse I had no Left Flank cards in my hand at all, started with Order Four Center and took a pot shot at his HCH to no effect. Patch Ordered Lights to start bringing up units, and picked on my LC with his to no effect. I Ordered Four Right to do a block to his LC (they evaded in the face of Heavies, and then lost a block to a banner from archery). Patch moved up with Order Three Left, and I did the same with Order Two Center. Patch Ordered Two Left, and did a block to my LC as they evaded. I used Line Command to bring up everything other than my left flank, but scattered archery had no effect; Patch Ordered Two Center with similar results.
I Ordered Three Center to finally get us in contact, and knocked out an Aux in return for taking two blocks. Patch used Coordinated Attack to dress his line a bit, and I Ordered Mediums; on the right, we traded three blocks each on Mediums, and Patch knocked out my weakened Medium in the center with a First Strike. Patch Ordered Two Left to knock out the weak Medium and do a block to the Heavy next in line. I Ordered Three Right and knocked out his weak Medium, and on momentum did two blocks to his Warriors, who also lost a third block on a two-banner retreat. Patch Out Flanked me, and got his leader up to his HC to knock my HC down to a block and force it to retreat, using momentum to take my Heavies down to a block and force them to retreat. I used Leadership Any Section to move up the remaining right flank, and made his LS and HC evade away.
Patch then did a Mounted Charge, which allowed his HC to finish off my Heavies and HC on my right, and did a block to my Warriors on my left by making them retreat, and did two blocks to my remaining Heavy in the center, though they then knocked out his HCH. I Ordered Light to drive off his HC and do a block to a LC with archery. Patch Double Timed to bring parts of his right flank up the rest of his line, while I used Inspired Left Leadership to finally get that flank in motion, and drove off his LC, though I couldn’t do any damage, and I lost mine on a two-banner battle back. Patch used Line Command to move his entire center and knocked out my heavies, killing Dionysius for the win. 3-7
Afterword
With the variety of units all mixed together, this is a much more chaotic battle than most, and the lopsidedness of where the action happened only added to it. The first game had us trading units constantly after a slow start, and I thought I had it until that Mounted Charge. The second game was much more uncertain, though we started trading ranged attacks a lot earlier, but again, Mounted Charge came up for Patch, and smashed me. I had plenty of things I could do after that, but I just couldn’t get the time for them. Especially for moving my left flank up which had been abandoned by the cards for most of the game. Interestingly, we were both holding a Counterattack at the end of the first game.
Discussion ¬