
Block Clearing—Offense
Patch and I decided to go for a game of Up Front after our big SFB adventure, and again went for the next scenario in line, G “Block Clearing”. One side sets up with a group already in a -3 Building, and some anti-tank weaponry, while other has a squad and an AFV, and must score twice as many VPs as the first side to win. Also, only the defending side can use Sniper cards. I had attacking Americans (with a Sherman and the higher-morale leaders) against Patch’s defending Germans (who have a couple MP 38-armed men in place of standard 98ks, and a pair of PFs). I’m afraid I had a lot of screw ups this time, which we eventually sorted out. (I’m giving the Fire Strength and all the modifiers that applied to attacks; a ‘C’ refers to a concealment card played on it.)
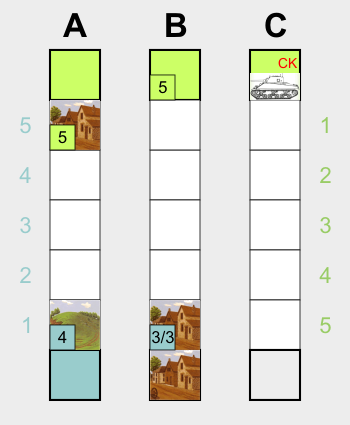
Patch set up in two groups, with the LMG and six men in Group B, which was in the start Building. One PF was in each group, so I split my infantry into to equal groups in A and B, and put the Sherman in Group C, where it was a little further away from one of the PFs, and could concentrate on the larger German group. Neither of us had any additional starting terrain, and Patch started off by Moving Group B closer. The Sherman Fired its MGs at Group A (2) to pin one man. Patch immediately Rallied him and Group B moved into a new -3 Building. I tried more fire, with A Firing at Group B (3 – 3), and pinned three men with good cards, and followed up with more MG Fire from the Sherman at B (5 – 3 – 1C), and pinned two more men, but couldn’t affect the guys already down.
Patch Rallied 2 of his men, and put some Smoke on Group A for protection. I continued pounding Group B with my B Firing (2 – 3) for no effect other than blowing away the smoke, and the Sherman Fired (4 – 3 – 2C), but malfunctioned the MG to halt the attack midway through. Patch Moved up A, and I followed suit, and Patch moved up onto a Hill, and took a Sniper shot at the Sherman, getting a KIA to kill the commander and force it to button up. (This was really bad this early in the game, but I didn’t always remember to apply the commander modifiers on top of the button up.)
 I finished my move into -3 Buildings, and repaired the Sherman’s MG. I tried putting some Wire on Patch’s B, but he immediately Moved off of it. Patch finally opened Fire on my Group B (2 – 1) to pin one man. I Rallied him immediately, and kicked the Sherman into gear to Move to Range 1. Patch finally Rallied the rest of his B, and the Sherman parked in an open field. The plan was to use the Sherman as cover for B when they moved up, but Patch put some Wire on B before they could get started.
The Sherman opened up with MA at B (TH 0), but missed. Patch Fired his B at my B (2 + 1 – 3C), and pinned two men. I Rallied them, and Fired the Sherman’s MA at his B (TH 0-1), and missed again. Patch Fired his B at B again (3 + 1), and pinned the entire group. I Rallied All. Patch Fired his B at my B for the third turn in a row (2 + 1 – 2C), but had no effect, though he did place a Wire on my Group A.
I finally Moved my Group B off their exposed position on the wire. Patch Moved his Group A forward again, and I discarded a Stream onto them. I then Moved both of my infantry groups, getting A off the wire, and finally moving B up to Range 1, and following up with a Wall the next turn.
After that, we had several turns of discards before Patch Fired his B at B (3 – 2) again for no effect. I responded with Firing the MA at his B (TH 0-1) for another miss. After another couple turns of discarding, the MA fired at his B again (TH 0-1) for a hit (4 – 3; it should have had a +1 FS from the hit, but we missed that rule for a while) that pinned one man.
Patch Forded the stream on Group A, and my A Fired on them (1 + 1 – 1C) for no effect. They then occupied some -2 Buildings. The Sherman fired the MA at B again (TH 0-1) for a Hit (4 – 3) to pin two more people. Patch Rallied them all.
I Smoked my Group B before Moving them up to Range 2. Patch Fired on them with his Group B (5 – 2-1+1 – 1C) and pinned two men. They slipped into -3 Buildings before more fire came their way. Patch did Fire on them again with his Group B (4 – 3 – 2C) for no effect. I then Rallied my two men before Patch Fired again (1+3 – 3) to pin one man again. The next turn, Patch Fired B at B again (5 – 3) pinning the rest of the group. I Rallied the group, and Moved up the Sherman to lend a little more protection. It parked in the open again, and then reacquired Group B with the MA (TH 0-1; miss). Patch made another try at Firing on my Group B (2+2 – 3-1), pinning two men again. After a turn, I was able to Rally them, and the Sherman Fired on Patch’s B again (TH 0-2), and hit (4 – 3), pinning everyone but the LMG and his crewman (I slipped up here and read the MG firepower at this range (5) instead of the MA effect (4), but it made no difference to the results). And Patch immediately Rallied them.
I tried discarding some Wire on Patch’s Group B, but he immediately Moved them off it. Then I Fired the MA at Group B again (TH 0-2) and hit (4 – 3) to pin the LMG assistant, who was immediately Rallied. The Sherman Fired again (-1C; TH 0-1) and missed (thanks to the Concealment; that was nearly a hit at +2 FS). Patch then Fired his A at my Group A (3 – 3), pinning one man, who I Rallied.
 I started the Sherman on a lateral Move, and promptly found a Stream, which I Forded before parking it on a Hill. A Sniper shot at my Group B, but did nothing. Patch’s Group B Fired at my A (4 – 3), but did nothing more than malfunctioning a rifle. The Sherman reacquired Group B again (TH 0-1), and hit (4 – 3) to pin four people. Group B followed that up by Firing at his B (4 – 3 – 2C), and routed one man. My Group B took another Sniper shot, but there was no effect. The Sherman Fired the MA at B again (TH 0-2) and hit (4 – 3 + 2), killing two pinned men (including the LMG assistant) and pinning another. The next turn, the Sherman Fired again (TH 0-2) and hit again (4 – 3 + 2), pinning the only GO man left in B, and killing another.
At this point, Patch decided it was past time to try and take out the Sherman (it was) despite the odds, and played a Hero card on the man with the PF in Group B, and took the shot (H+1; TH 0-1; black only for HD), but missed. I’d taken the position on the hill purely for the HD, and recent events showed why I thought he needed to try for it even with the normal 0 TH odds (which were also true for Group A firing at it).
The next turn, Patch Rallied his LMG. The Sherman shifted its Fire to Group A to have more people to possibly affect (TH 0-1), and hit (4 – 2 +1), pinning one man. Patch put his remaining rifleman as the crew to the LMG in Group B, and Fired at my A with his (3 – 3) for no effect. The next turn, his B Fired at my A (3 – 3), pinning one man. I Rallied him, and the Sherman Fired at his Group A again (TH 0-2), but missed. Patch Fired his B at Group A (2 – 3) and pinned three men. The Sherman Fired on his A (-1C; TH 0-1) and hit (4 – 2) for no effect. Group B followed up (5 – 2), routing the pinned man, and pinning another.
The action slowed a lot as we searched for good cards. I placed Wire on his Group A, and Patch Rallied the pinned man in the group. The Sherman Fired again (-1C; TH 0-1) and missed, and Patch Moved off the wire. I Rallied two men in my Group A. A Sniper shot at my Group A and missed. My Group B Fired on his A (2+1 – 2) for no effect. His B Fired at my A (1 – 3) for no effect. I Rallied my last pinned man in A. A Sniper pinned my Squad Leader in Group A.
I didn’t want to waste a Rally 4 just on him, but after a couple turns used it because the hand limit was a problem. But in the meantime, Group B Fired at his A (4 – 2 – 1), but did nothing other malfunction a rifle. It was repaired at the same time as my rally. The Sherman Fired on A again (TH 0-2) and hit (4 – 2 + 2), pinning two men. Group A followed up with more Fire (2+1 – 2) but had no effect. Patch Rallied both of them. I tried putting Wire on his Group A again, but they immediately Moved off it again. The Sherman Fired on Group A again (TH 0-2) and hit (4 – 2 + 2), and killed a man, ending the game as Patch was under half his original force.
Afterword
I’d actually saved up three more Fire cards, and had finally gotten a Hero. I’d been wanting one since early on to get the Sherman Crew Exposed again, but now was saving it to double the BAR’s firepower the next time I got a big Fire card. If Patch had survived the Sherman’s shot, I would have done a 1+1+3 attack on him (needing 9 firepower) to hopefully finish it.
The ability of ordnance to just throw otherwise useless Fire cards downrange is really nasty, especially if you can get a bonus to the Fire Strength from the hit. Even better, they aren’t as likely to malfunction, as only the To Hit draw can malfunction the gun. The Sherman also has a MG factor that’s really nasty, and was pounding Patch until that Sniper. That forced me to use the MA a lot more than I would have otherwise.
The entire middle part of the game devolved into a stalemate. A scenario that removes Woods cards instead of Buildings allows for much tougher terrain, and we had a hard time getting through the cover available. As things sorted out, I was at 15 VP to his 13 (for groups in cover; his forward group was the smaller one). But then I got a streak with good RNCs, and Patch’s Group B came apart. At that point, it was 22 VP to 10, so I had a likely win, but wanted to shut him down before he could get lucky. Which he did at one point. Thankfully I was able to recover before he could do anything permanent to my Group A.
We had enough fun with this that we’re going to turn it around and play it again. I need to figure out how to deal with his tank.
Discussion ¬