
51 The Taking of Takrouna
I figured it was time to go back to North Africa for my next ASL game with Patch, and started looking at the Hollow Legions scenarios, which it appears he has largely not played. The first one of the set, “The Taking of Takrouna”, is interesting, featuring a quick New Zealand assault up half the board 25 hill to take overlay X1, which was obviously meant purely for this scenario.
The Italians are defending with 12 346 squads (and a pair of HS), a MMG, three LMG and a pair of light MTR, dug into a few foxholes. The New Zealanders (Maoris, actually) enter six 458 squads (and a pair of HS), a pair of Heroes, some excellent leadership, some LMGs and a pair of light MTR. Overlay X1 becomes the level 4 top of the hill with a small stone village surrounded by cliffs (Takrouna). The Italians can shift one squad in or out through a hidden trail, everyone else must climb. A couple of nearby crag hexes become further stone buildings, and Moderate Dust adds a 1d3 LV to all attacks.
Patch had the Italians, and set up concentrated on the obvious route from the NE corner, where there’s a little bit of brush for cover. (In fact, his MMG and a MTR were boresighted in there.) I seriously considered it; the brush helps, there’s a couple gullies to go up, if could get that far, and it’s the shortest route to the goal in BB5. I also considered the middle, where there’s a wall, and the exit of one of the gullies. Eventually, I went with the SE corner, with the longest way to go, but relatively few defenders, and I was worried about breaking as I entered and being forced to rout off the map.
Unfortunately, there’s a lot of crags in there too, and I didn’t realize just how badly going uphill into crags was going to slow me down.
My fears were justified though. Patch broke one of my MTR HS as soon as he entered, and I never did get anyone over there to pick up the abandoned MTR either. I also realized that residual was more dangerous than original fire in this scenario. Most residual is one column below the fire that caused it, which makes it about equal to a +1 version of the original shot, and the original fire has at least that much from Dust, while the residual isn’t affected at all.
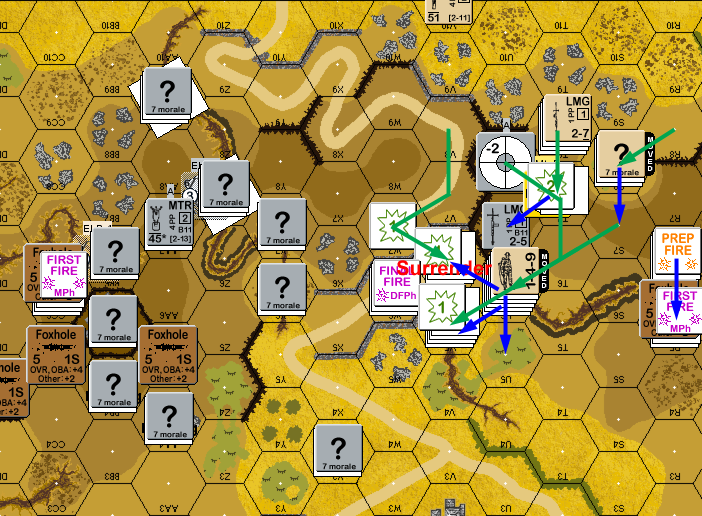
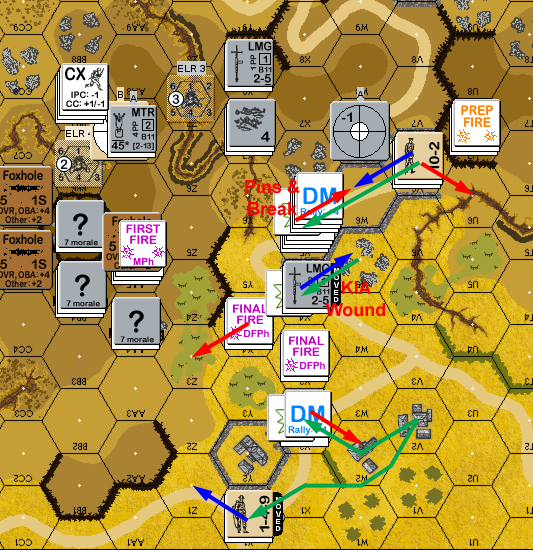
Thankfully, the one HS was the only thing that broke, despite getting a 1MC on my 10-2 stack. My 9-1 and a squad were poised to advance onto the ridgeline, and my fire managed to Pin two squads. I advanced onto one of them, but neither of us got any result.
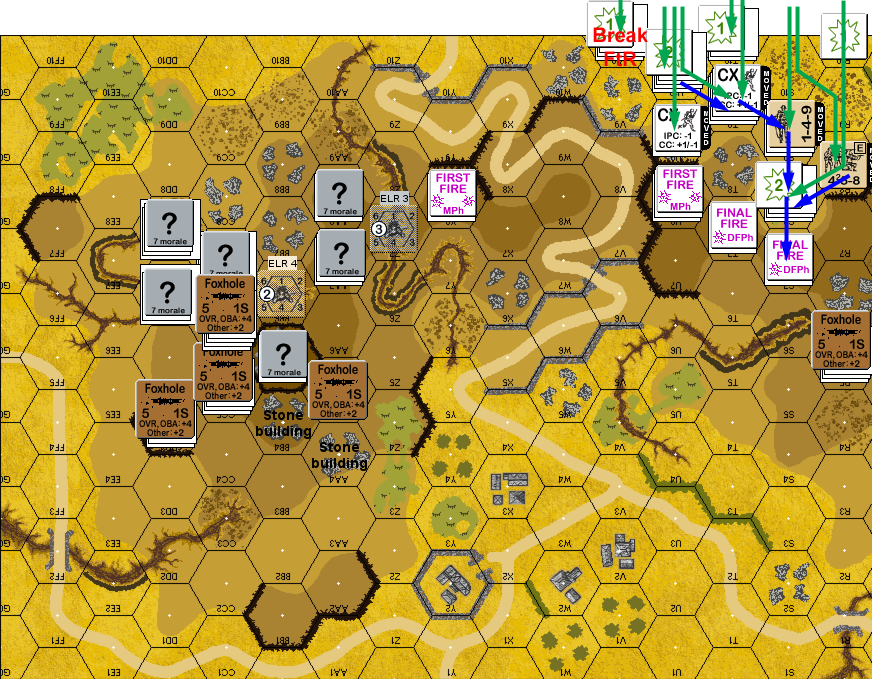
Situation, British Turn 1, showing the full board. North is to the left.
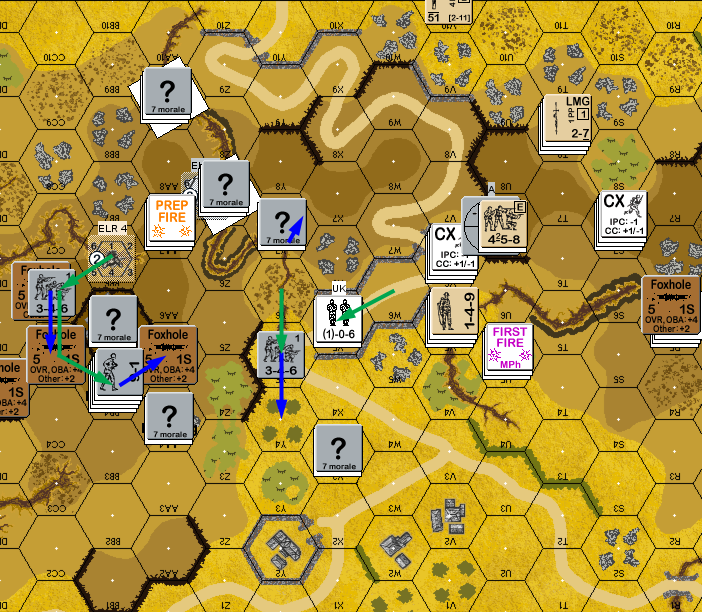
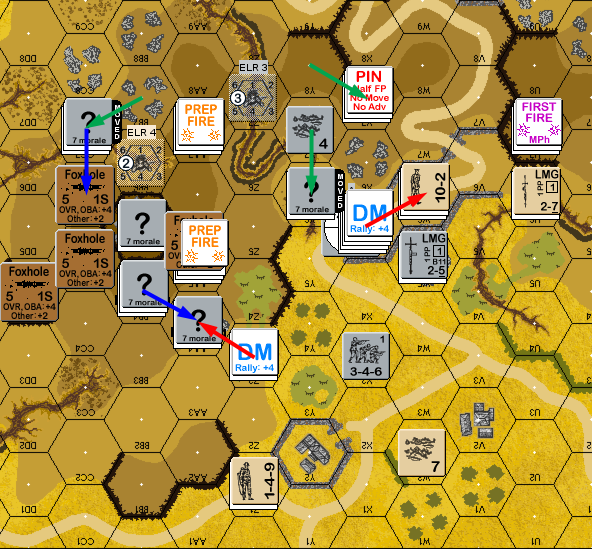
Patch pulled back at the focus of my attack, and reworked his defenses near the the goal. The only thing I had to fire at was the Melee, and I stopped that after pinning the squads on both sides. Still no result.
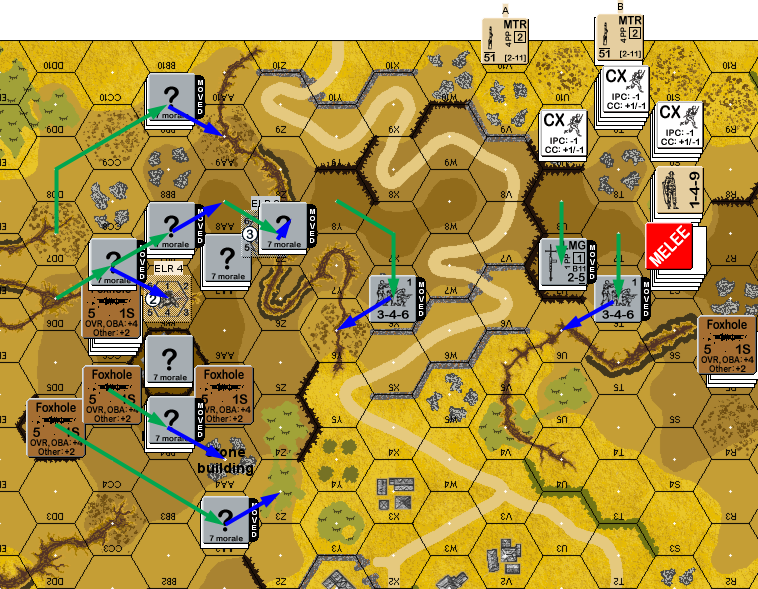
Situation, Italian Turn 1.
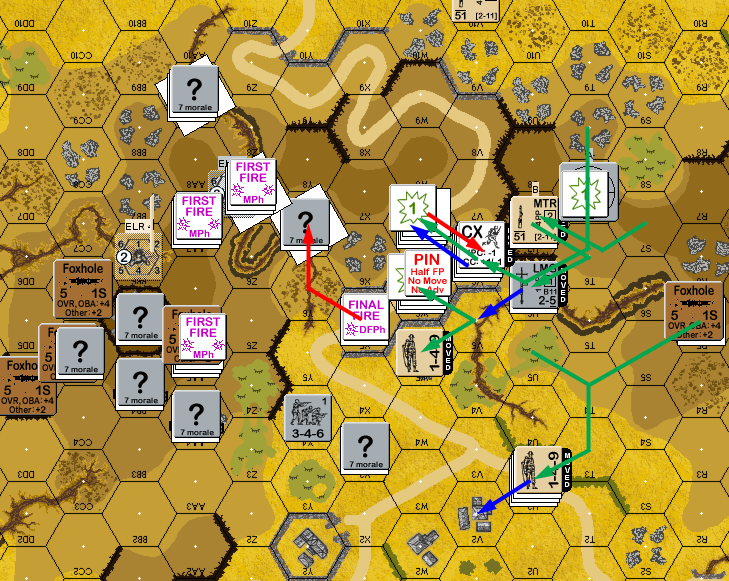
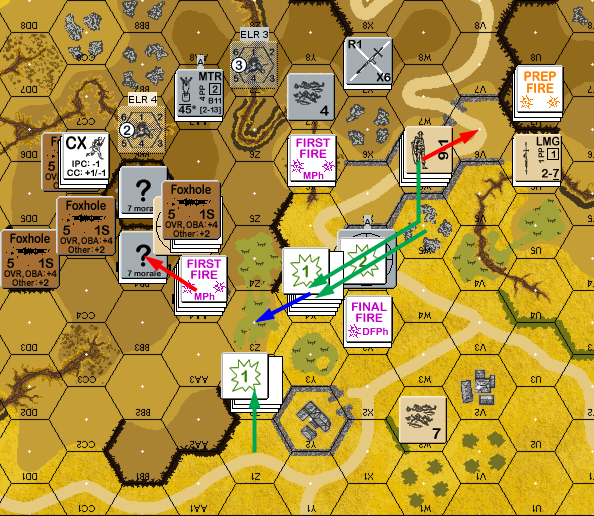
I got some early practice with the climbing rules when I had a HS go up the side of the U9/V8 cliff. They were successful, allowing them to advance off into V8 after having been hidden from the main defenses the previous turn. I attempted to put a force into CC range of the Italian LMG squad still on top of the hill in U7, but the squad broke, so my main advance was towards the foxhole in R5.
Patch revealed both of his mortars. One in AA7 fired on U8 for acquisition before I advanced in, and the other was in R5, but malfunctioned on the first shot. I sent a second squad into the Melee, and finally eliminated his squad at the cost of a HS.
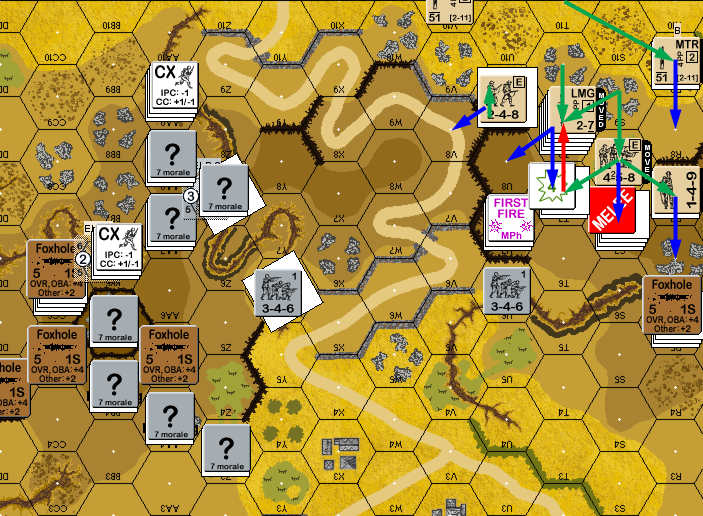
Situation, British Turn 2.
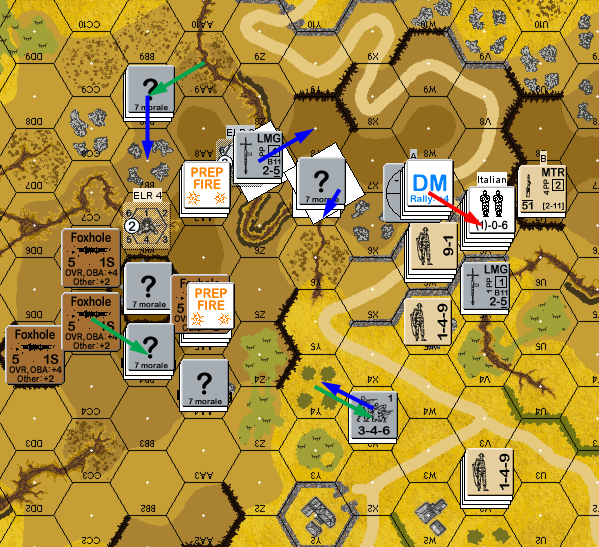
Patch got his MTR back in rally, along with my squad. The MTR turned out to be boresighted on T7, but couldn’t do any damage, even with a hit. U7 rolled a ‘3’ (and thankfully also had +3 dust) to break the squad in T7. Thankfully, the other MTR and MMG were unable to do anything.
Most of my fire didn’t do anything, but U8 managed to break the squad in U7, and then pin the AA7 MTR HS on a ROF shot.
Situation, Italian Turn 2.
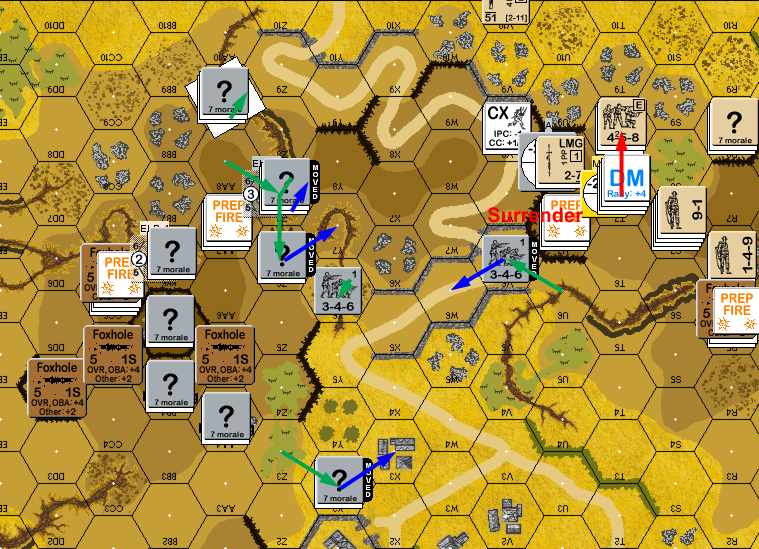
Even with the 10-2 helping, I couldn’t rally the just-broken squad for my turn. Between the cliffs in U7/U8 and the gully cliffs, the main path off the hill I was on goes through T6 and U6 without any room to maneuver. Worse, since it’s a level change into a gully, it costs 3 MF to go INTO U6. R5 does go around the head of the gully, but Patch still had that locked up with his MTR HS. R6 fired at R5 without any effect, leaving me to start running the gauntlet.
However, Patch could only really get residual into T6 with his MTR, which broke again on its first shot. I tried sending V8 around to help with potential CC with the squad in W6, but broke at the end of his move. Further moves caused FPF, and pinned my squad and the Italians. Sadly, I had nothing left to get into CC with him. I realized a bit late, that V6 could see R5, which forced my HS there to surrender.
The HS and Hero in R6 moved into the MTR HS in R5 and took them out in CC with no trouble.
Situation, British Turn 3.
My squad rallied for Patch’s RPh, but I failed to recover the Italian LMG in U7. Patch didn’t move much, but shifted his MMG to AA5. My only effective shot pinned a squad while also eliminating the prisoners he’d taken.
Situation, Italian Turn 3.
I recovered the LMG for my turn, and started moving to try and get the Italian squad on the road, which was the main roadblock to advancing at the moment. My first move was to send a squad into the crags in X6, but they broke before getting there to MMG fire. A second attempt absorbed a fair amount of fire before the 9-1 and squad pinned to a 2MC. I did move a couple HSs and a Hero around the west end of his line, hoping to eventually get up the shoulder of the hill and threaten victory that way, while the main force slogged forward.
A lucky shot from W6 (‘2’) got a K/1 to reduce X5 to a broken HS.
Situation, British Turn 4.
Patch couldn’t rally his DM HS for his rally (not a surprise), but I got my squad back. Patch opened up with the heavy weapons again, with the MMG pinning W6, and then causing a break/CR (’12’) in W7. (I hadn’t realized he’d switched targets at first, and thought he’d just wounded my 9-1. The CR/break was bad enough, but it was nearly a lot worse.)
Situation, Italian Turn 4.
Faced with needing to get even closer to the MMG, I finally remembered that my MTRs had smoke… in theory. Sadly, a ‘9’ robbed me of that solution.
So, the next goal was clearing X3/Y4. I sent a HS adjacent who broke, but stayed alive to restrict fire. Then I sent a squad in, and got lucky when doubles forced both hexes to Final Fire. I tried for a smoke grenade to help with further movement, but not only failed (‘6’, ending movement that was ending anyway), but the residual rolled low and killed the squad on a 1KIA.
The next attempt Pinned in X5. I sent a Hero in, and he got wounded on a failed NMC. Then the 9-1 pinned in X5, and the squad with him broke. The only thing that did go right was hooking a HS and Hero around his line, where he couldn’t fire on it.
Final Fire only managed to malfunction a LMG. The wounded Hero had managed to recover the Italian LMG dropped by the dead squad, and used it to break Y4.
Situation, British Turn 5.
Neither of us get anything for Patch’s rally. He pounds X5 in Prep, and the MMG breaks both the squad and 9-1 there, leaving the HS of prisoners unharmed. He moves up on my line of brokies, but the MTR HS in U7 pins a squad as it moves along the hill.
Situation, Italian Turn 5.
I get my 9-1 and a squad back for my rally, leaving me down the other squad and the HS back in U6. Patch can’t get his HS or LMG back. With three turns left, and needing—at best—a turn to climb up the cliff and win a CC in the victory hex, I had to continue forward with all possible speed. I expected the game to end here as most of my guys went down to enemy fire.
And, surprisingly enough, it didn’t.
The 10-2 and recovered squad hopped over the wall into the crags into W4 to avoid the point-blank shot from Y6, and hurried towards the hill. As the stack crossed the road, he took three different shots for a NMC, 1MC, and PTC with the only result being the 10-2 battle hardening into a 10-3! The wounded Hero dashed across the road to join the stack.
The HS+Hero got up the shoulder of the hill, and the HS pinned.
Situation, British Turn 6.
Patch’s wind change DR generated a mild breeze to the east. This would have meant more if I had smoke. (Or another increase would boost the Moderate Dust to Heavy Dust.) Looking things over carefully, I could tell that it was possible for Patch to win at this point. All he had to do was block me from advancing up to the cliffs on the next turn, and there were just too many surviving Italians available to move around to prevent it.
He advanced units into Z4-AA4-BB3. For a moment, I thought I had a way around: AA3-BB2-CC3-CC4. But it needed 8MF, and my 10-3 stack was already CX. The Hero in Z2 could do it, but he can’t take Control. He did also move up the X3 squad into CC with my main stack, and died in exchange for my wounded Hero.
Afterword:
It’s a really different scenario, and I hadn’t realized just how bad going the slope I attacked was. The upslope crags required going CX to get into, keeping me from advancing, since that was also upslope into crags. After that, I generally managed to stay on plan, if a turn or so behind where I wanted to be. Other than the fact that my ML8 troops broke more often than the ML6 Italians.
I still think going for the brush entry is too chancy. It’s too obvious, and if I’d taken it, I’d have walked into the MMG’s boresight hex (EE9), which I imagine is a common defense. The center is still a possibility, but it tends to force a really constrained frontage.
But it’s fun, tense, and a really small and fast scenario.
Discussion ¬