
J260 Retaking Hill 772
After trying out the strike cruiser, Patch and I looked at scenarios from ASL Journal #16. While we were interested in the Capriquet scenarios, the boards weren’t in VASL yet. We ended up with a North Africa scenario with the Americans attacking the board 25 hill. I’ve done this twice in the past, so it was time to get revenge and force Patch to attack into miserable terrain.
An interesting SSR has the cliff hexsides removed, and instead any move over those hexsides is an abrupt elevation change. Nice concept, but I would like a little more guidance. “Abrupt elevation change” normally just means you changed levels at least twice in one move (and then gives you the extra costs for the ‘intermediate’ levels). Moving from Y9 to Y8 seems simple enough – the cliff becomes a double-crest line, and you pay for going up two levels at once. Y9 to X8 is a little trickier: there is a cliff there, but the difference is one level. Do you just assume that there was a non-existent intermediate level, and pay as if you just went from level 1 to 3? (I think yes.) How about IN K5 to K6? Normally, removing the cliff, this is abrupt elevation change, going from level 1 (wadi) to a level 3 hex. But do you again ‘assume’ the cliff hexside (with only a 1 base level difference) is itself assumed to be a two-level change (or at least costs as much as one), and you pay as if you just went up three levels?
Most of the time, the complicated part doesn’t come up. And the Italians have five squads, a 75mm ART, and light fortifications (12 mines, two wire and a pillbox for the Gun). The ART must face west (towards the American setup) on level 4. Since the American attack comes down the length of the board, the Italians get a choice setting up forward with better LOS, or back, with not a lot of LOS outside of other level 4 Locations.
I went for a forward set up, hoping to force the Americans out of the center and out of CA, and then have to deal with the hill they just got off of.
First try.
This didn’t work. I mean, I did shoot up the Americans, but my forces were just too exposed and close, and I lost men about as fast. Turn 1 Prep saw two of my squads ELR, and they surrendered in RtPh. My sniper broke a squad, and fire broke another squad, then the ART got a hit for a 12 MC and ELR/CR a squad, and the MTR broke his entire MMG stack. The ART broke another squad in my turn, but a CH from his MTR killed my 7-0 and broke his squad. Patch lost a HS in his RPh, my MMG broke a squad, and the ART ELRed his 7-0. Patch broke my LMG squad. My turn saw a malfed MTR, and Patch killed my MMG squad (and MMG) on a snap shot as they got out of their foxholes. He then broke the MTR squad and we called it less than two turns in, as the ART was the only thing I had left.
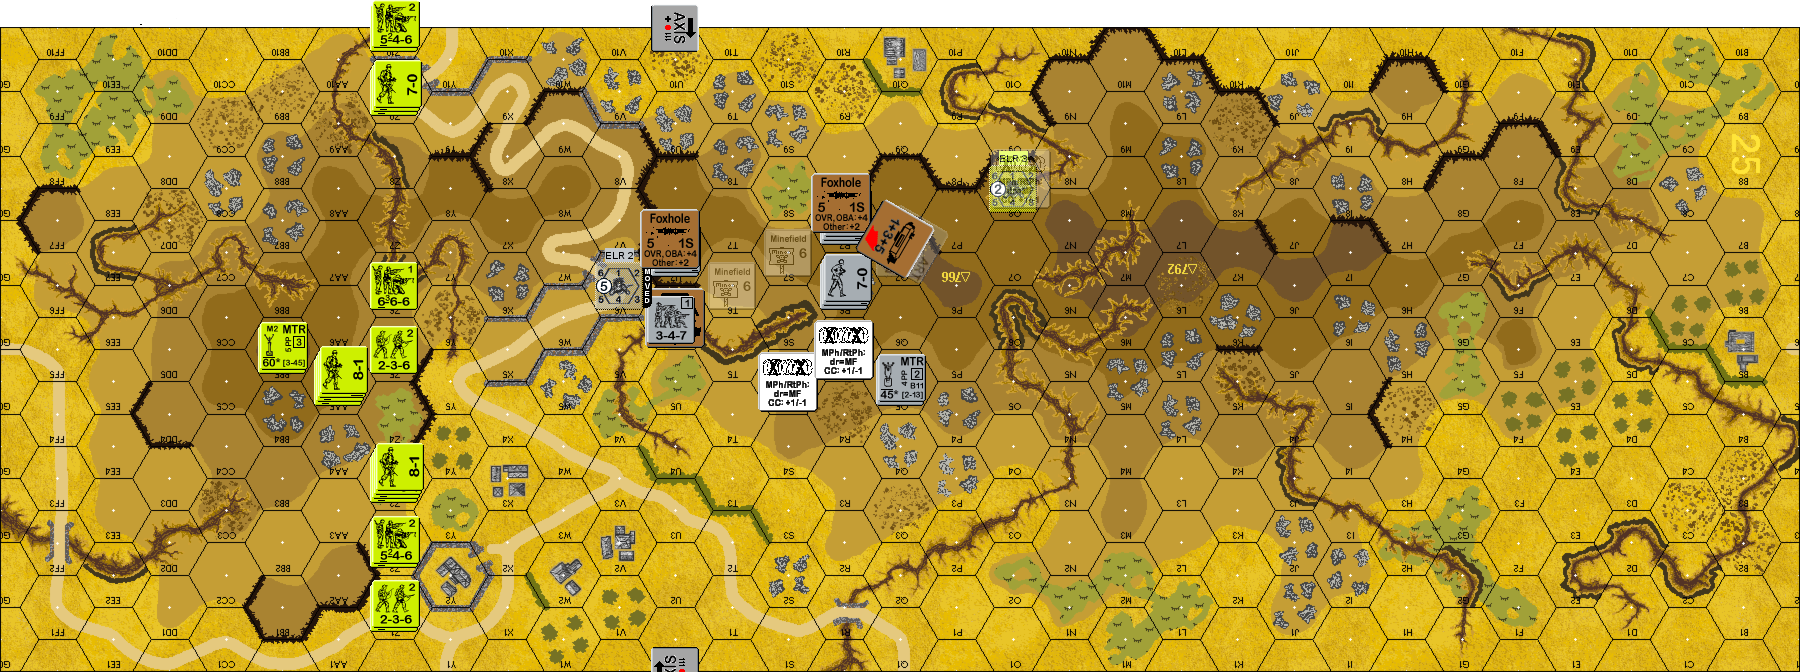
So… we tried it again, and I went for a defense a bit further back. I still resisted putting the ART all the way back; instead it went in N5, where it could see much of the north approach, and my idea was for it to hold that side while everything else tried to hold the south. I had noted that it was going to be hard for Patch not to use the road in U3, so mines went there. The other 6 factors eventually became a protection in front of the level-4 foxhole P6. Wire went on the wadi on the north side of the ART’s CA, and protected the ‘easy’ way up the hill. Three squads were further back, to better cover the south approach around the shoulder of the hill and all the crags.
Patch immediately got a hit on my MTR squad with his MTR and broke them. However, his advance was fairly slow, getting a feel for where defenses were, and staying to cover in the south.
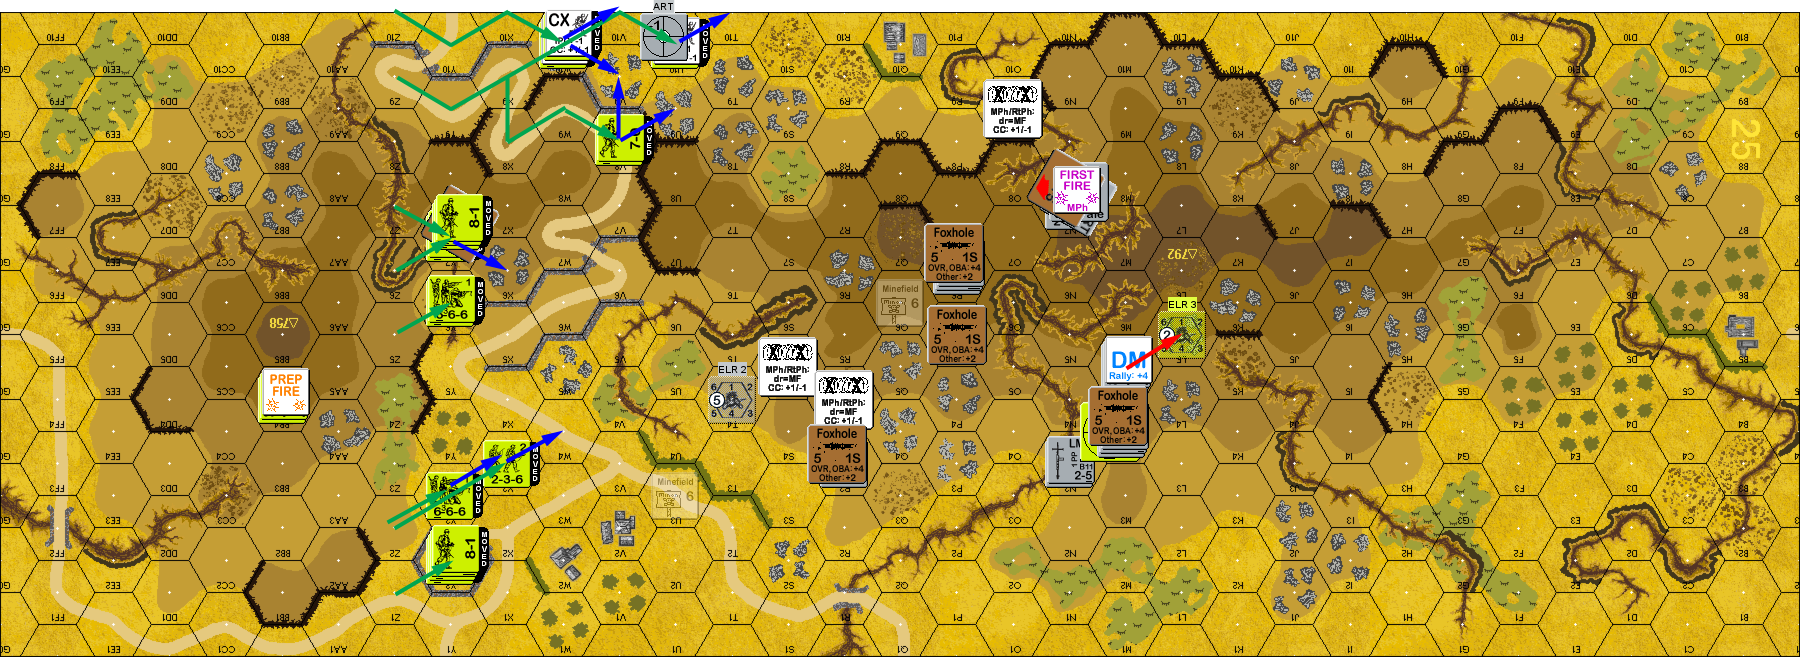
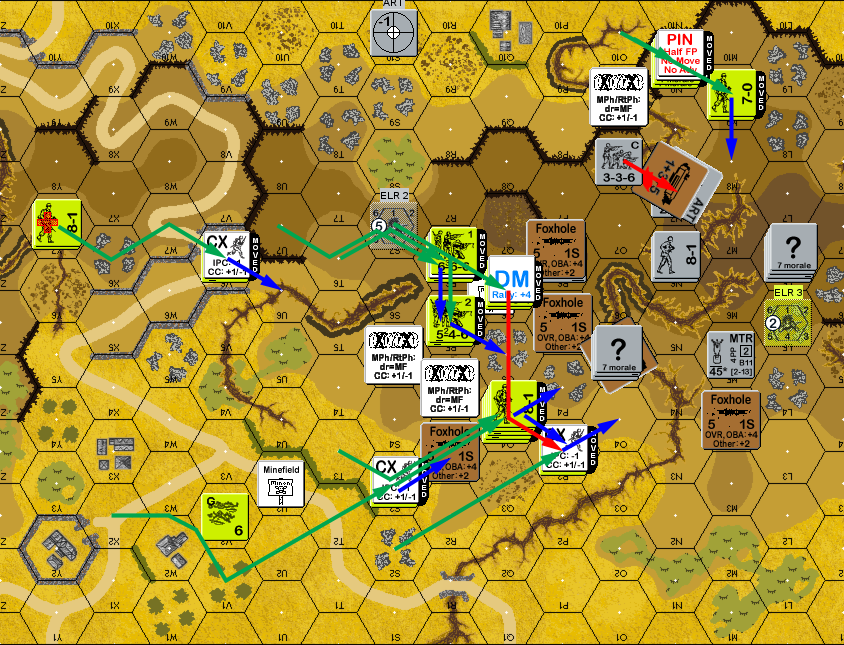
Situation, American Turn 1.
My PFPh went well, with the ART breaking a HS, and the MMG getting a lucky NMC on a stack, breaking an 8-1 and squad-and-a-half with him. However, DFPh broke my MMG squad, and CH from his MTR killed my broken MTR squad, and then he went on to break my LMG squad in L4, before finally malfunctioning the MTR.
This meant I had two functioning squads for Patch’s turn 2, one of which had the second LMG hiding in a wadi with a view of the road as it crossed the same wadi, the other of which was a bit too exposed, but still shielded from anyone not on the hill. The American 8-1 wounded on RPh, and his first move found the mines in U3 to ELR the HS. The ART managed to break two squads as they moved (Intensive Fire, on B11 and that thing is critical… not a calm die roll), but one HS did slip through to behind the CA. And Advancing Fire ELRed the squad in P4.
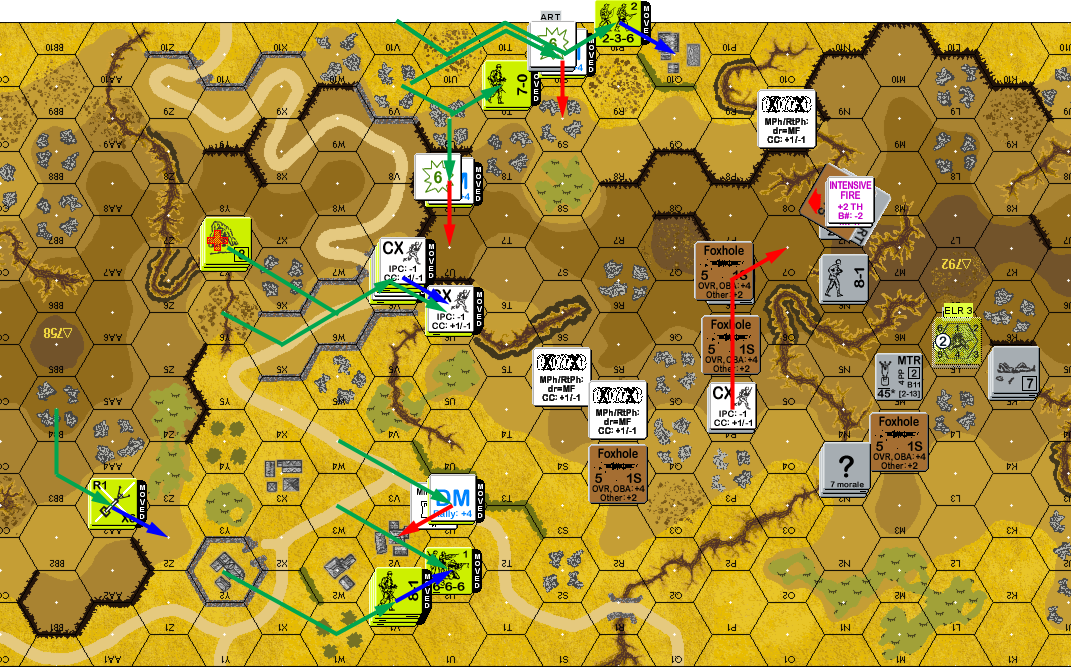
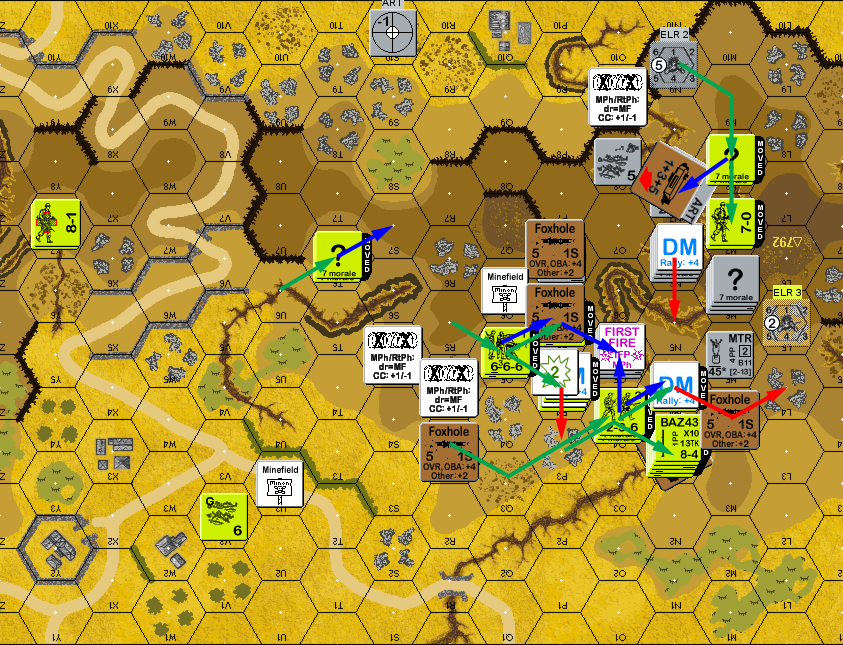
Situation, American Turn 2.
I managed to rally my 7-0 and a squad for my RPh, and Patch rallied a HS and deployed a squad in U2. The LMG squad crawled up the wadi and into Crest, and I put a new squad into P6.
Patch self-rallied a squad, and I rallied the one in K5. I recovered the MMG, but Patch’s first shot ELRed the squad; at least that was two squads not moving this turn. AFPh then reduced it. I had no shots, but Patch was searching for the other mines and coming up empty.
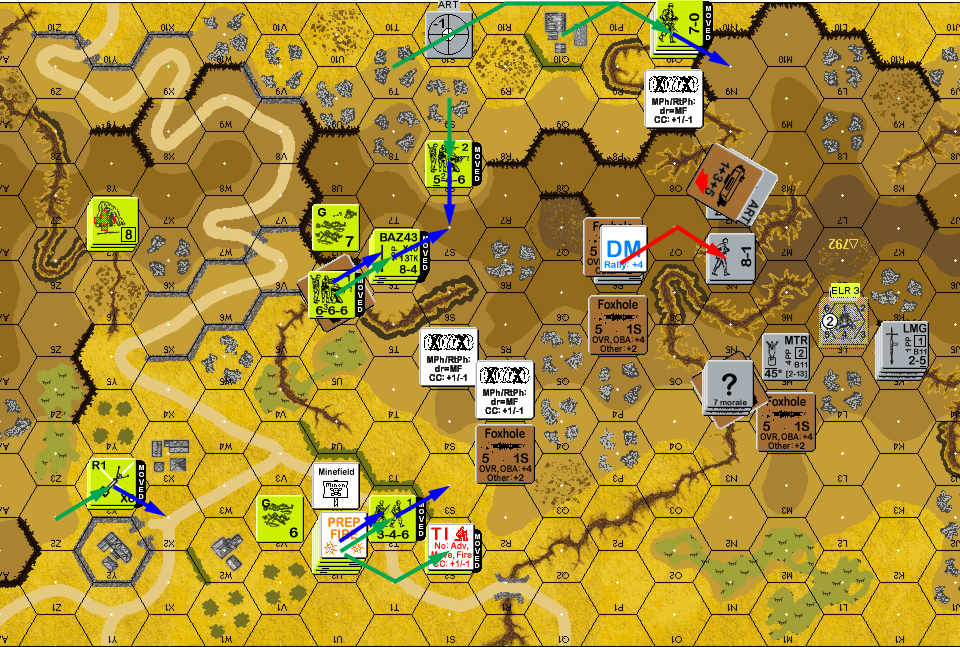
Situation, American Turn 3.
I rallied one squad for my turn while Patch lost his MTR permanently. The squad rallied in K5 moved up to the top of the hill, N4 shifted to be in Crest of O5, and rallied conscripts went into O8.
Patch self-rallied his squad in U7 for his turn 4 RPh, and his wounded 8-1 finally rallied, along with a squad. He started up the hill from nearly all directions, running into one snag. His BAZ squad ran into mines in Q6 and ELRed. My only shot was the conscripts in wadi O8, but they had no effect, and then return fire broke them. Patch only had one other shot, and rolled a 2, but found the LOS was blocked.
Situation, American Turn 4.
Patch had gotten up to one of my remaining defenders, which was a problem because they had no way out without exposing themselves. In the end, O5 just went out of Crest status, where the only shot was an adjacent CX HS, and my squad pinned on a NMC.
Patch rallied a HS, getting a Battle Harden. His shot at O5 cowered and did nothing. And then he started moving around the position. A HS moved into the gully, and broke to LMG fire. A squad moved into the foxholes above them. Another squad moved into P4 and broke to fire. The original HS pinned on Final Fire. Patch wasn’t able to get a result on them, and had to go CX to get a squad and a half into the hex. CC did nothing, leaving them all in Melee. The bad news was that Patch got a HS in for CC with the pillbox.
Situation, American Turn 5.
At 1-1, that CC did nothing either. But I had too many problems to be able to do anything about it, and sooner or later it was going to be bad. I had one active squad left, who stayed in cover to try and interfere with Patch’s next turn. Patch decided against firing into the O5 Melee. I did have the higher morale, but with 24FP it was likely everyone would break, and he needed the hex cleared. O5 just saw me pick of the HS, but the crew in the pillbox was killed. That basically finished the scenario, since all Patch needed was some MMC in or adjacent to that hex at the end of the scenario.
Afterword
I lost, but the primary goal was a win. Patch exclaimed near the end, “I swear, someone designed this map with the express purpose of pissing people off.” He has now experienced the pain of attacking the board 25 hill. At some point we’re going to have to do something with the escarpment overlay (/board 25e), which Patch says he’d done once before. I was also thinking one of the big hill boards (namely 9 or 50) combined with board 24 (levels -1 through 4!) could be interesting, but I only see one thing at the moment (but that does throw in Korean steep hills).
The scenario itself is good: There’s too few dealing with fortifications, and the new foxhole rule certainly helped out here. The main Italian problem is there’s way too little to even begin to cover everything, and the troops only have 23 FP total (excluding Ordnance and the crew). Those five squads just aren’t enough to stand up to twelve American squads (even if half are second line). After this, it’s tempting to just put everything in hard-to-see Locations and pop up as they get close, but the firepower problems will be even worse. On the other hand, the terrain does a lot of the work for you, and another 12 mine factors would probably worth another full turn in the scenario.
Probably the only really good Italian defense puts the pillbox far back, and relies on forcing the Americans through as much terrain as possible. It just goes against my grain to have a pillbox with an extremely limited field of view.
Discussion ¬