
U42 Stand Fast
Looking for small, simple, ASL scenarios to give Mark a chance to concentrate on the general flow and maneuvering a few squads, I came across a tiny scenario from Rivers to the Reich. It was originally Squad Leader/GI scenario 302 from the Series 300 pack, and uses a couple large overlays to mess with the very familiar board 3.
The Germans are defending the board 3 village (that doesn’t change) in early December ’44 with two 838 squads, two 9-1s and two LMGs. The Americans are attacking with five 747s, two leaders, a MMG, and a pair of DCs. They have six turns to find two ammo caches that are HIP in buildings inside the road loop and destroy them (which takes going TI for a turn—note by the wording of the SSR, this seems be either player’s turn…), or make sure there’s no unbroken German units at the end. The Germans set up entirely inside the road loop, and can only go one hex outside that area (including to rout, though berserkers are allowed to go wherever they need). Both sides can freely Deploy, and the Americans enter from any one board edge. The overlays are oddly positioned, as they don’t line up with other terrain, but they do cover the hills with woods and a little open ground, and Wd3 eliminates the only three-hex building in N1 on the board.
I took the Germans, and only deployed one squad as I didn’t see a lot of point to having a pair of LMGs if the only real point to them was a 1 ROF (and longer range in a short-range scenario), and put my three stacks looking down the three roads going into the loop. Mark entered in the SW, where there’s a nice line of wooden buildings as cover. This was also where the full-squad was, so I had good firepower, but Mark was generally content to stay to cover, but final fire broke a squad and HS.
Mark moved them back to T0, safely out of sight, but didn’t rally them for my turn. I stuck around for a prep fire shot at T1, but had no effect. Thankfully, his return fire did no better, and I backed off in APh.
He got both units back for his turn 2, and moved into the village proper. My squad took a shot at S3 and the LMG at T3, netting me 1 1/2 broken squads, a broken 9-2 and a pinned squad adjacent to me. His advancing fire had one success, pinning my leader in T4.
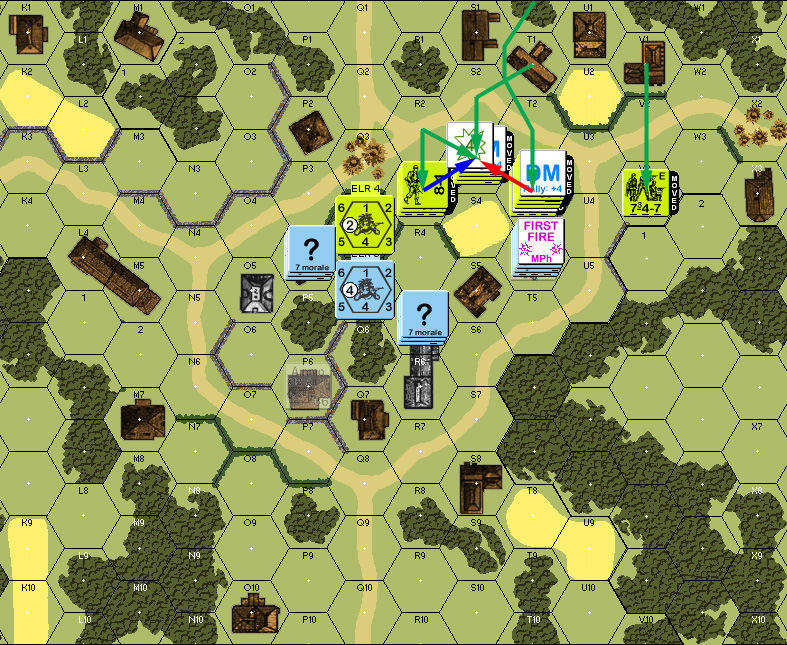
Situation, American Turn 2, showing the entire board. North is to the left.
My turn 2 RPh had one success for Mark, with a MMG squad rallying, but a near disaster as his 9-2 was wounded on a 12. My HSes skulked, while the squad faded back to S5, but the 9-1 was pinned and the squad broke, forcing me to self-break and rout them all to Q7.
Both of us rallied everything for Mark’s turn 3 RPh. His first move was to place a DC on P4, and I decided to try to avoid it by staying concealed. On the other flank, I pinned a squad that came up to my HS in R5, but only after he’d found the ammo cache in T4. He moved a squad across to take care of that, but otherwise stayed cautious, even though he could have seriously overwhelmed the the HS in R5 with some work (admittedly, it would have required approaching in the open, but I’d be down to FPF in pretty short order).
As it was, Final Fire broke the pinned squad, and the DC did did nothing, but advancing fire from the squad revealed my HS on a PTC. I ended up self-breaking them rather than face a 7-3 CC.
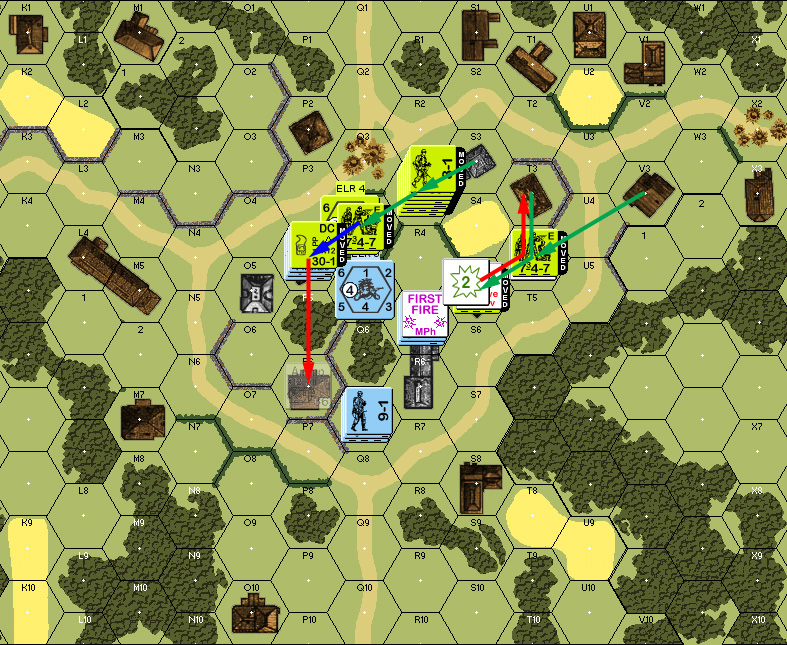
Situation, American Turn 3.
I mostly skulked on my turn, but the squad in T4 went TI to destroy the ammo cache, so my squad stepped out into the road to get LOS to fire on them, but it turned out to be a 2FP +2 shot, so I didn’t bother. The broken HS was joined by one of my leaders, who then battle hardened and generated a hero for Mark’s turn 4 RPh.
Mark prepped with most of his main stack for a 1MC that I passed. Everything else advanced cautiously, and I managed to pin a HS. He nearly left things at that, and I had to prod him into being more aggressive, and pointed out that yes, CC can go wrong, but with a concealed squad versus my HS in R5 the worst that was likely to happen was losing a HS and holding 1/3 of my force in Melee during my turn. I need to be able to maneuver my units, and being in Melee prevents that.
So, he did go in, and ambushed, and killed, my HS easily. (Actually… that should have been leader creation, and I missed that.)
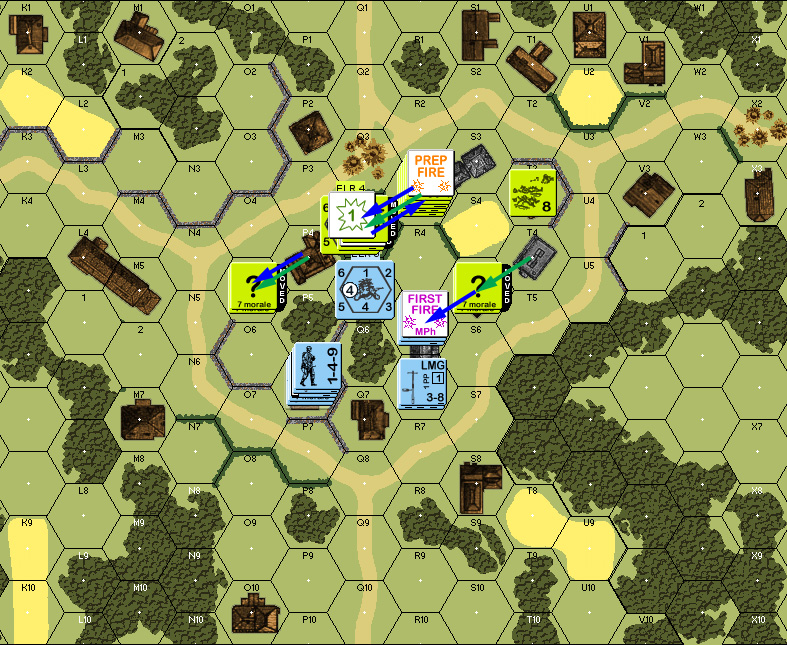
Situation, American Turn 4.
With nowhere left to go, and another couple turns to get through, I prepped with everyone, but couldn’t get a result on concealed units. On the other hand, he didn’t blow concealment by firing back.
For Mark’s turn 5 RPh, he got his squad in T3 back, and I finally thought to hand my LMG over to the hero. Mark prepped a squad at P6 but got no result. His main stack came forward into R5 where a 2MC broke the 8-1 and HS, but his squad went fanatic. The other flank went slowly as… the wounded 9-2 was shown as having the DC (which he had started with), even though it had been traded over in a previous week’s session. Counters had gotten shuffled somewhere in there. If it had been with the HS as it should have been, there might have been a try at placing on P6, though that would probably have meant a 12 -1 shot (-2 if I revealed my leader)… so perhaps not.
The bad news for me was advancing fire broke my squad, but at least he was able to rout all the way to P6 where the remaining leader was. The Americans closed in….
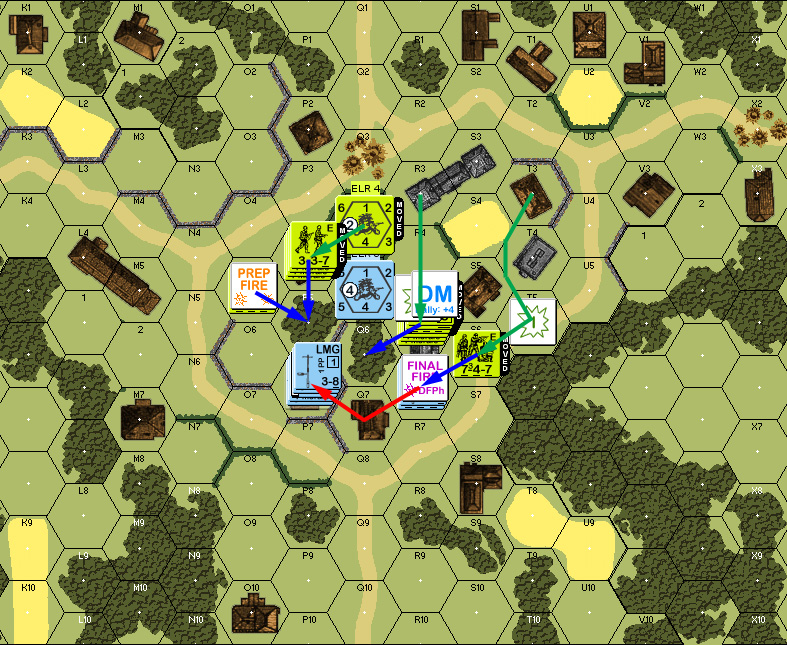
Situation, American Turn 5.
I was not able to rally for my turn, so I had a HS, hero and 9-1 on top of the second ammo cache and a bunch of angry Americans next door. Abandoning the ammo cache meant that it’d probably destroyed during my turn 6, but I was unlikely to stay unbroken if I stayed put. So I Dashed to N7, and let the broken squad rout to M7 on his own. It was the best cover I was going to get, and if I was lucky, I might at least pin anyone destroying the cache during my next turn (which would disrupt the task).
The movement went fine, but the broken squad took a K/4 in Final Fire and evaporated.
Mark got his broken units back for his turn 6 RPh, and sent a HS forward to enter the last two building locations and find the cache in P6. After that, everyone else moved up to two-hex range of M7. Advancing fire got a 1MC to reveal my guys again, and break the 9-1 and pin the HS. A second shot got a K/4 to kill the HS, but had no effect on the leader and hero. Mark then advanced to N6/N7.
A good roll self-rallied my 9-1 for the final turn, and the HS in P6 started work on destroying the ammo cache. To my vast surprise, my prep was a K/1 vs the HS in P6 stopping that task quite handily. My ROF shot was an 11 to do nothing. Mark’s first Final Fire was a NMC which I passed, and the second was a 2MC to break the leader and wound the hero. But he was out of options, and I won purely by the fact that heroes don’t break.
Afterword
This is a fun little scenario with the ammo caches adding just that little bit of twist that a tiny scenario needs; its kind of a pity its buried in Rivers to the Reich, which I don’t think gets a lot of play.
I was sure I was going to lose going into our final session as I didn’t see any reasonable way to protect the ammo cache and not get broken by American fire. I certainly didn’t see the K/- result happening (I figured at PTC was the best I could count on), though it points up that using more than a single HS is a better idea (since the survivors might have passed the 1MC). On the other hand, that hero was exactly what I needed. While they tend to die easily, you still have to get them to break twice to get them out of unbroken status.
Mark definitely played too cautious in the middle game. Six turns is actually a decent amount of time for the amount of ground to cover, but if he could have flushed me out of P6 a turn earlier, I really couldn’t have stopped him. As for the last turn….
He could have moved someone to N6/N7 to begin with and then advanced into CC. This has the advantage of possibly killing units outright. On the other hand, part of the reason for me going there is there’s no cover immediately surrounding the building (at least on the side I had to worry about) and the -3 shots from the hero would be bad news….
The other thing to think about is deploying more and and actually maneuvering around the village as well as working through it. Some real flanking maneuvers on the other side of the road loop could really crimp the Germans plans.
Discussion ¬