
Kemal’s Counterattack
I have to say this one is all my fault. I’m the local enabler, and after seeing an interesting ‘full game’ report on GMT Insider for Gallipoli, 1915, I talked it up to Mark, who preordered a copy. In due time, it hit our ‘Saturday rotation’, where we play bigger games that we’re still learning on Vassal. I did about a turn’s worth of the tiny “Clearing Sedd el Bahr”, which did a lot to walk me through some of the basic procedures, and assaults, which are definitely unlike most games’.
The second scenario, “Kemal’s Counterattack” deals with the second half of the first day. The ANZACs are ashore, but they’ve lost momentum (in fact, two Australian brigades start in “stalled attack”, and the third is in “disorganized defense”, the NZ brigade is in “general reserve” waiting for the second half to arrive), and Kemal has ordered the elite 57th Regiment to attack towards the beach while the 72nd and 77th get ready to march up and the 27 holds on to a “cordon defense” of the area. Nice, dramatic start, but there are some problems. Partially, I’m unsure of how some of the Australians got to where they are given the preexisting orders, and how such things are supposed to work, which left me scratching my head on what they legally do during the first turn.. Given that this is the scenario that introduces the entire orders system, I’d really appreciate it if there was at least advice on if some of the ANZACs should be declared “In Reserve” at the the start, and if so, who.
As you might guess, I had the Entente, and Mark had the Ottomans for this game. The scenario technically starts after the command phase is done, but the Ottomans get to decide just what the attack order for the 57th consists of in terms of objectives, and the 72nd can be given an “attack” order from the start, despite being a bit far back. However, the scenario says the 27th can have either an attack or defense order to be set as the player desires, however, it is in a state (with three picket units out) that the rules tell you means “cordon defense” is the only possible state for it to be in. Mark set the 72nd to march to Kuja Dere, and the 57th to take Baby 700 (35.57).
He got the first initiative and drew the 72nd Regiment. Just that took us quite a while to sort out, with the artillery limbering up, and making its slow way uphill along the roads and trails, and the infantry making a mere four hexes out of column (the 1/Field 39 battery managed 5, but wasn’t any further thanks to the path of the road). He then drew the 27th Regiment for the second activation, and Mark voluntarily routed the pickets to be able to take it out of cordon defense, and commanded fire in 36.57 to knock out the Australian company there (which was illegal: that hex was in Us/Them, which meant both sides were Hiding, and there’s no fire from Hiding units). A couple other fires caused morale checks, but nothing more (we would pass all our morale checks for quite a while until one spectacular failure).
I got the third initiative, and drew the 2nd Australian Brigade. Jacob’s battery fired on the 1/Field 9 and reduced it a step. Most of the division made way towards their goal of 37.52, with an eye to forming a decent line, and passed a morale check when the 1/Field 9 fired on one of the half-battalions. I got the next initiative, and the first discretionary chit draw of the game, picking the 1st Australian, and shuffled parts of it forward.
Mark got the next draw for the 57th and the big attack. Commanded fire knocked out the half-battalion on Battleship Hill, and then the 8 Mtn/39 caused a step in Baby 700 (really bad rounding rolls). The 2nd Battalion rushed forward to assault Baby 700, followed by the 3rd, who took a step loss on the way into the hex, ending up with a 7:3 assault, that knocked out all the defenders in three rounds for no Ottoman losses (only the first round had a real chance at a 1/1 result, and Mark rolled well).
The last two chits were mine, and the 3rd Australian started work on some rifle pits, and commanded fire caused a step loss to the 57th in Baby 700. The NZ Brigade was last, and merely moved up a hex within their reserve area.
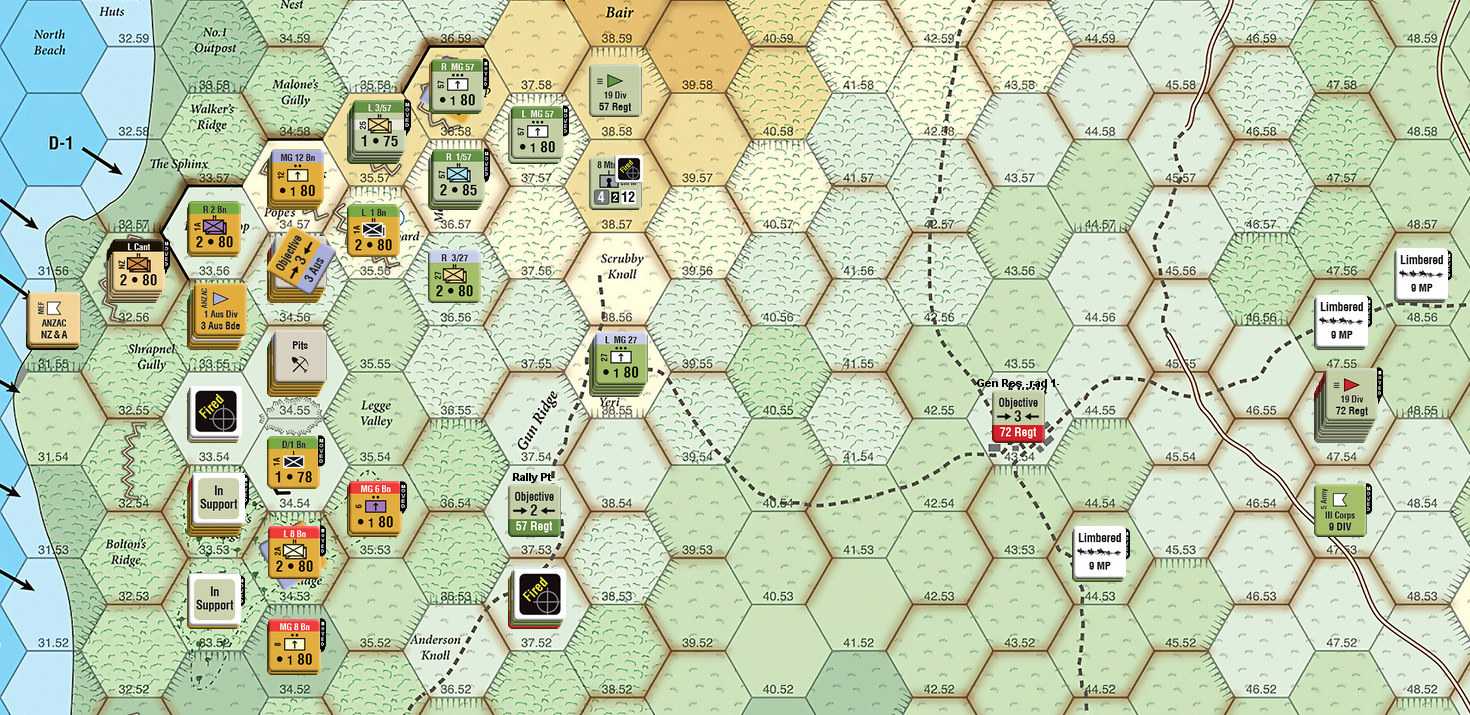
End of the first turn (turn 5; Noon-2 PM). As were helping each other learn, we used objective chits directly on the main map as we figured out orders. Our stacking isn’t very regulation either.
The orders segment is part of an interesting mechanism in the game. Each “brigiment” (brigade or regiment) checks to see if its current orders ‘fail’ due to outside forces, or internal loss of cohesion, and if so it drifts towards a state of “disorganized defense”, where it simply tries to hold on to the ground it occupies. A stalled attack does this automatically, so there was nothing to check with two of my brigades, and the 3rd Aus was too disorganized (no officer points) to move to a more active order. I wanted the NZ Brigade to move to a defense posture (and move up where the fighting was), but my roll was high, so my segment was unproductive. Mark tried to update the 57th’s attack order, and shift the 27th from cordon defense to attack, but failed both rolls. He did manage to update the 72nd’s order to march to Kemal Yeri (38.55), the 77th was given orders to march to an area a bit beyond my southern flank.
Mark led the second turn with the 57th (by random draw). Commanded fire did nothing, and the 1st battalion moved to assault The Chessboard (35.56). I had good modifiers this time (-7!), and half the battalion was lost getting into the hex, and then lost another step in the assault, retreating into Us/Them (where they stayed for the rest of the game). He also repositioned the 7 Mtn/39, but lost a battery to fire from Jacob’s.
The 3rd Aus came up next to finish the rifle pits, and then the 2nd Aus started some new ones (in 33.56/Russel’s Top and 34.54). Mark got to go again and picked the 27th, who started some rifle pits in 36.56, and then the 72nd went, marching up to its original destination of Kurija Dere. The attached artillery, being already limbered this turn made good time and got to Kemal Yeri. I picked the 2nd Aus after that, starting a rifle pit at the south end of the line, and Jacob’s fired at Kemal Yeri, causing a step loss to the R 1/27. Then the New Zealanders went, but I just passed with them, and Mark finished up with the 77th, which being in column, and on a road without ridgelines and lots of uphill (much of the area is really slow going because of those), the head of the column got to 33.48, a mere four hexes from the south end of my line.
Another wrinkle with the orders segment is that officer points get adjusted during it; being in an attack order at night generally guarantees the loss of points, being in defense generally gets them back (different formations can have slightly different rates; the Ottoman 57th brigade loses officer points on attack at night a lot slower than normal). But disorganized defense gets them at half the normal rate; I got lucky and two of the three Australian brigades got a point back for the third turn of the scenario (including the 3 Aus, which starts at zero). This time Mark managed to change the 57th’s attack order, setting their objective as The Nek (34.57), got the 27th to change to an ordinary defense with an objective line running through the part of the ridge he currently held, and then running SE around Legge Valley. The 1 Aus got a really low roll to change to a regular defense that encompassed the northern half of the current line (with L 4 Bn and MG 4 Bn slated to move up into this line, and R 4 Bn in support). 2 Aus also changed over to regular defense and was assigned the southern half of the line, a planned flank in 33.51, and a few units coming out of support. The NZ Brigade, now all arrived, changed to attack, with a goal of Baby 700, and a route going around the north flank.
Mark picked the 57th to go first, and after some ineffective commanded fire, moved the big stack (still 6 steps) to assault The Nek. Op fire took out a step (16 FP @ -6; a high roll got me 1.74, and Mark avoided losing the 0.74), and then he rolled a 99 for the resulting morale check. Morale levels in this game are fairly high (70-80 on d% is typical), and we’d passed everything with ease… and now the first failure was a rout. Normally, a failed morale check at this point would just cause the stack to become confused, and assault at half value. A rout removes the entire stack from the board, with them capable of eventually coming back if the unit goes into a regroup order. So what was looking like another nasty assault for me ended up with the bulk of the 57th Regiment just dissolving and fleeing for the hills. The 57th finished by moving a couple MG platoons into the trenches in Baby 700, passing the loss checks from my OpFire.
After that, I chose the NZ brigade, who moved a battalion and a half up to 34.58 (Malone’s Gully), with the other half following in support, and surviving op fire from the newly positioned MGs. Then the 2nd Aus finished off its rifle pits, started some new ones, and moved up into the newly defined line. Jacob’s battery fired on Kemal Yeri again, doing two step losses (the crowding bonus and limbered artillery modifier together is murder). Then the 72nd continued its march forward, and the 27th went, allowing him to finally disperse the crowd I was shelling, but lost it all to op fire. The remnants of the infantry, and the 8 Mtn/9 to op fire from Jacob’s, and then he lost the MG platoon to concentrated MG fire across Legge Valley. He tried to move L 3/27 and R MG 27 into Baby 500, but failed a morale check to become confused in Battleship Hill. He then tried to get the 2 Sqdrn into Baby 500, but lost them to op fire as they entered the trench.
Then the 77th went, which turned into its own disaster. The area he was entering was largely in LOS of Jacob’s, and artillery can fire as often as it likes… though there’s an extra +3 on the roll per previous shot that’s been taken in the turn. With the -3 for moving, and often the -3 for having spent extra MP in the move (thanks to all the ridgelines around), I could still get effective shots off, even after firing twice before the 77th started moving. Overall, he lost two steps, plus a battery of the 4 Field/39 to op fire (admittedly, this was thanks to some low rolls, mirroring some unlikely step losses I took at the very beginning), with seven op fires from Jacob’s. The turn finished with the 3rd Aus and 1st Aus, and I took a step loss from the 8 Mtn/39 as elements of the 1st Aus filled out the line (and failed the MC to become confused).
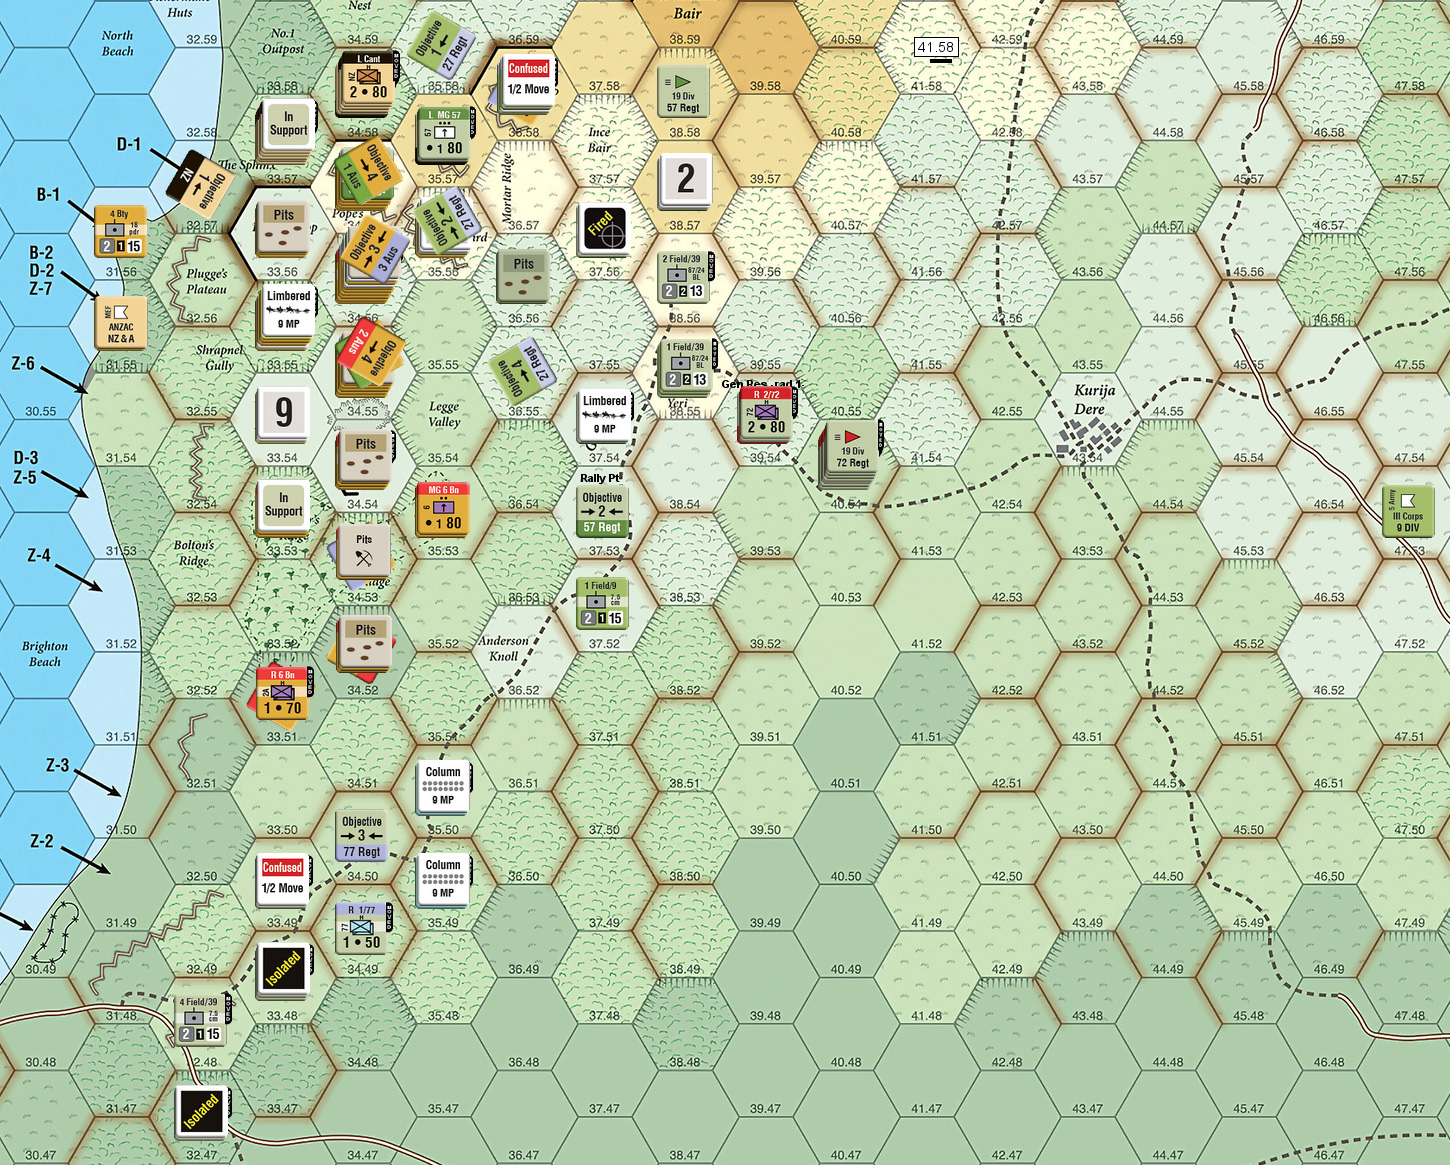
At the end of turn 7.
For turn 8 (dusk, and the fourth turn of the scenario), the 3rd Aus got another officer point, but failed to accept actual orders, but the 2nd Aus managed to change orders to refine the characteristics of its defensive line a bit. Meanwhile, the 72nd changed over to an attack order, with Battleship Hill as the primary objective, and the 77th stayed in reserve. (It was at this point we discovered that lost steps cause a loss in officer points, something not mentioned in the combat section. We did what we could to adjust things, with the primary effect that the 77th failed a roll it had initially made to go over to the attack.)
The 1st Aus lead the turn, and rallied its confused units. Mark then picked the 72nd, and tried shelling The Nek, showing just how much more limited artillery is during twilight in the process. They got about halfway to the front, nicely out of observation range in the failing light. The 57th went next, doing commanded fire on the New Zealanders coming up, and managing to confuse the stack. Mark then picked the 27th, who rallied units in Battleship Hill and then moved into Baby 700 separately, losing the MG unit and a step from L 3/27 from Op Fire. Then the 77th went, with the Brusa falling back, and the confused units rallying.
Since the Ottomans were out of units, I could finally go, starting with the NZ Brigade, who rallied and failed a Move to Assault morale check. The three Australian brigades didn’t do much, but the 2nd Aus did lose a step as they worked into the line.
We did an abbreviated turn 9 (night) to check a few things, and the 77th switched to an attack order, targeting a line from 31.52 to 33.50, and the 77th switched to defense in the Baby 700/east-side of Legge Valley area. The 2nd Aus committed their supporting half battalion to the line. The 72nd went first, getting into position before the NZ Brigade could do anything again, and we called it there.
Afterword
All of this took much longer to do than to say. While there’s some interesting ideas in the system, we had a lot of unanswerable questions (at least by anything we could find in the rules) and spent a half-hour hashing things out, and then spent another half-hour on the same problem a week or two later because there was just no certainty on the first answer. I know the rules are getting a rewrite for the second game (Mons, which Mark has preordered), but I have to say the rules feel underbaked to me, and I hope the rewrite is truly extensive.
The attempt at a boardgaming orders system is interesting, and the various types of orders seem to cover things well. But it is the place where I have a lot of trouble. The combat system is a bit over-fiddly with modifiers, and how they’re grouped, but the chart for them really does a good job with sorting that out. LOS turned out to be a lot more open than we figured when we finally got a handle on some of it later in the game. The assault resolution (and just the process of going into one) is nicely done, though the chart needs touching up (each “cell” of results needs a heavier line around it to group them better). Best of all, you quickly start getting an idea of why attacks were so costly in WWI. Dealing with things in relatively light terrain was bad enough, dealing with truly extensive entrenchments would be murder on the attacker.
Here’s a partial rundown of problems and questions (I started keeping track partway through):
First, a pure symbology nitpick which grated on me: The common maneuver unit of the game is the ‘half battalion’, which is an informal grouping of two companies from the same battalion. The counters for these show a “stacked” unit symbol, which implies two identical units. Then, the size symbol above that is an “H”, a non-standard designation for a half-battalion (fair enough…). This implies that the counter is a pair of half battalions, instead of either a pair of companies (which would just show the standard “I”), or one half battalion.
When you do Op Fire, does the density modifier include everyone in the hex, or just the triggering units? Can non-triggering units be affected by op fire? Considering the loss priorities in 17.2.6, they can be, and presumably that means they contribute to density as well, but a clear statement is needed.
Mountain artillery needs to pack up to move (termed “limbering” for ease of use, fine). However, the terrain effects chart (bad name for a chart that also includes non-terrain movement costs!) says N/A for Limbering foot movement cost (which mountain artillery uses). Should mountain artillery use the cost for entering/leaving column? Free? Whatever it is, it is applicable.
In 3.7.6 you can break down artillery to single step to unlimber in steep scrub, which can only hold one unlimbered step, and there’s advice on how to mark that the unit is one step/battery. What happens to the other steps? There seems to be no extra markers to split up the unit with.
In the Change Orders segment, it looks like you get to either attempt to change orders, or attempt to Commit units in support. i.e., one or the other, but there’s nothing explicit on whether you can attempt to Commit after a failed order change.
Attack orders: once completed, with all units on objective, is there anything that keeps a unit from just staying on that attack order forever? You’ve arrived at the objective already, so it doesn’t seem to turn into a stalled attack if you do nothing on top of the objective.
The rules do not state whether a failed assault attempt (i.e., failed MC for Move to Assault) counts as progress. The status display thankfully states that it does, but it needs to be said in the rules.
Officer point losses due to casualties really needs to be mentioned and referenced in the combat section where you will take casualties.
Trench sides: First, several pre-printed trenches are a little ambiguous where the ‘sides’ are (such as 34.57 The Nek). But the main question is, when fire is traced directly down a hexspine into a… ‘trench side border’, is it enfilading the trench or not?
Objectives and route of march needs a going over. The general intent is clear, but it’s really hard to figure out what’s allowed, and what isn’t. Part of this is just the problem of having a defined start, and defined end (kind of… which is also part of the trouble), and you’re left to sort out the middle without a lot of signposts. In confined spaces that might get really confusing if more than one turn is needed. Admittedly, thinking about it, a diagram written on one of the planning sheets would probably take care of the real troubles, which come from trying to short-hand it from the counters. Still, with an attack order with a point objective, and, say, a line of four units… what’s the expected end state (with the point only being three hexes wide)? When an attack has all the units inside a one hex distance of its point objective, can you keep going to other hexes inside the radius? Do you get to figure that out from turn to turn? The quibbles go on and on….
Discussion ¬