Rindis.com

All my hobbies, all the time
  • Home
  • My Blog
  • Games
  • History

Categories

  • Books (503)
  • Comics (10)
  • Gaming (917)
    • Boardgaming (673)
      • ASL (154)
      • CC:Ancients (83)
      • F&E (78)
        • BvR – The Wind (26)
        • Four Vassal War (9)
        • Konya wa Hurricane (17)
        • Second Wind (5)
      • SFB (78)
    • Computer games (162)
      • MMO (77)
    • Design and Effect (6)
    • RPGs (66)
      • D&D (25)
        • O2 Blade of Vengeance (3)
      • GURPS (32)
  • History (10)
  • Life (82)
    • Conventions (9)
  • News (29)
  • Technology (6)
  • Video (49)
    • Anime (47)
  • Writing (1)

Patreon

Support Rindis.com on Patreon!
Become a patron at Patreon!

Other blogs:

RSS Inside GMT

  • Coast Watchers – Session Report – “The Airfield” June 5, 2026

RSS Playing at the World

  • Playing at the World 2E V2 Arrives May 5, 2025

RSS Dyson’s Dodecahedron

  • Cyberstyle 8.4 June 6, 2026

RSS Quest for Fun!

  • The Expense Post May 24, 2026

RSS Bruce Heard and New Stories

  • Pain, Exhaustion, and Morale in D&D BECMI June 7, 2026

RSS Chicago Wargamer

  • The 2 Half-Squads - Episode 310: Cruising Through Crucible of Steel January 27, 2023

RSS CRRPG Addict

  • BRIEFs: Black Crystal (1982), Creepers (1982), Chitei Tanken (1982) June 8, 2026
SF&F blogs:

RSS Fantasy Cafe

  • The Leaning Pile of Books May 24, 2026

RSS Lynn’s Book Blog

  • Booking Ahead/Weekly Wrap Up June 7, 2026
ASL blogs:

RSS Sitrep

  • Cardinal ASL Sins March 18, 2026

RSS Hong Kong Wargamer

  • FT114 Yellow Extract After Action Report (AAR) Advanced Squad Leader scenario April 16, 2025

RSS Hex and Violence

  • This still exists? March 25, 2025

RSS Grumble Jones

  • AAR Slides for Schwerpunkt SP96 Husum Hotfoot June 5, 2026

RSS Desperation Morale

  • How to Learn ASL March 16, 2025

RSS Banzai!!

  • October North Texas Gameday October 21, 2019

RSS A Room Without a LOS

  • [Crossing the Moro CG] T=0902 -- Rough start July 18, 2015
GURPS blogs:

RSS Dungeon Fantastic

  • Felltower House Rules Examined June 7, 2026

RSS Gaming Ballistic

  • B-Scale: Damage That Scales from Tardigrades to Kaiju June 5, 2026

RSS Ravens N’ Pennies

RSS Let’s GURPS

  • Review: GURPS Realm Management March 29, 2021

RSS No School Grognard

  • It came from the GURPS forums: Low-Tech armor and fire damage January 29, 2018

RSS The Collaborative Gamer

  • Thoughts on a Town Adventures System January 18, 2022

RSS Don’t Forget Your Boots

  • GURPS Supers Newport Academy #6: “Old Friends, New Again” June 7, 2026

RSS Orbs and Balrogs

  • Bretwalda - Daggers of Oxenaforda pt.4 - Fallen King May 27, 2017

Endurance Fight

by Rindis on April 22, 2022 at 12:00 pm
Posted In: Boardgaming

After my second game of Space Empires 4X with Demon over Discord, I got involved in a four-player game, which stalled out for a while (it’s still unfinished), and I got talked into a second four-player game as a replacement for someone who decided he couldn’t swing the time. As such, it went for more of the Replicators rules than I was comfortable with, since I’m still trying to grasp the implications of most of Close Encounters. It got going early in November, and wrapped up towards the end of January (which is actually pretty speedy for this).

But the main set up was the ‘blood brothers’ option for a 2 vs 2 game, and to combat worries over weaker cards, each side drew four Empire Advantage cards and picked two. Random pairing gave me BravoCo as my ally in the upper right, with me in the lower left, PLM directly opposite me, and Demon in the far corner. We drew Gifted Scientists, Powerful Psychics, Warrior Race, and Celestial Knights, and I took the first one, while Bravo took the second option. I was hoping to use the discount in tech to get into a few different specialized branches, and force our opponents to spend CPs reacting to them while Bravo concentrated on the main line and exploring for the both of us.

The first three econ turns or so went as usual, with everyone exploring their home space and preparing for a wider-ranging future. The zone between Demon and Bravo was the first to get truly explored, turning up a pair of adjacent black holes. Bravo manged to get a pipeline into one of them, and set up a force on top of it next to two of Demon’s colonies. My attempt to shortcut the black hole in my space with a pipeline did not end well, and set me back a bit for setting up on the frontier.

The first fight was on my frontier with PLM in the lead up to econ 7. He revealed a Fold in Space chit that he’d explored earlier, and hit two colonies at the edge of the board, getting a hit on each of them. The really bad news for me is that he revealed three CAs (of varying tech, the best being +0/+1 with move 3) doing this, and I was still on DDs, though I had built two raiders (both +1/+0).


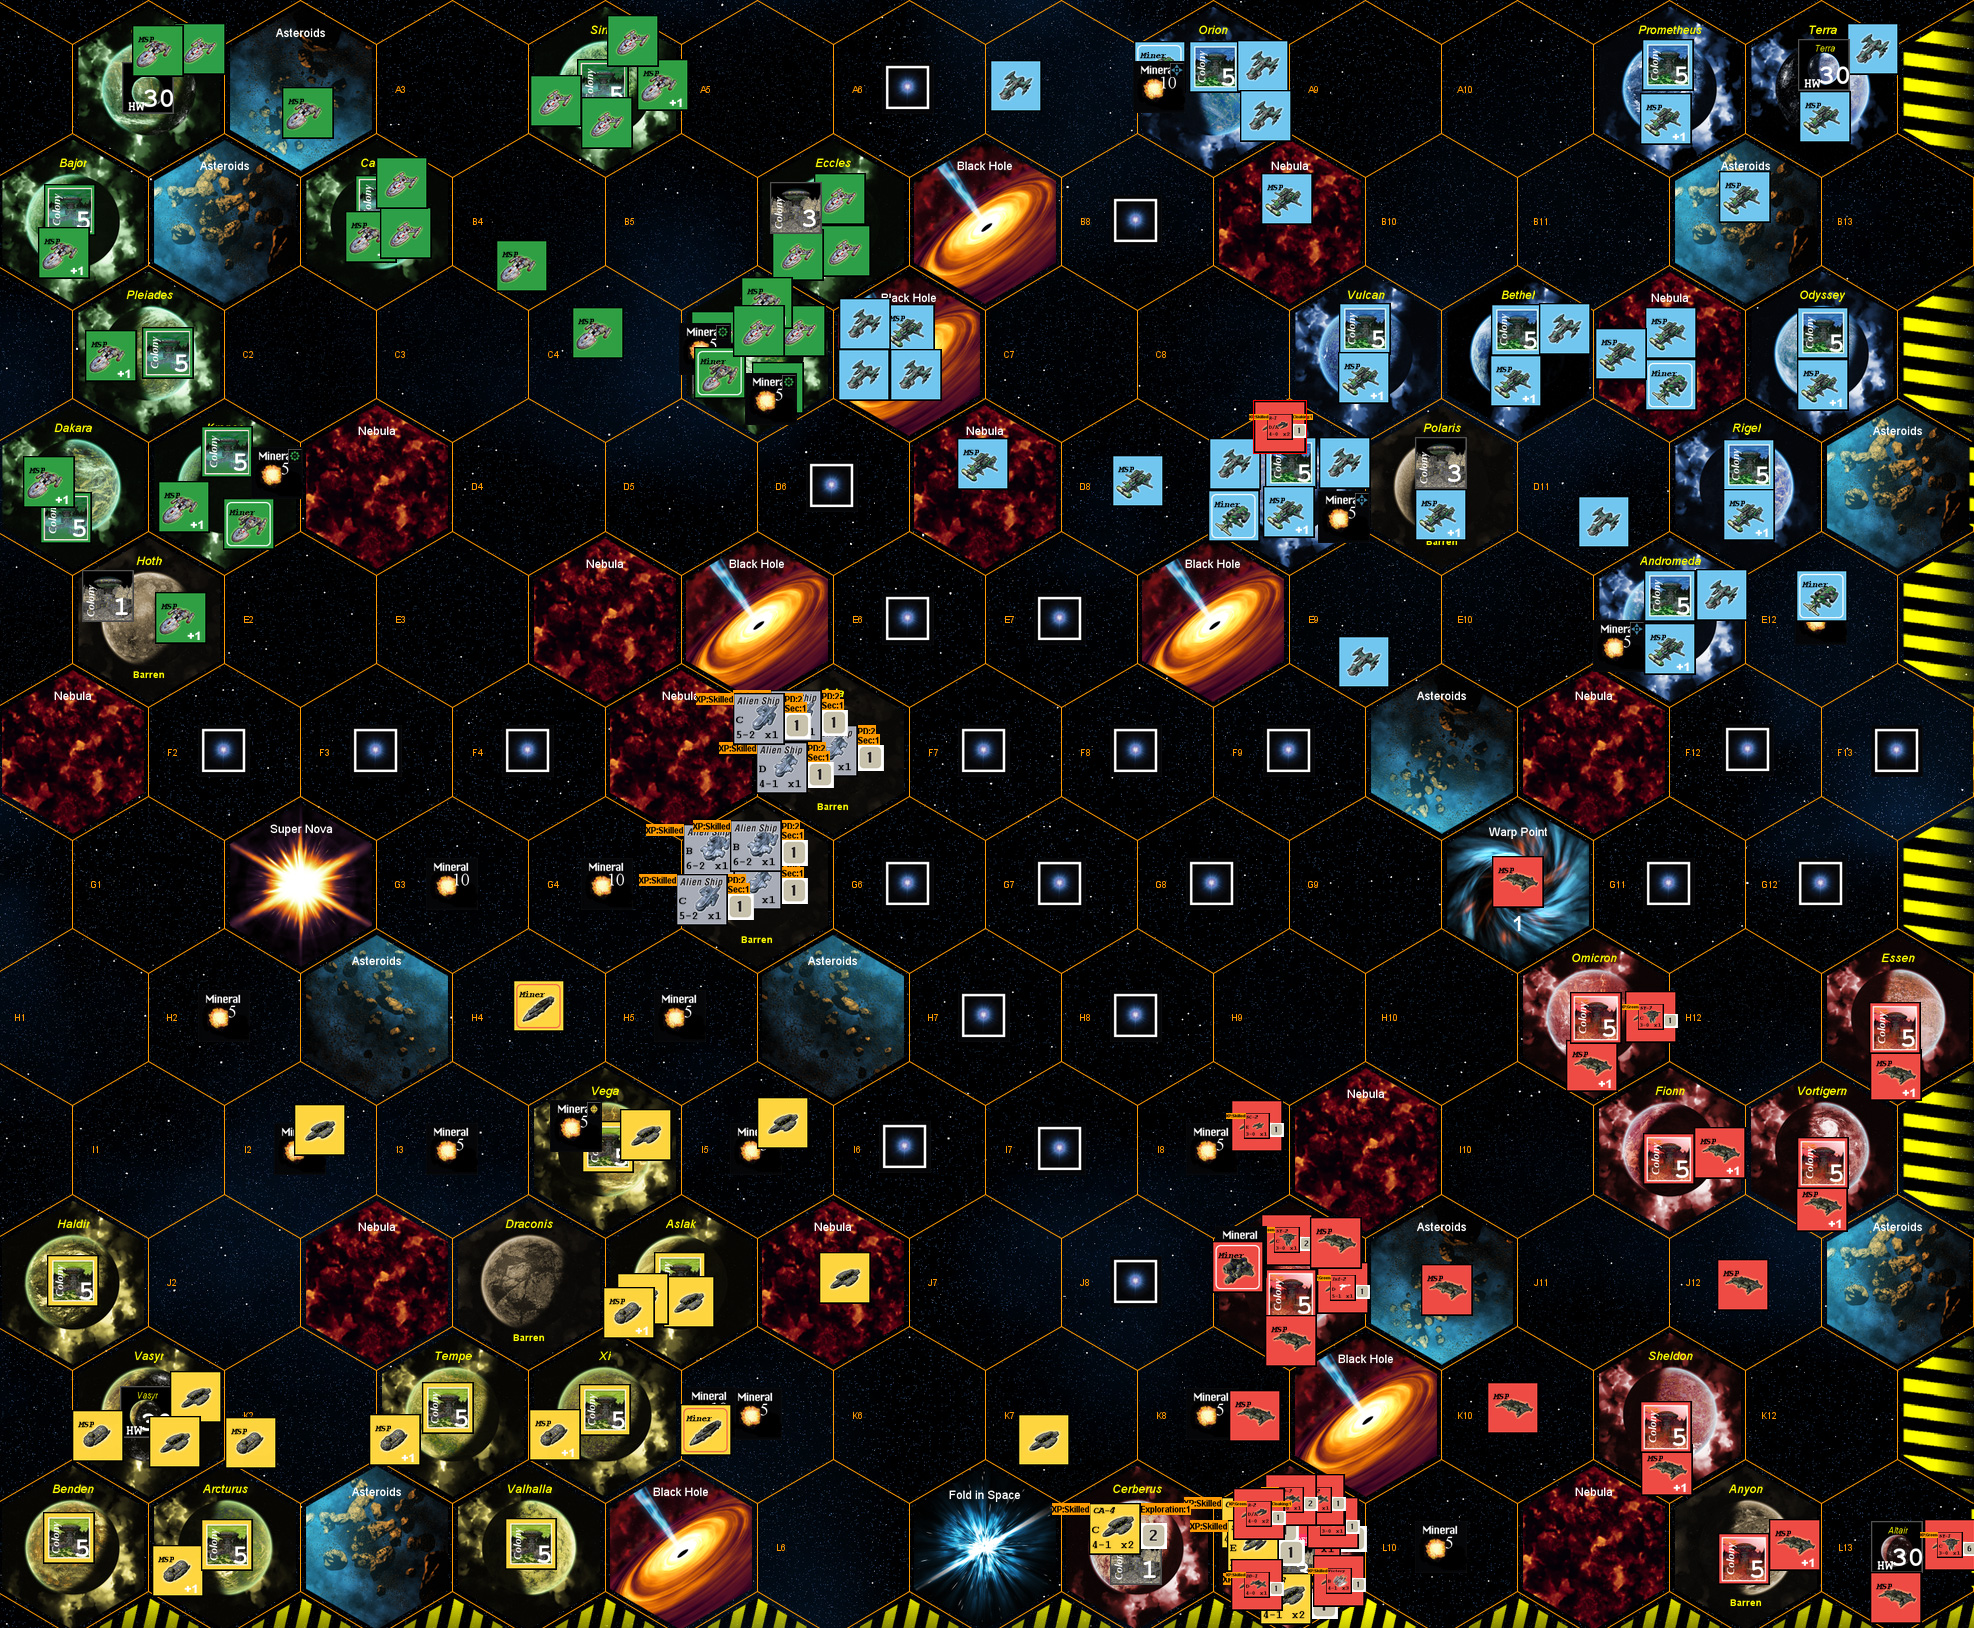
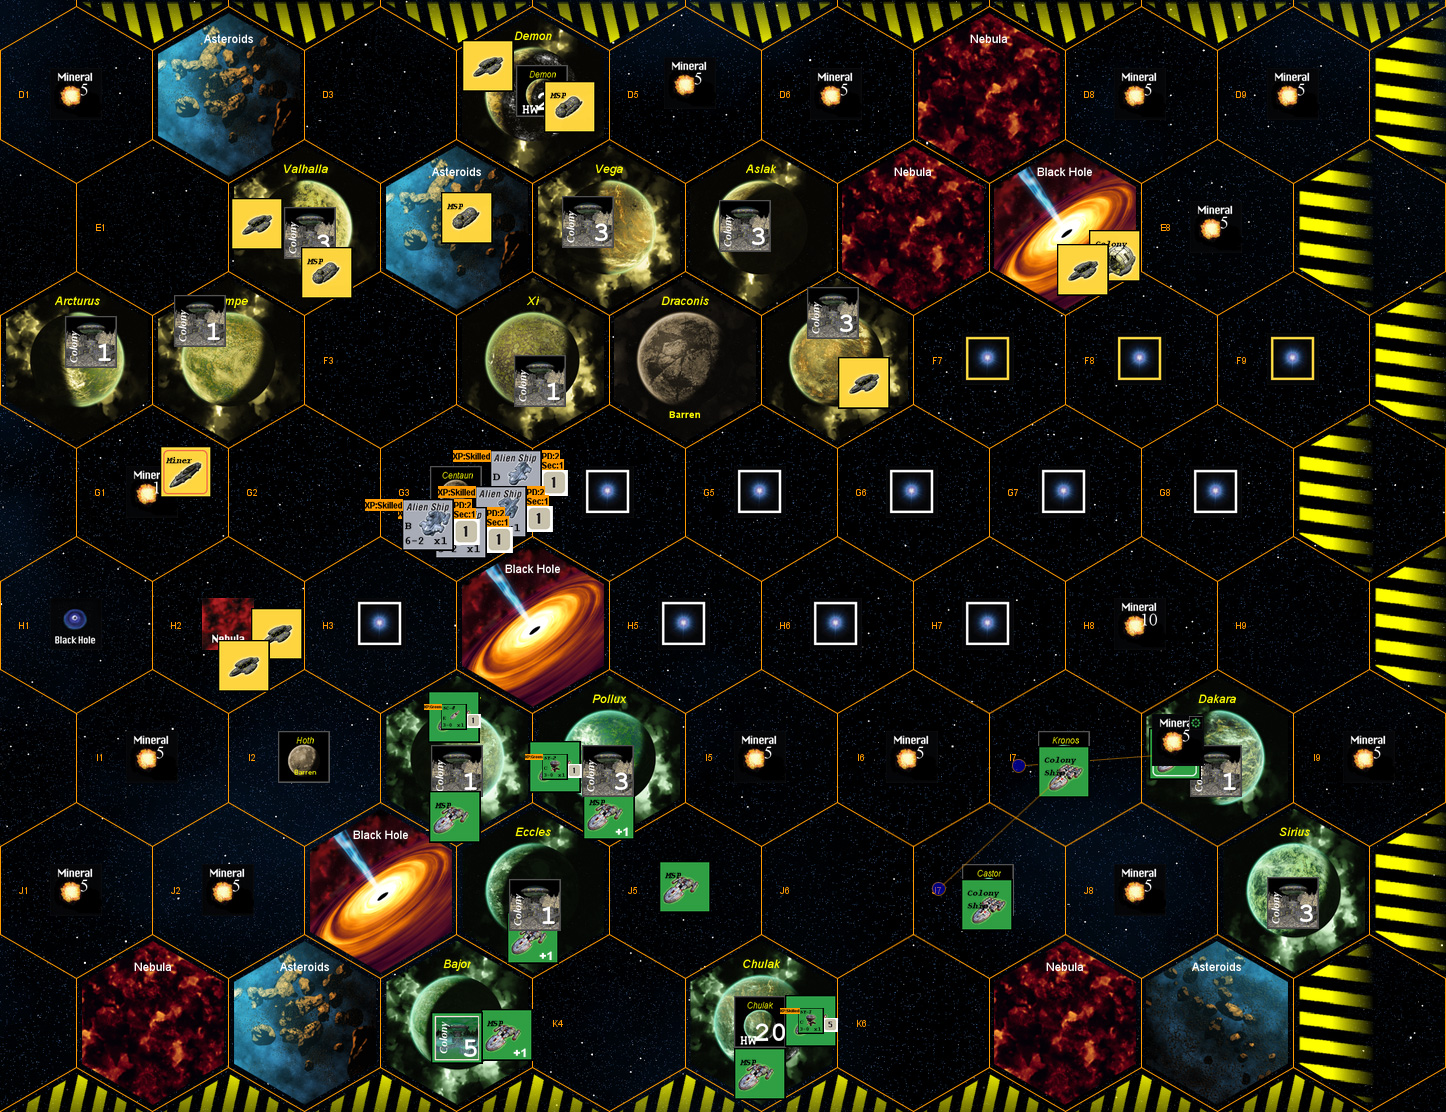
Battle at Antaries (bottom middle). I’m red, Bravo is blue, Demon and PLM are green and yellow respectively.

I moved against the bigger fleet with everything available, and knocked out a CA with a R and Victory, and he knocked out one of four DDs. I was only able to get a single hit against his remaining CA before it retreated out.

Econ turn 7 followed immediately after that, and I spent 3 CP on the turn order bid while setting up a forward base, a new R, and two decoys (while getting Def +1, Move 4, and Military Academies). Sadly, Bravo could only manage 1 CP, and bids were tied, 4 CP to 4 CP for each side, letting PLM and Demon continue to go first, when I could have really used a second turn. PLM moved Argo onto the rest of his fleet, and took out my colony at Cerberus. That gave him 3xCA and Argo, while I could hit him with Victory, 3xCA, 2xR, and 1xSC. I very nearly went in after him (and would have if I’d gone first), but eventually decided I didn’t like the odds.

And the odds on my front permanently tilted in PLM’s favor. Partially because he was always a step or so ahead of me, and partially because I painted myself into a corner. The plan was to fortify and then build a navy, but it just left me without a navy. I took mine technology in hopes of mass-producing them, but the extra CP cost on everything for my advantage meant that was probably a bad decision. They certainly slowed him down, but also contributed to me not being able to stand up in a fight.

Demon revealed a fold in A6, and used it to get at a second fleet of Bravo’s, bringing 6xBC against 4xCA (Demon’s BCs were move 2 with no other upgrades while bulk of the CAs were move 4 +1/+0). Demon killed 2xCA for no return damage, and Bravo retreated to his forward colony. Demon then pulled back to protect his space, leaving behind a one-group blocking force… which turned out to be a transport with no troops….

I had tried to slip my new R through the lines, but PLM leapt on it with everything he had, and had scanners available to engage and kill it (one bad bit with the timing of the first combat is he got to see an R right before production…). After that, he went back to my fleet sitting over Antares (Athos in J9 could have crippled me, with only a base, the forward 2xSY and 1xSC, but the two decoys I sent in did their work). This time, he had a BC, 3xCA, 1xDD, 1xSC versus the same fleet I’d had before, and lost everything but my flagship, only taking out his DD (and scanner…) in return. Amazingly, bombardment did nothing to my colony, with the 1 defense from having infantry stationed there blocking everything.

Things were a little quiet after that other than the slow bombardment of my colony. After the 8th econ turn, he pressed on into my space, leaving a small force above Antares to continue the bombardment and blockade. Two new groups moved up adjacent, and I worried they might be ground troops, so I came out to check, finding a BC and DDX(!) with Victory and a SC. I got lucky, killing the DDX while taking no hits, and the BC retreated out on the second round. While some ships pressed on to my inner colony Fionn, others turned back to join newer ships at taking the battle to Victory, losing my SC, but costing him another DDX before Victory retreated.

Bravo moved in to pick off the transport, showing 11xCA in three groups to do it. Demon moved in Thunderchild (improved to move 2…) 5xBC, a BV with three fighters and a SC. All of Demon’s ships (other than the SC, which he screened) fired first, and killed three CAs on the first round with good rolls. Return fire killed the fighters, and damaged one BC, while the second round took out another two CAs, and Bravo’s fire merely did two hits to the BV. The fight went another round with a wounded BC picked off, and another CA lost before Bravo retreated. (It should be noted that Demon’s ships were generally no better than move 2, while the CAs were largely +1/+1, and so had better stats than the BCs, but the dice were against Bravo.)

However, after that Bravo put his “black hole squadron” (now consisting of Enterprise, 1xCA, 2xSC, and my first R, which I’d sent over before my first encounter with PLM) into one of Demon’s colonies, which merely had a base, 2xSY and a DD (with scanning, sadly). He had to retreat out, but took no losses, and killed the DD and shipyards. Demon managed to get a SC into the black hole to kill the pipeline there, and of course pulled ships back to cover that area. Bravo moved in on the remains of Demon’s fleet on his border (1xBV, 1xBC, and Thunderchild) with 5xCA and 3xBC. Both sides lost a BC, and then Demon retreated (with two hits on his BV). The group from the black hole could retreat sideways (towards my colonies), and then pressed further into Demon’s space, where he caught up to it with a BV (w/2 fighters) and DDX. This time the dice were kind to Bravo, and the BV retreated after the first round, everything else having been killed for no more than a single hit on my R.

Meanwhile, PLM finished off the colony at Fionn, and moved to Essen, wiping it out in bombardment. Much worse, he got a colony ship to Cerberus, and a transport to Antares with 6xmarines to capture it. I’m not sure what techs he took from me, but I would guess attack-1 would be one of them. He also had the opportunity to move two groups into Demon’s area, one of which accompanied the next combat with Bravo’s fleet in Demon’s space. There were 3xBC (one of which was PLM’s) and another DDX, and they took out the deep-raiding force for no losses (couldn’t get a hit on that DDX).

Bravo forked Demon’s defenses, and picked the one he didn’t expect, and sent 6xBC and 3xCA to Eccles, which had a base, Thunderchild, 3xBC, 1xBV (w/1xfighter), and 3xSY. Demon still didn’t have any combat techs, while Bravo was at +1/+1 and tactics 1 for most of the fleet. He retreated out after a round, having lost 2xBC, but having killed the shipyards and fighter. After the next econ phase, he came back and hit Sirius, which Demon had thought was Bravo’s initial target, and now had no defenders, and wiped it out.

With Antares out of the way, PLM went after Athos, while his fleet deep in my space was slowly pushed towards the center of the board by mines and Bravo showing up with 4xCA.

Sadly, I only had one mine there, and PLM showed up with a minesweeper, so that did nothing. He had two DDXs, and I got both on the first round before they could fire, but he got my three shipyards. I also managed to kill one of three BCs, and kept getting single hits against the others, so PLM retreated rather than accept the loss of any of them. However, he landed six marines from a transport before retreating out, taking the planet and killing my base, leaving me blockading it with Victory and a surviving CA. After the ensuing 12th econ turn, PLM came back to force my ships off the planet, killing my CA for no losses. Worse, he finally revealed his empire advantage at this point: Cloaking Geniuses, which promptly overturned most of my defensive plans (with cloaking 2, everything up to a CA can be cloaked, so the bulk of his navy could just ignore the mines I was trying to use to control his movement).

I struck back at Antares with 5xCA, one of which was killed by PLM‘s mine. Past that, he had 2xCA, 1xSC, and a shipyard, and I took out the latter two, leaving him to retreat from a 2:1 fight. He came back on his turn, adding Argo and 2xBC to the previous fleet. What I hadn’t anticipated was that he would move into the hex I came from, leaving me with only a black hole as the path out. I lost three CA, and then the fourth did not survive the retreat. In the meantime, I killed 2xCA.

Bravo returned to Eccles with a large fleet (12xBC, 2xCA, and two transports with 6xinfantry and 6xmarines). All the defenders were at Pollux next door, so he knocked out the base, bombarded the planet to a “1”, and then took it with ground troops, losing three infantry. Demon, as it turned out, had Traders which had given him a strong economy, though Bravo’s actions had largely disrupted the pipeline network. PLM’s old forward fleet tried to take on a fleet of Bravo’s but found 4xCA, and eventually retreated back out, with no one losing any ships.

PLM had moved a couple of cloaked groups deeper into my area, and on top of one of my blocking forces. However, he left a gap between them and the rest of his navy, so a slipped a single R into there to force the heavier units to stop. He obligingly sent in 2xBC, 2xCA, and a SW, which I revealed, and then retreated the R out before combat. The forward force turned out to be 2xSC, which probed further in, found mines, and retreated out. I repeated the trick on the next turn, with everything else huddled on various valuable hard-points.

We finally won a turn order bid on econ 14 to get a double turn, and Bravo sent the main fleet to Castor (two hexes from Demon’s homeworld… on the other side of asteroids), and wiped it out. He advanced to adjacent, and Demon and PLM went into Bravo’s space and hit Orion, destroying the colony. And on move 3 before the 14th econ turn, Bravo’s fleet got to Demon’s homeworld with 12xBC and 3xCA. Demon’s defenses were a base, 6xfighters, and 8xship yards. All of those went down in three rounds of combat for the cost of one BC (Demon’s shipyards got lucky with two 1s  in the first round to kill a BC by themselves). Then the bombardment knocked out the homeworld to give our team the win.

Afterword

I spend a lot of time regretting the initial encounter with PLM. I figured if I’d killed one more CA I could have contained the situation long enough to get a proper navy built, and then narrowly missing the turn bid ruined the next chance, but I got caught on the wrong side of the DD/CA divide. Which isn’t entirely true, as the raiders are really a specialty cruiser, though I kept wanting to think of them a one-hull ships instead of two-hull. On the other hand, in a full fleet battle the Rs aren’t as good as the CAs because they lack the native defense, and after the first round have a worse firing rank. But in a smaller battle, they’re good since that first round is more important, and either way, the +1 attack is handy…. once there’s no scanners.

Overall, I’m not sure just how PLM managed all he did. On the other hand, thinking it over, I wasted my main chances with my empire advantage. Going for mass-produced mines as a hold-over defense is a poor play when everything costs one more than normal. In fact, I’m thinking going straight for big expensive hulls might be a good idea for them, since the per-unit penalty goes down the more expensive the ship is.

On the other hand, BravoCo did an excellent job mass-producing CAs and BCs. Things were a little touch-and-go on his front for a while, but he picked on Demon’s infrastructure, taking out forward shipyards, and then disrupting the pipelines to leverage a better position on the front over time.

The end of the game was a bit of a race, as I still didn’t have much of a navy (every time I started getting one put together, I’d lose most of it in the next battle), and PLM was three hexes away from my homeworld with a force I couldn’t really stop, though it’d quickly exhaust itself against the more defended locations. The real problem was that I’d never get a chance to recover economically with that running around.

└ Tags: gaming, Space Empires
 Comment 

Fighter Rush

by Rindis on November 5, 2021 at 12:00 pm
Posted In: Boardgaming

After my knife fight with Demon finished, we immediately went to a second SE:4X game on the small two-player map (which is, amazingly, still bigger than the previous game. This time we used all the base set regular and advanced rules, and threw in ship experience from Close Encounters.

The beginning went as usual, though I was slightly behind on initial colonies, as the placement wasn’t as good (nothing but minerals adjacent to my homeworld). To my surprise, Demon explored into deep space at the end of the second cycle of movement, with ten hexes of his own space left to explore. He found a 10 mineral and a barren planet, where the aliens promptly shot up his SC. Meanwhile I was down to seven unexplored hexes, but colonies were still slightly behind, as I was having trouble finding the planets.

His second SC died to a Danger! at the beginning of the third round of turns, while one of mine survived an encounter with the home-area black hole. Demon struggled to finish exploring his home area, while I finished up, and explored two hexes of deep space in the third round, losing a SC to another black hole, and finding a nebula, which gave us a clear route to each other. I was still a colony behind, but I had some pipelines in, whereas Demon had yet to build any. Demon built two forward shipyards and a pair of new SC, while I upgraded my homeworld SY and built one forward one, rounded out my colony ships, and replaced a SC.

I lost a SC to another deep-space black hole, and then another to Danger! Demon sent a pair of groups through the “pass” to my space, but thankfully I’d have another build before they could arrive. (Even if he’d bought move 2, the deep-space nebula would slow them up.) As he slowly explored his own space, a SC and colony ship stumbled into his black hole, but both lived. I got DD technology, so I could put a base up at the colony he was approaching, bought a DD and a SC, along with more pipelines. Demon improved his shipyards and deployed a new SC.


↓ Read the rest of this entry…

└ Tags: gaming, Space Empires
1 Comment

Two Versus One

by Rindis on August 29, 2021 at 12:00 pm
Posted In: Boardgaming

Our latest multiplayer-day went through a few revisions on the way to happening. It was going to be five people, but Mark’s work called him off to France for a couple weeks (…there are worse fates), and then Patch’s work called him at 6 AM on a Sunday (…and that’s one of them). So… we ended up with three-player Space Empires 4X again. This time we tried a 2-vs-1 scenario I had noticed in the scenario book after the last session; we actually went with the Close Encounters version where the single player (Dave) drew six empire advantage cards and kept four.

Jason and I of course then made up the team. Thankfully the scenario uses “suspicious allies” rules, because we wouldn’t have a chance at any unified action. By the end of the day we had some limited contact with each other (generally in the middle of the board), while the main strip between us was still mostly intact at the end of the day. I had set up a single shipyard out on that border, and most turns built a new SC to explore the region, but we use heavy terrain, and most of them just died instantly.

We also did two things to get things going faster, which worked. First, we used the 30-point homeworlds, but without much more to spend on, so after the initial hump of not enough shipyard space, things started humming along. The other was a ‘turn 0’ idea I had: everyone flips over three (non-deep space) tiles next to their homeworld, and moves a SC into each; do not bother to roll for any black hole you find (the price is having a black hole to dodge for the rest of the game). Then start the game, with a little knowledge of where your miners and colonies might want to go. It’s minor, but I think it helps, and is very fast.

Dave picked Space Pilgrims, Industrious Race, Fearless Race, and Star Wolves. The first negates terrain (other than pulling Danger! chits), which was certainly handy, the second allows colonization of asteroids, which he revealed mid-game, and did much to accelerate his economy. Star Wolves never came up as he wasn’t facing bigger ships (that the bonus applies to) until late, and he didn’t go the carrier route, and was only building the biggest ships he could. Fearless was handy for a long time, as the free rank “A” firing trumped everything until very late when BBs appeared. There’s a few times when retreating early might have been best, but he wasn’t afraid to throw away mid-game ships, and the big battles later happened over his colonies, which he was loathe to abandon.

His major successes in early exploration were mostly on my side of the map (actually, he got a lot of ‘safe’ deep space tiles early on), including a space wreck back on his edge of the board which got him Move 2. There was a barren planet in the area between him and I, another almost in the middle of the board, and a set of three at the far corner between us. I’m not so sure what was in the area between him and Jason, but it was taking a lot longer to clear out. I had a slow start thanks to most of my planets being in the outer reaches of my home area.

We had also opted to use terraforming 2/nebula mining from Close Encounters, just so miners would have something else to do (we used the base set sheets, but penciled in the extra tech, though I mis-remembered it as 30 instead of 25). Three of the hexes adjacent to my homeworld were a barren planet and two nebulas (and only two planets at range 2 of my homeworld!), so I purchased terraforming 1 during Econ 2, and terraforming 2 during 4. It took a while to get around to mining the second nebula, but the extra income sure helped. My economy was the weakest of all three until econ 5, when I overtook Jason, and I overtook Dave on 6 (though our totals stayed very close; Dave took terraforming 2 in econ 4, but didn’t start mining asteroids until later—I think he was still busy picking up mineral 10s).

I sent in raiding forces as soon as I could get a clear path between us (the first ‘clear’ path had a black hole, unfortunately), and while I established a small shipyard on my outpost out there, it mostly kept busy with colony ships (I got those three planets in the deep corner; it helped my economy keep up). And had enough success to keep Dave trimmed down a little. It helped that another space wreck showed up on my side of the center of the board, and it got me Move 2. (Jason spent on it too at some point, so we were all at Move 2 at the end of the day. I kept remembering that I wanted to spend on Move 3 right after balancing the budget….)

It was right after the first drive petered out and I was trying to face off Dave’s fleet that the asteroid colonies began, and I was seriously worried about the long-term economy building up there. Thankfully, Jason started finding his way to Dave’s empire at that point (aided by a Lost in Space for first contact). He was able to put ever-mounting pressure on from his direction that helped me manage to colonize that far corner without interference. While I was finishing with using destroyer swarms, and moving up to CAs, Dave had been using BCs after extensive construction of bases and shipyards. Jason initially showed up with CAs and moved to BCs, with slightly better tech. He also went his traditional route of taking tactics, which didn’t help in the first round, thanks to the free rank A shot, but helped after that, when when he moved into BBs and DNs, he consistently shot first.

The BC-to-BB period had two or three large fleet battles that tended to go on long, thanks to cold dice, and Dave’s lower technology on his ships vs Jason’s smaller ones. In the end, the first fleet battle went narrowly to Jason, and the second one went to Jason more quickly, but still with considerable losses to Jason.

By that time, my CAs were showing up with increasingly better tech, and I shifted to BCs for the final two rounds. As we were nearing the end of the day, Dave surrendered in frustration, with all his mobile assets gone, and his economy ready to take a big hit as our fleets pressed in. One thing that was a continuing problem for Dave was that with everyone at move-2, the pattern was to wait for round 3 from two hexes away, and hit the least-defended target.


End of the day. Dave = Yellow, I was Red, and Jason Blue.

Afterword

Dave has expressed problems with the game before, and is currently officially “done” with it. Now, right after the session, it turned out that one big problem is really an expectation mismatch. He sees naval designations, and thinks in terms of (WWII wet-)navy realities where cruisers have no right to take on a battleship and win even with higher numbers of cruisers. He has come to a belated realization that technology trumps size to a degree he doesn’t care for (…I pointed out the differences between a pre-dreadnought and the Iowa; we’ll see if that goes anywhere). He also doesn’t have a big background in space 4X games, which regularly just use naval designations as a shorthand for “size”, and is mentally prepared for mission differences. And he finds the tracking onerous enough that he doesn’t care to have different types of ships.

I’d been thinking his combat problems more stemmed from the fact that combat is a nuanced bucket of dice system, since relatively low-odds results were when the frustration was evident. Personally, combat is a place I find a bit weak in the design. Mostly, it’s a very neat, reasonably fast system with the right level of complexity. The trouble is that it’s a little too easy to get into combats where both sides have low odds of hitting, and then the combat drags out (asteroid fields are especially bad at this; thankfully we hardly ever end up with combat in one); the first fleet combat this time dragged out a few extra rounds with only moderately cold dice.

Accelerating growth by using the 30 CP homeworlds definitely helped, and freed up early game budgets a lot. I assume that effect is still true in full Close Encounters as you won’t be buying many of the extras straight off the bat. Since everyone also started building out pipelines early, this also meant a common early purchase was an extra shipyard at the homeworld. I eventually got to a full 6 there, but was stalled at 5 for a long time as it was another place that I kept thinking about after getting my production set.

Since Dave tends to be central to multiplayer days, there’ll probably be noticeably less SE4X in the future, though I’m currently engaged in a game over Discord (actually, my second game). Hopefully, next time we’ll finally have more than three people, and we’ll be doing a long-planned day of shorter games.

└ Tags: gaming, Space Empires
 Comment 

Destroyer Encounters

by Rindis on July 28, 2021 at 12:00 pm
Posted In: Boardgaming

I had originally thought to do a day of smaller, shorter games for our first multiplayer day after the lockdown, but Patch had to cancel, leaving us with three people for the day, and we went for one of our better games for that player count: Space Empires 4X. I actually got Close Encounters at the end of 2019, so I punched and clipped all the counters that expand the pool of available ships from the main set, and the fleet markers.

We (Mark, Dave, and I) also tried out both the Empire Advantage cards and Alien Technology cards (with no non-player aliens, so needing to pay to keep the card) with our otherwise usual setup (merchant pipelines, heavy terrain, and carriers—though nobody bothered with the last). I drew Hive Mind, which was tempting with the slowly stacking list of combat improvements, though I find most combats don’t go much past two rounds, which made it limiting, and Merchants, which I kept for the extra pipeline income. Mark took Nano-technology, which I twigged to mid-game as I knew some of his ships hadn’t been back home, but had upgraded…. And Dave took Expert Tacticians (which would have done better if we would remember the fleet size bonuses more often, though early on it was used to deny me one).

My start was both fast and slow. I had one of the three-player ‘corner’ empires, and I sent one of the initial scouts into the deep-space corner behind me, and promptly lost it, slowing down exploration. This was also something of a recurring theme, and getting some of my home area explored took quite a while, and nothing good ever turned up there (final reveals were a doomsday machine, which we aren’t using, so it’s a null draw, and asteroids; Mark didn’t explore his corner until extremely late in the day). On the other hand, two planets were adjacent to my homeworld, which allowed quick colonization and pipeline setup.

Heavy terrain combined with the extreme amount of deep space on a three-player map leads to a lot of dead scouts, especially as we were all slow getting to cruisers, and no one ever took exploration (by that point, shooting wars had largely stopped exploration). Conflict started a bit early when Mark hit a lost in space marker, and Dave sent him deeper into the void to another lost in space marker, which sent him into my home region (this was a bit short of the third econ turn I think). Mark’s scout continued on to shoot at my colony (reducing from 3 to 1) before I showed up and got it on a lucky shot with my scout. This planet was about two hexes away from the deep space zone… which was as far out as any of my planets were in that direction.

I built a pair of DDs, sent them out there, cleared a couple unexplored hexes in the region with SCs and went into Mark’s home area, shooting up a just-colonized planet. The plan was to head along the fringe of his space and into where he was making contact with Dave. Then a pair of Warp Point 2s showed up, one near where the DDs were headed, and one near where Dave and I were coming into contact. So then the plan was to move through that. Then Dave found a space wreck out in the deep corner away from Mark on his side of the board, and the DDs headed there just in time to shoot up a miner that had claimed it (that was allowed by a muffed turn reshuffle…). Dave had also found three barren planets out there, and had just colonized them. I attempted to shoot them up, but missed every single roll, only blockading one for two econ turns until Dave’s navy finally took care of the problem.

Meanwhile, I had found the last of my regular planets on the edge of my area towards Dave, and “my” barren planet was in the hex closest to Dave. I researched terraforming and headed out there when a deep-space barren was found adjacent to it. I put a SC or two out to garrison it, and colonized it. I forget what the other card was, but I drew Efficient Factories, and paid for it on econ turn 6. That was another healthy boost to income (full colonies produce 6 instead of 5). We forgot at first, but Dave drew cards for all three barrens in the back corner he colonized, picked cards… and then refused to pay for any of them; they were all large ship bonuses, and we were a ways away from those.

So, I ended up poking both anthills, and I was kept busy trying to keep both fronts active, or really, semi-secure, which stretched my budget which was notably bigger than it looked. Dave’s navy came visiting the colony with a small force, and lucky dice rolls pushed him back. Moving to his colony (two hexes away) revealed that he had indeed built a base there, which was a lot more than I was prepared to handle. He came at me with a fairly serious force, but I had a base of my own, and had just gotten +2 attack tech, which meant it hit on 9s against his unprotected DDs (that was a shock for people). I had a decent DD force as well, but lost maybe half of it before Dave left with a much smaller fleet, but he knocked out my two shipyards there.

The reason why I had +2 attack, is that there was a barren discovered between me and Mark, and while I had the initiative, I got in and colonized it. Mark promptly shot up what little force I had in there with CAs (+1/+0), and then killed the colony. But I got to draw, and kept, Interlinked Targeting Computers (DDs can take any amount of attack technology, instead of being limited by hull size 1). I had been about to make the jump to CAs myself, but instead worked on getting my attack up to +3, and was building 7-1 DDs (sadly fragile, but an insane amount of punch, especially if they got to fire first—we did have a fight in a nebula and I took Tactics right before all this; worse, everyone’s defense tech was lagging).

I got to try out the 6-1 DDs [+2/+1] against Mark first, and I lost them in two engagements, but they restabilized the border again, and then the 7-1s [+3/+1] were coming on line, followed by my first CAs.

We had a fairly quick start, but slowed down later as things got more complex. Combined with a fairly hard 5 PM stop time for Mark, we only got to econ turn 12; which is fairly typical of us, but we have done better, and it’s been well over a year since the last time. Dave had the largest obvious economy, having a number of deep space colonies, and an income of 84 for econ 12 (eleven fully-developed colonies, and eight of them on the pipeline). Mark had trouble recovering after my early shoot up of two colonies, and ended with an income of 63 (eight fully-developed colonies and three on the pipeline). Mine was a stunning 100 for ten colonies (with that last home-space world out towards Dave just having gotten to full growth) all of which were on the pipeline, which would normally be 80 CP, but the two economic advantages were boosting it by 10 each.


End of day. It is hard to take photos with the camera pointing down while at eye level. Green = me; Red = Mark; Blue = Dave.

Afterword

The empire advantages have some really neat ideas in them; leveraging some of them might take some work. I’m very happy with them, and I believe Mark is as well; Dave less so. His inclinations are a bit more ‘eurogamer’ than the rest of the group; he has no problem with chance per se, but he much prefers low-chaos effects, and the powers do potentially add a lot of chaos. I’m thinking the auction method might work better with him, though I’m not sure I care as much for it. (Certainly, I’m unlikely to be permitted to take Traders again if anyone else can help it. Though I always build out my merchant pipelines as fast as I can; I was really surprised how slowly Mark and Dave built them out this time.)

I’ve tried DD-heavy strategies before, and gave them up as a bad job, as they’re just too fragile to do much but die once CAs come along to take twice as many hits, after firing first for a modest increase in cost (and BCs are generally an even better buy, if expensive to get to). There’s a few other really nice DD bonuses in the alien powers too (like one to make them fire at rank B), but that looks to be true for almost any class (well… I don’t think SCs get any bonuses not also shared with DDs).

I also started transitioning to a military economy earlier than normal with all the DDs I built. That did slow down the final round colonies and the last couple pipelines some, but the extra income helped soften the blow. I also did relatively little exploration of deep space. Certainly a lot less than Dave managed.

We used the original costs and charts since we didn’t add anything new to build (we still need to try raiders and mines, and that’ll probably stretch the patience of the group, I’ll bet troops and boarding actions are right out). But… going to the 30CP homeworld and the revised costs would probably also jumpstart things and bring the action quicker, which we need. It’s already getting time to look into the various ‘quick start’ options.

└ Tags: gaming, Space Empires
 Comment 

Small War

by Rindis on January 14, 2020 at 12:00 pm
Posted In: Boardgaming

Ardennes ’44 took me and my Dad some time to go through, but we still had a couple days left afterward, and so I introduced him to Space Empires 4X for the end of my vacation. We’re both space 4X fans, and I introduced him to Stellaris a couple years ago. Overall, it was easy to teach, and went pretty fast; the one trip-up was the difference between ship size tech and the size of a ship for yard capacity/maintenance/hits purposes (same as with Patch…).

We stuck with a small map and the very basic rules, though I touched on a few things before and after. Overall, the game went to a surrender just before the 11th economic turn (which would have been followed by an assault on his home planet). The early game went as normal, with home area exploration, followed by slow work into the two rows of deep space between us. About the time we made contact, an Alien Wreck showed up on my Dad’s side of the board. As I started reacting to that, another one showed up adjacent to it.

Naturally, that became the initial focus for conflict, and I managed to get my Miner in there and haul out the first one as the build-up got going, and got Move 2 from it. However, despite scaring him off long enough to do that, combat quickly turned against me, and I was losing DDs to my Dad’s cruisers (and a few DDs, and the spare SCs… basically everything other than CAs quickly evaporated).


As the war gets going.

However, the field of battle stayed generally on my Dad’s side of the map, and things started shifting as my navy built up. My Dad got to 0/+1 CAs and generally stopped there as he fielded more ships, while I had +1/+1 CAs, and the extra chance to hit started telling (generally 3 to hit vs 2, so long-drawn out combats where I had a 50% better hit ratio). Things were pretty grim as the initial fleets ground down, and I nearly had to face a 2-1 advantage against me, but I managed just enough hits to keep it from happening.

The early offense and extra Move also helped me keep the action near his colonies, and I slowly ground them down, allowing my economy to support shipbuilding and a limited amount of upgrades. I finally thought I’d run out of CA counters (I had one left that I’d misplaced; also, they were all tied up with singletons), so shifted to +1/+2 BCs (who natively are +1/0 compared to the CAs), which really started upending the odds, though it took a bit for the advantage to really be felt.

Between the gunnery advantage, and the economic one of raiding his colonies, I ground him down for the win already mentioned. My Dad certainly enjoyed the game, and hopefully we’ll do this again next year as well.

└ Tags: gaming, Space Empires
 Comment 
  • Page 1 of 4
  • 1
  • 2
  • 3
  • 4
  • »

©2005-2026 Rindis.com | Powered by WordPress with ComicPress | Hosted on Rindis Hobby Den | Subscribe: RSS | Back to Top ↑