Rindis.com

All my hobbies, all the time
  • Home
  • My Blog
  • Games
  • History

Categories

  • Books (503)
  • Comics (10)
  • Gaming (917)
    • Boardgaming (673)
      • ASL (154)
      • CC:Ancients (83)
      • F&E (78)
        • BvR – The Wind (26)
        • Four Vassal War (9)
        • Konya wa Hurricane (17)
        • Second Wind (5)
      • SFB (78)
    • Computer games (162)
      • MMO (77)
    • Design and Effect (6)
    • RPGs (66)
      • D&D (25)
        • O2 Blade of Vengeance (3)
      • GURPS (32)
  • History (10)
  • Life (82)
    • Conventions (9)
  • News (29)
  • Technology (6)
  • Video (49)
    • Anime (47)
  • Writing (1)

Patreon

Support Rindis.com on Patreon!
Become a patron at Patreon!

Other blogs:

RSS Inside GMT

  • Coast Watchers – Session Report – “The Airfield” June 5, 2026

RSS Playing at the World

  • Playing at the World 2E V2 Arrives May 5, 2025

RSS Dyson’s Dodecahedron

  • Cyberstyle 8.4 June 6, 2026

RSS Quest for Fun!

  • The Expense Post May 24, 2026

RSS Bruce Heard and New Stories

  • Pain, Exhaustion, and Morale in D&D BECMI June 7, 2026

RSS Chicago Wargamer

  • The 2 Half-Squads - Episode 310: Cruising Through Crucible of Steel January 27, 2023

RSS CRRPG Addict

  • BRIEFs: Black Crystal (1982), Creepers (1982), Chitei Tanken (1982) June 8, 2026
SF&F blogs:

RSS Fantasy Cafe

  • The Leaning Pile of Books May 24, 2026

RSS Lynn’s Book Blog

  • Booking Ahead/Weekly Wrap Up June 7, 2026
ASL blogs:

RSS Sitrep

  • Cardinal ASL Sins March 18, 2026

RSS Hong Kong Wargamer

  • FT114 Yellow Extract After Action Report (AAR) Advanced Squad Leader scenario April 16, 2025

RSS Hex and Violence

  • This still exists? March 25, 2025

RSS Grumble Jones

  • AAR Slides for Schwerpunkt SP96 Husum Hotfoot June 5, 2026

RSS Desperation Morale

  • How to Learn ASL March 16, 2025

RSS Banzai!!

  • October North Texas Gameday October 21, 2019

RSS A Room Without a LOS

  • [Crossing the Moro CG] T=0902 -- Rough start July 18, 2015
GURPS blogs:

RSS Dungeon Fantastic

  • Felltower House Rules Examined June 7, 2026

RSS Gaming Ballistic

  • B-Scale: Damage That Scales from Tardigrades to Kaiju June 5, 2026

RSS Ravens N’ Pennies

RSS Let’s GURPS

  • Review: GURPS Realm Management March 29, 2021

RSS No School Grognard

  • It came from the GURPS forums: Low-Tech armor and fire damage January 29, 2018

RSS The Collaborative Gamer

  • Thoughts on a Town Adventures System January 18, 2022

RSS Don’t Forget Your Boots

  • GURPS Supers Newport Academy #6: “Old Friends, New Again” June 7, 2026

RSS Orbs and Balrogs

  • Bretwalda - Daggers of Oxenaforda pt.4 - Fallen King May 27, 2017

Two Rounds of River Sabis

by Rindis on March 18, 2026 at 12:00 pm
Posted In: CC:Ancients

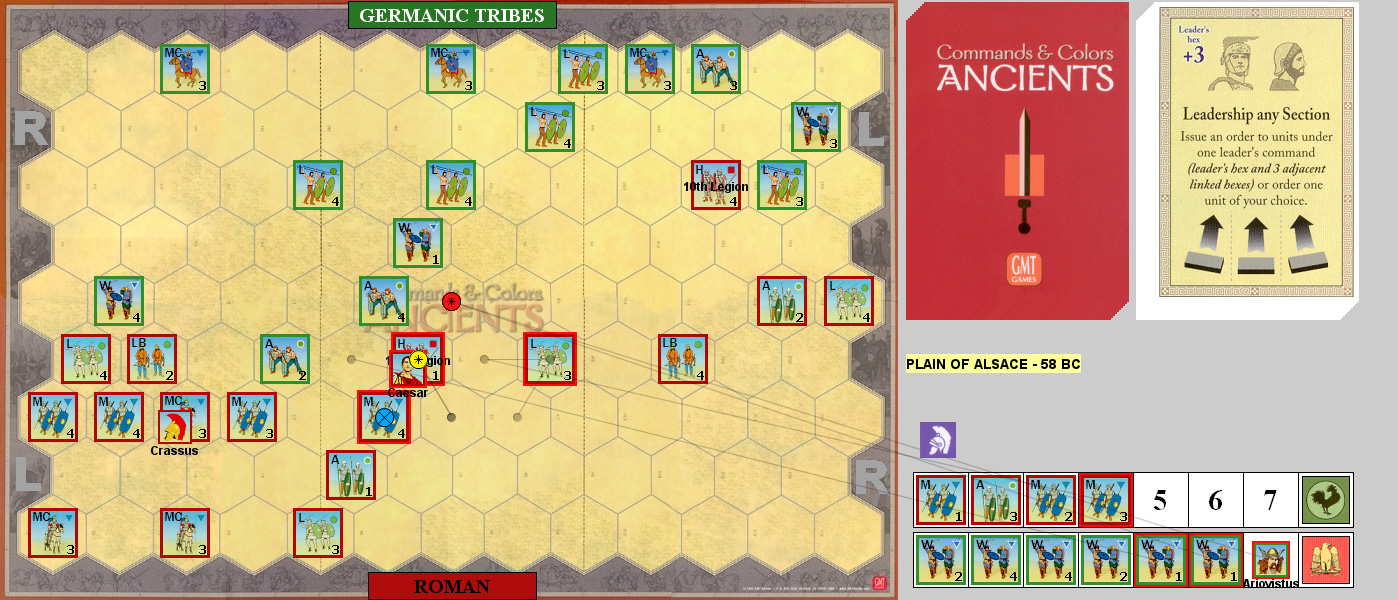
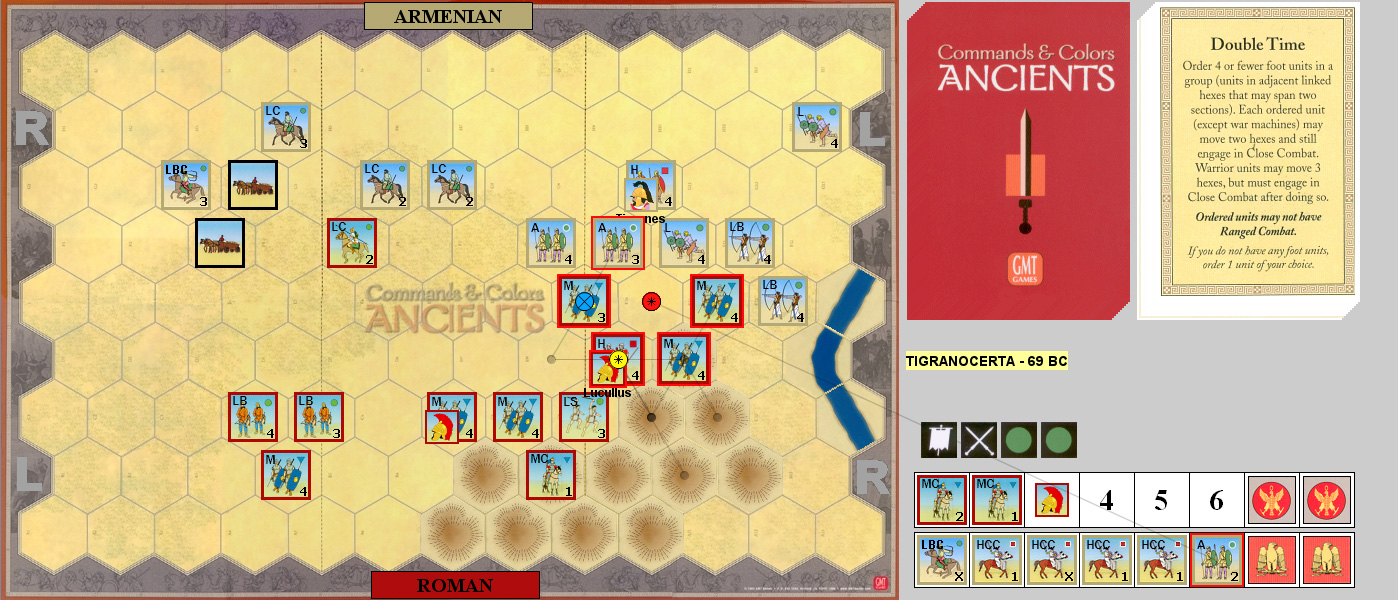
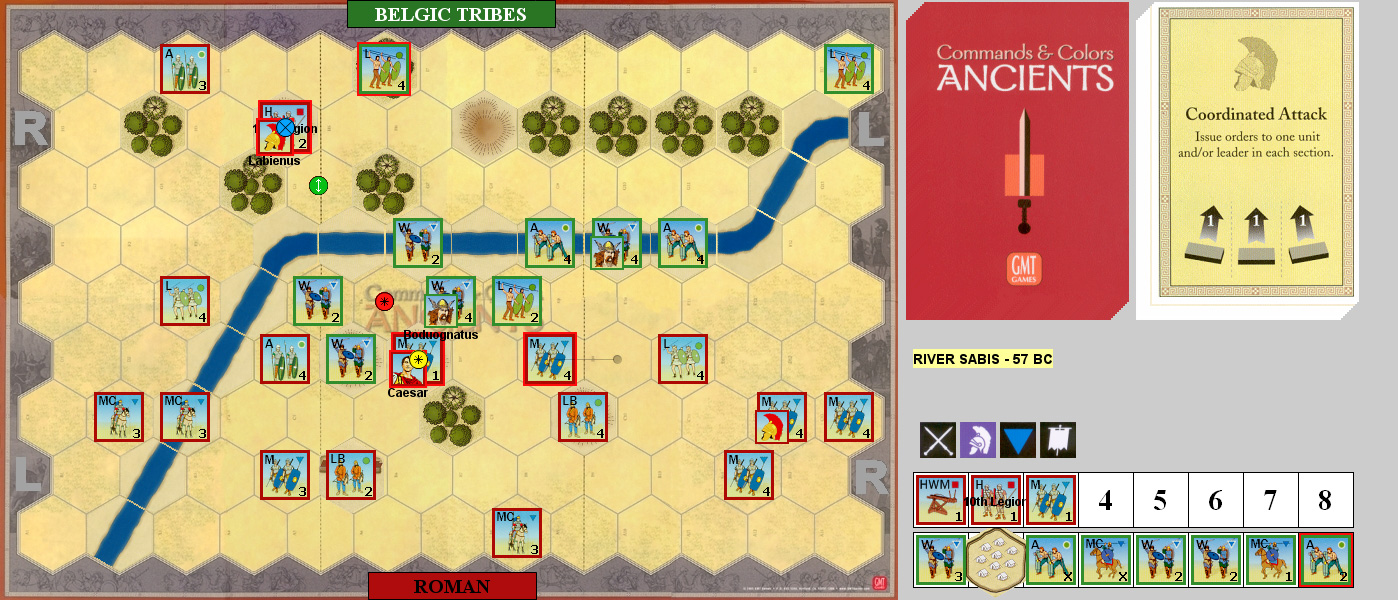
After Patch retook Hill 772, we went back to an interstitial Commands & Colors: Ancients game. Up this time was River Sabis from Expansion #2. Caesar gets ambushed by a Belgic tribe while setting up camp. The Romans are a bit scattered, but otherwise in good shape, lots of terrain, and both sides have a camp hex that can be captured for a banner.

I had the Belgics first and started with Order Lights to do a hit to a LB. Patch Ordered Four Left to get the 10th Legion into the river and force a MC to retreat and lose a block. Line Command got my forces into the river, and forced three units to retreat but did no blocks while taking two on an Auxiliary. Patch used Leadership on his left to do a hit to a Warrior. I had Leadership in the center to get across the river and force the HWM to retreat and do a block to a Medium while losing two on a Warrior. Double Time took Patch into my right flank, wiped out a Warrior, did a hit to an Auxiliary, and took my camp.

I hit back with Inspired Right Leadership, and did a block to a LB and three to a Heavy, while losing four blocks across a Warrior and MC in return. Patch Ordered Two Left to protect the weak Heavy, and forced my Auxiliary to retreat. Order Three Center let me do one block to a Medium. Patch declared I Am Spartacus to order four units and do a hit to an Auxiliary, and force a weak one to rout off the board. I Ordered Two Center for a hit on the HWM and one on a Medium. Patch Ordered Lights to do a block to Lights and force a MC to rout. Order Two Center let me finish off the HWM. Patch Ordered Two Center to force an Auxilia to retreat. I Out Flanked to move up my left a little, destroy the weak Heavy, and do two blocks to the other while losing a Warrior and two blocks off another. Patch Out Flanked to finish off a Warrior and MC and force a leader to evade off-map.

Inspired Left leadership got me into the river with a couple units, but that was it. Patch Ordered Four Center to do a hit each to a Light, Warrior, and Auxilia, but took two hits each on a pair or Mediums in return. Inspired Center Leadership got more forces into the river, and I finished off one of the Mediums. A Coordinated Attack from Patch finished off an Auxilia. 3-8

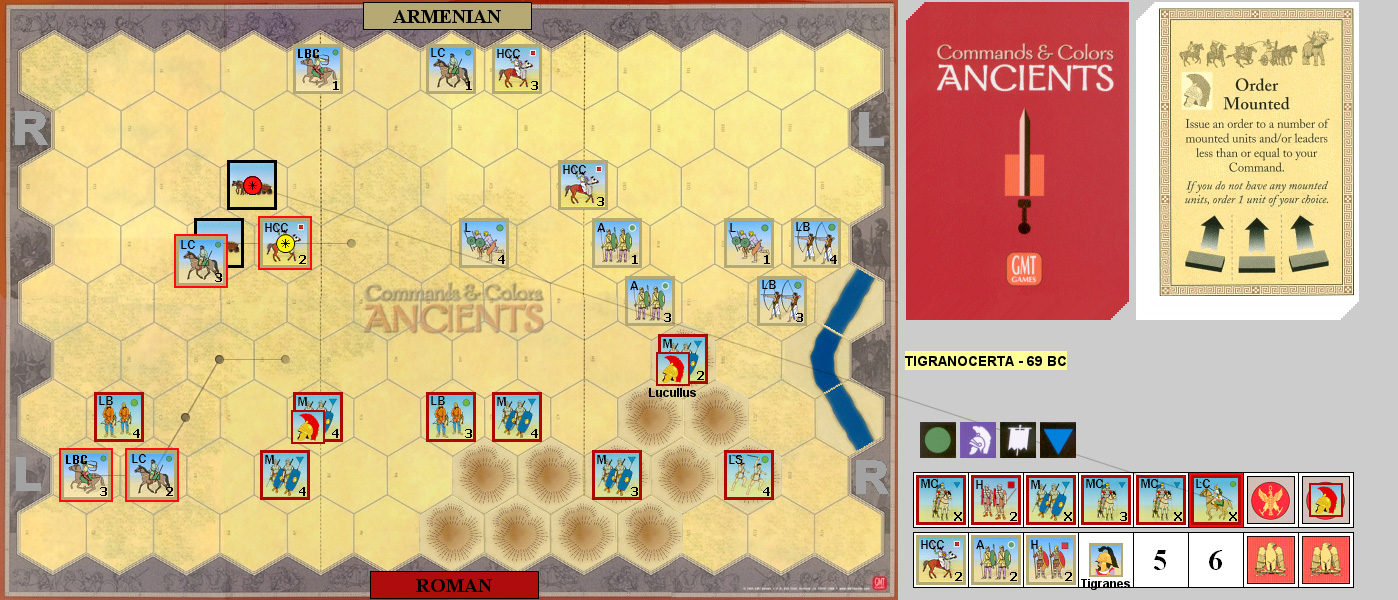
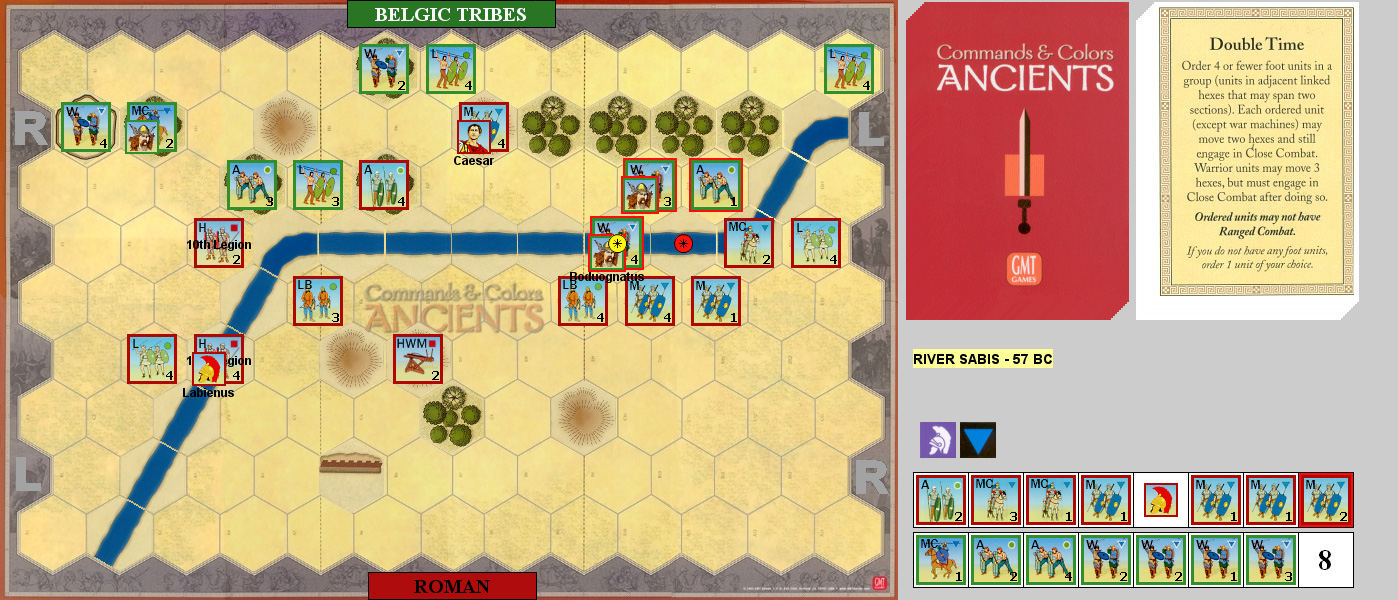
For the second round, Patch led with Mounted Charge to destroy an Auxilia and MC on my left. I used Clash of Shields to take out a MC and do a block to another. Two Left brought Patch up and Inspired Center Leadership solidified my line while the HWM picked off a Warrior block. Coordinated Attack did a block to a LB, Order Lights did a block to a Warrior. Counter Attack brought Patch up to the river but did no damage, and Order Mediums pressed my line forward and I did a hit to a Warrior, but lost two blocks on a MC. Patch Ordered Lights to finish off the MC and do a block to a Medium.

Line Command put nearly everything in the river, and I did a hit to a Warrior, a hit to an Auxiliary, a hit on a Light, and knocked out an Auxiliary. But I took three blocks damage across two Mediums. Patch used Line Command on three units to finish off a Medium and kill a leader, while forcing another to retreat. Order Mediums saw part of my line out of the river (and to the woods), but I only did one hit to an Auxiliary, and took four hits on three Mediums in return.

Patch used Line Command on a six-unit group to do two hits on a Heavy, and two hits to Caesar’s Medium, but lost four blocks on two Warriors in return. I Ordered Three Center to destroy an Auxilia and lose my weak Medium to a First Strike. Patch Ordered Two Center to finish off a Medium, taking two hits on a Warrior in the process. I Am Spartacus ordered six units to finish off four Warriors. Patch Ordered Two Left, but we just traded one block each. I Ordered Three Right and lost two blocks to one. Patch Doubled Timed (not actually moving…) to finish off a Medium. 7-8

Afterword

Generally speaking, this is the type of terrain you almost never see in these scenarios. That makes it recommended right there. The armies are fairly well matched as well, but the Belgics are at the mercy of a four-card hand. Frankly, I had more hand problems with six cards as the Romans. I would have dearly loved to hang on to Clash of Shields until the inevitable river fight, but nothing else in my beginning hand would do anything.

The four units in one turn with Spartacus was very satisfying (along with attacking uphill with four dice thanks to card and Caesar bonus), but I had a lot of bad luck during both games. Patch’s dice were fairly average, though we both started the first game with a lot of banners. After that, I could roll any color I wasn’t attacking and very little else.

└ Tags: C&C Ancients, gaming
 Comment 

Two Rounds of Plain of Alsace

by Rindis on December 21, 2025 at 12:00 pm
Posted In: CC:Ancients

After going on patrol, Patch and I went to our normal round of Commands & Colors: Ancients. This time was “Plain of Alsace” from Expansion 3. Germanics versus Caesar, with both sides about equal, but the Romans have Julian regions, Caesar, a second leader (the Germans just have Ariovistus), and two more cards.

Patch started the first game as the Romans with Order Four Right to get the Heavies into action and do one point ranged. I Ordered Lights to solidify my line. Patch Ordered Three Center to move his Mediums up, and Move-Fire-Move got me a hit on three different units. Patch used Line Command to get his right into contact and knocked out a Warrior, and did one block each to two others, with one evading, and the other retreating to the base line; but took three hits to a Medium in return.

Then I used Line Command to come into contact across the board, finishing off the Medium, destroying an Auxiliary, doing two damage to Caesar’s Heavy, three damage to an Auxiliary, and causing a lot of retreats, but I lost a Warrior outright. Patch Out Flanked, wiping out a Warrior, and trading blocks on other units. I Ordered Mediums, doing two hits to a LB, and an Auxilia, but whiffed on a one-block Auxilia, and took a few hits in return. Leadership Any Section let Caesar move into the center and destroy another Warrior. I Double-Timed into the center and my right, forcing a couple of retreats and finishing off a Medium. Patch used Leadership Any Section again, finished off a Warrior, did three blocks to another, and then finished him off, killing Ariovistus, after losing a three-block Medium. 4-7

I started the second game with Order Light Troops, doing one block to a Warrior. Patch Ordered Two Left, and did two blocks to an Auxiliary and took one in return. I Out Flanked and destroyed a weakened Warrior. Patch Ordered Three Right, forcing retreats with one loss. Order Two Left let me nearly knock out a Warrior with two banners. Line Command let his right move up and finish off an Aux, and then killed Crassus with a single hit on an evading MC.

Coordinated Attack did three hits across two units for no loss. A second Line Command re-engaged Patch’s right, doing four blocks across three units without me battling back. Order Mediums let me do some damage in the same area, killing Ariovistus on the second hit on a Warrior. Patch then Ordered Mediums to finish off a MC. I Counter Attacked to do a couple of individual hits and finish off an Auxiliary. Patch Ordered Three Right to finish off a Medium and do three hits to a second one. Inspired Right Leadership did nothing… except get Caesar ready to go into action.

Patch Ordered Lights to finish off an Auxiliary, and do two other blocks of damage, taking two in return. Leadership Any Section finished off an Auxiliary and forced a Warrior to retreat off board. Patch Ordered One (Mounted Charge) to finish off a Medium and do a block to an evading LB. Order Three Right got Caesar to the the Barbarian base line where he destroyed a Light and MC. 7-6

Afterword

Given the various Roman advantages, especially the hand size, I figured the Barbarians would be doing well to get more than a couple banners. But both of us had pretty good hands as the Barbarians, and did better than I expected. I might have done better with the Romans, but was holding my right hoping that Patch would finish off a one block Auxiliary and come into range of the Heavies. In the end, I pressed that just in time to wrap things up.

Overall, it’s a good scenario, and there’s plenty of tools (if not cards) on both sides. It is very cavalry light, with just three MC on each side. Losing the two leaders early in the second game was a big surprise, and cut down options.

└ Tags: C&C Ancients, gaming
 Comment 

Two Rounds of Bibracte

by Rindis on October 22, 2025 at 12:00 pm
Posted In: CC:Ancients

After Getting Out of Hatten, Patch and I did our usual between games round of Commands & Colors: Ancients. Up this time was the Battle of Bibracte, the earliest scenario in Julius Caesar’s career. The Helvetii have a force of Auxilia and Warriors, while the Romans have a mix of Auxilia and Mediums, with two Heavies, and one HWM. The Romans are largely on hills, and both sides have two camp hexes that can be looted for a banner, though the Roman ones have Auxilia permanently stationed in them.

I had the Helvetii first, and led with Order Three Left to move up the detached flank a bit, with the woods interfering, and ran off a MC with one loss. Patch Ordered Four Right forcing my Warriors to retreat, and doing a block to another with the HWM. I Ordered Two Center to chase off a LB, and Patch advanced the Heavies with his own Order Two Center. I Double Timed to get two Warriors in contact on my left-center and destroyed the HWM, and advanced a Warrior onto the hills, trading blocks with a Medium, and then retreating.

Patch Ordered Two Right to close up his line, and I Ordered Lights, doing no damage, but getting my left and center into better shape. Patch Ordered Two Right again, forcing my weak Warrior unit to retreat. I Ordered Mediums to bring reserves up in the same area, trading blocks with a Light. Patch Ordered Two Left, but didn’t do more than rework his flank, while my Order Four Left let me kill a Light and get back on the hill, also doing a block to a MC in return for one hit. Patch used Leadership Any Section to attack with his right, destroying my Warriors, and doing two blocks to an Auxilia, taking one block in return.

I got around his leader-Medium with Leadership Any Section, finishing off a MC and Medium and doing two blocks to an Auxilia, while taking two hits on a MC, and one on a Warrior. Patch used Leadership Any Section for his isolated Auxilia, and finished off my MC. Order Three Center did two ranged hits to a LB, and Patch tightened up his line with Move-Fire-Move, getting one hit each on a Warrior and Auxilia. Mounted Charge got my remaining MC up, and I lost one while taking a hit on the other, but did two blocks to a Heavy, and one to an Auxilia. Patch Rallied to bring his Heavy and a Medium up to full, and recover a block on the Auxilia, and then knocked out my Auxilia. I reformed with Order Two Center, and Patch used Line Command to come into contact, and shuffle the rest of the line towards where all of the action was. I lost two Auxilia, but finished off one of his, and killed a leader. I rushed in with Inspired Center Leadership, did three hits and a banner to a Medium, used momentum to attack again (uphill), and got the final hit. 7-6

Patch Ordered Two Left to start the second game, and I Ordered Two Center to pick off a block with ranged fire, and Patch got closer with a Line Command. I used my Line Command to come down off the hills, and did another block with ranged fire. Patch launched a Coordinated Attack, but did no damage, and I Double Timed to get both Heavies into contact, and took three blocks across two units, but wiped out a Warrior and Auxiliary. Patch used Leadership Any Section to hit back in the center, knocking out a weak Heavy, and a block on another, but I did three blocks to two units in return, and forced two units to retreat, leaving Ceasar alone with the Heavy in nearly the exact middle of the map.

Out Flanked let my Mediums engage, and took two hits on one, but knocked out a Warrior and Auxilia. Patch Ordered Mediums to finish off the weak Medium, and do three hits to two others, but had two Warriors take nasty hits and retreat, as well as losing one outright, and a MC retreated off the board. Mounted Charge moved my MCs up, and I knocked out another MC. 7-2

Afterword

This is a heavily pro-Roman scenario, where they have good troops, bolstered by the Julian Legions rule, and Ceasar adds a die to the unit he’s leading (6 dice heavies!), and it’s 6 cards to four. However, Patch had a poor hand in the first game, and I was just able to keep going in the area around the right/center border and keep up pressure while doing well. In the second game, I just out-and-out diced him (his sixth unit loss was to a roll of four swords).

Still, the hills and the HWM add some nice interest, and that woods separating the barbarian left flank makes their situation worse, though it can be used defensively if the Romans attack there.

└ Tags: C&C Ancients, gaming
 Comment 

Two Rounds of Tigranocerta

by Rindis on July 18, 2025 at 12:00 pm
Posted In: CC:Ancients

For our regular round of Commands & Colors: Ancients between bigger games, Patch and I ended following “Mortal Wounding” with the first scenario of Expansion #4, the Battle of Tigranocerta. We’re still on red-block Romans, but Tigranes gets four Heavy Cataphract Cavalry units… facing an army that is half on hills. His main force is bunched up in one corner with the only leader, and there’s a couple of baggage wagons that can be taken for banners. And he only gets four cards. The Romans go first and have six cards, about their only problem is that they only have one Heavy.

Patch started the first game with Order Two Right, deploying his LS forward, and forcing one of the HCC to retreat with a banner. I countered by making the LS retreat and lose a block on a banner with Order Two Left. Patch then Ordered Four Left and did a block to a LC. I Ordered Two Right to do a block to a LB, while Patch did two blocks to a HCC and forced my damaged LC to evade with Order Three Left. I Ordered Two Center to do a hit to a LC, and Patch Out Flanked to force a couple retreats and do a block to a LBC. I started deploying the big mass with Order Three Left, and Patch got his center cavalry in motion with Order Four Center to drive off a HCC.

I Counter Attacked with my HCC and Patch evaded with one loss. Patch Ordered Lights, driving my LBC off the board, and doing a block to a HCC, while occupying the hex of one of the baggage trains. I used Coordinated Attack to bring another LBC adjacent to the baggage trains and drove off the LC, and destroyed a MC and did a block to another at a cost of two blocks. Patch used Leadership Any Section to engage my strung-out HCC, finishing off all three in exchange for two blocks to a MC. I used Move-Fire-Move to bring up more of the left-flank army, and Patch Ordered Four Right to do two hits to an Auxilia. Leadership Any Section advanced me some more, and Patch did a Coordinated Attack to trade blocks between a LC and MC. I Ordered Lights to do a block to a Medium, finish off a MC and get a leader when it had to evade through me. Patch Double-Timed his right into my force and killed an Auxilia. 3-6

I started the second game with Order Two Left, which promptly did two hits to a LC with ranged fire. Patch started Tigranes forward with Order Four Left, and I forced the weak LC to the baseline with another Order Two Left. Patch Ordered Four Left again, getting his lead Light onto the hills. I Ordered Lights to drive him off, did a hit to a HCC, and nearly routed a LBC (one hit, and then another from a retreat). Patch Counter Attacked to bring up elements of both flanks and forced my LC to lose a block retreating. I Ordered Two Center to knock out a HCC; Patch Ordered One (Medium), and knocked out a MC when it declined to evade and took two banners.

Line Command put my left in motion, and forced a HCC to evade. Patch used Line Command to put the big group forward, and I Ordered Three Right to confront the mass from hilltop, doing one block to a LB. Patch used a second Line Command to keep advancing (and pull back the LBs) doing one block to my Heavy in return for two to an Auxilia. I Ordered Two Right, finished off the Auxilia and did three to a Light for a loss of one block. Inspired Left Leadership let Patch wrap his line around my Heavy at the point of the hill who lost two blocks and retreated while doing two blocks to an Auxilia. I attempted to Rally, but only got one Heavy result to bring that unit back to two blocks (the rest was banners and lights, I’d been hoping for Medium and wild to get both units at the front of the hill in better shape). I did another block to the Auxilia, but lost my Heavies in return. Patch Ordered Three Left to do two blocks to my Medium, and rout it (forced to go through other units), while I did a hit to the weak Auxilia and forced a retreat.

I Out Flanked to bring up the next set of Mediums and position close to the baggage train. Patch used Mounted Charge to get his HCC into the hills, routing a MC w/leader (three banners), killing a second one, and doing two hits to a Medium, which forced the HCC to retreat. Out Flanked let me finish off the Armenian Heavy and kill Tigranes, while putting a LC on a baggage train. Patch used Order Two Center to get his LC next to the baggage trains again, and do a block to a LB. Order Three Center drove off a Light and HCC, doing a block to the latter. Patch Ordered Mounted to cut off retreats and routed my LC. 4-6

Afterword

The Romans had very good ranged die luck in both plays. Mine was especially good at the start, but faded later. Patch did pretty good with his four-card hand the second game, while I struggled with a lot of “Order Two” cards, and not a lot else until the end game. Between that and really well-timed Line Commands and Mounted Charge, Patch nearly did better as the far weaker side than he had with the Romans, but my kill of Tigranes put me in reach of a victory, though it was too late.

The baggage train rules stipulate that there can’t be any enemy units adjacent to it at the start of your turn to loot it and get a banner, which kept both of us from exploiting it. That flank is technically weak, but has highly mobile LC, so you can’t really keep the Armenians away, unless they have no card options. That should be possible with a four card hand, but both of us were able to react.

The Roman center is largely MC, and the Armenian one is largely HCC, so it should be a good way to show off the latter, but the fact that most of the Roman center, and all of their right, is on hills keeps them from being particularly useful, outside of the Mounted Charge card.

└ Tags: C&C Ancients, gaming
 Comment 

Two Rounds of Silarus

by Rindis on June 12, 2025 at 12:00 pm
Posted In: CC:Ancients

After finishing off our carrier experiment, Patch and I went to our between-games round of Commands & Colors: Ancients. Up this time was Silarus, the final Sparticate scenario from Expansion #2, fighting against Crassus. Pompey is coming up from behind the slave army, so while they start in hills, any block loss from retreating off the board results in the unit being eliminated for them. (Not that it came up, but it’s a nice idea.) There’s also Crassus’ camp on one side, which is worth a banner if the ex-slaves can occupy it.

I started the first game with Inspired Center Leadership to get the middle off the baseline, and into the hills. Patch Move-Fire-Moved to harass the flanks, and got two blocks as well as driving back a Light. I Double-Timed my left into his line, knocking out a Medium, and reducing a second to one block, taking three hits in return. Patch Counter-Attacked to shift the rest of his Mediums over, knocking out a fresh Warrior unit at the cost of retreating a Medium. I Ordered Three Center to hit the flank of that move, and forced another Medium to retreat, and did a block on momentum, but took three blocks in return.

Patch Ordered Mediums, and finished off two Warriors, but not before a First Strike did three blocks, and then an Auxilia and MC traded blocks. I Ordered Three Left and finished off a Medium then forced a MC to flee the field (three banners) and finished off another Medium with momentum. Patch Ordered Mediums again to finish of an Auxilia and do a ranged hit on a Warrior. Coordinated Attack only traded one block each.

Line Command let Patch reorder his center a bit and do three ranged hits from his line at the wall and finish off the last Warrior unit. I started forward on the other flank with Order Three Right, and Patch met them with another Line Command and eliminated a Medium in two attacks. 4-6

Patch led the second game with Order Three Left for no result, and I Ordered Lights to deploy my left a little better and force a Light to retreat. Patch then brought his center into line with Order Three Center and I Ordered One (Heavy) for no result, and Patch Ordered Three Right and forced a Light to retreat. I Ordered Two Left and forced a Light to evade, while Patch Out Flanked, forcing a Light to retreat from the wall.

I stepped forward with Line Command, which didn’t get me into contact, but allowed some ranged fire, and I got a block that way. Patch Ordered Three Left to regroup on that flank, and a second Line Command got me into contact across my left and center, but left me fighting uphill to do a block each to two Auxilia, and knock out a Medium to break his line, and I took one hit each on four units. Patch Counter Attacked with the left half of his line, taking out four Mediums, and only took five blocks in return.

Order Three Center did three blocks to a Warrior, but I took two each on three units doing it. Patch activated his right wing with Line Command, which lost me another two Mediums. 1-6

Afterword

I went in aggressive for both games and primarily paid for it with well-timed Counter Attacks from Patch. The second game certainly would have gone better without that, though assaulting hills is just a tough proposition. The first game saw a lot of dramatically big results from the dice, mostly for Patch.

The scenario is interesting, as the slave army has to worry about being too close to the back line, but staying in the hills is essential to dealing with all those Mediums.

└ Tags: C&C Ancients, gaming
 Comment 
  • Page 1 of 17
  • 1
  • 2
  • 3
  • 4
  • 5
  • »
  • Last »

©2005-2026 Rindis.com | Powered by WordPress with ComicPress | Hosted on Rindis Hobby Den | Subscribe: RSS | Back to Top ↑