Rindis.com

All my hobbies, all the time
  • Home
  • My Blog
  • Games
  • History

Categories

  • Books (503)
  • Comics (10)
  • Gaming (917)
    • Boardgaming (673)
      • ASL (154)
      • CC:Ancients (83)
      • F&E (78)
        • BvR – The Wind (26)
        • Four Vassal War (9)
        • Konya wa Hurricane (17)
        • Second Wind (5)
      • SFB (78)
    • Computer games (162)
      • MMO (77)
    • Design and Effect (6)
    • RPGs (66)
      • D&D (25)
        • O2 Blade of Vengeance (3)
      • GURPS (32)
  • History (10)
  • Life (82)
    • Conventions (9)
  • News (29)
  • Technology (6)
  • Video (49)
    • Anime (47)
  • Writing (1)

Patreon

Support Rindis.com on Patreon!
Become a patron at Patreon!

Other blogs:

RSS Inside GMT

  • Coast Watchers – Session Report – “The Airfield” June 5, 2026

RSS Playing at the World

  • Playing at the World 2E V2 Arrives May 5, 2025

RSS Dyson’s Dodecahedron

  • Cyberstyle 8.4 June 6, 2026

RSS Quest for Fun!

  • The Expense Post May 24, 2026

RSS Bruce Heard and New Stories

  • Pain, Exhaustion, and Morale in D&D BECMI June 7, 2026

RSS Chicago Wargamer

  • The 2 Half-Squads - Episode 310: Cruising Through Crucible of Steel January 27, 2023

RSS CRRPG Addict

  • BRIEFs: Black Crystal (1982), Creepers (1982), Chitei Tanken (1982) June 8, 2026
SF&F blogs:

RSS Fantasy Cafe

  • The Leaning Pile of Books May 24, 2026

RSS Lynn’s Book Blog

  • Booking Ahead/Weekly Wrap Up June 7, 2026
ASL blogs:

RSS Sitrep

  • Cardinal ASL Sins March 18, 2026

RSS Hong Kong Wargamer

  • FT114 Yellow Extract After Action Report (AAR) Advanced Squad Leader scenario April 16, 2025

RSS Hex and Violence

  • This still exists? March 25, 2025

RSS Grumble Jones

  • AAR Slides for Schwerpunkt SP96 Husum Hotfoot June 5, 2026

RSS Desperation Morale

  • How to Learn ASL March 16, 2025

RSS Banzai!!

  • October North Texas Gameday October 21, 2019

RSS A Room Without a LOS

  • [Crossing the Moro CG] T=0902 -- Rough start July 18, 2015
GURPS blogs:

RSS Dungeon Fantastic

  • Felltower House Rules Examined June 7, 2026

RSS Gaming Ballistic

  • B-Scale: Damage That Scales from Tardigrades to Kaiju June 5, 2026

RSS Ravens N’ Pennies

RSS Let’s GURPS

  • Review: GURPS Realm Management March 29, 2021

RSS No School Grognard

  • It came from the GURPS forums: Low-Tech armor and fire damage January 29, 2018

RSS The Collaborative Gamer

  • Thoughts on a Town Adventures System January 18, 2022

RSS Don’t Forget Your Boots

  • GURPS Supers Newport Academy #6: “Old Friends, New Again” June 7, 2026

RSS Orbs and Balrogs

  • Bretwalda - Daggers of Oxenaforda pt.4 - Fallen King May 27, 2017

J124 Cobra Kings

by Rindis on December 20, 2012 at 12:00 pm
Posted In: ASL

After the wrap-up of the last scenario (which coincided with a bad week for me), I asked Patch to put forward a scenario suggestion. He came up with the interesting J123 “Charging Chaumont”, which we had to cancel be the deluxe overlays don’t seem to have been redone for the new VASL deluxe boards yet. Instead, we ended up with J124 “Cobra Kings”, with me as the attacking Americans.

It’s Christmas Day 1944, and the Americans are attacking into Assenois in the drive to relieve Bastogne. I enter into a pair of deluxe half-boards with a mixed force of Shermans, halftracks, and infantry, and have five turns to clear one of two full boards that the Germans set up in of any GO Infantry. This is at dawn, so there is a +2 LV for the first turn, and a +1 for the second turn. In addition, I pick hexrows, and the Germans roll to see if any buildings are rubbled in them; finally, all Germans without a leader are TI for the first player turn, those with a leader are merely Pinned.

I enter in two turns, with the first turn’s forces being a 76 M4A3E2, two 75 M4A3E2, four halftracks, an armor leader, a hero, 8 squads of infantry, and various toys. Since all Infantry must enter as Riders, some of them have to be on the Shermans. Patch gets 12 squads, two 88s, and two Hetzers enter on turn one.

Patch initially forgot to HIP his roadblocks, which forced a re-setup, and a move away from his first plan. Sadly, we also forgot the +2 LV for most of my turn, which did hurt some. I am continuing my habit of failing PTCs and MCs with Riders, but passing all the Bail Out MCs.

Taking a look at things, I decided I liked the western (bottom) route better, mostly because I knew a fair amount of my force would end up using the sunken roads, and the east one forces turns. One squad of Riders was pinned and Bailed out successfully, only to be broken by Patch’s Sniper, while another Broke and Bailed Out in the middle of the entry board. I managed to unload five squads + hero successfully (one of these was due to a mis-count on a Sherman’s movement—the error was probably more than made up for by forgetting the +2 LV on the shots that pinned/broke me).

In the APh, I advanced squads into both ground-floor stairwells of building bC4, Encircling two groups of units on Level 2. I also advanced a MMG squad into D2, while the Hero that had been with them stayed outside with his BAZ. The one flame set by the pre-game rubble checks went out in the wet conditions.


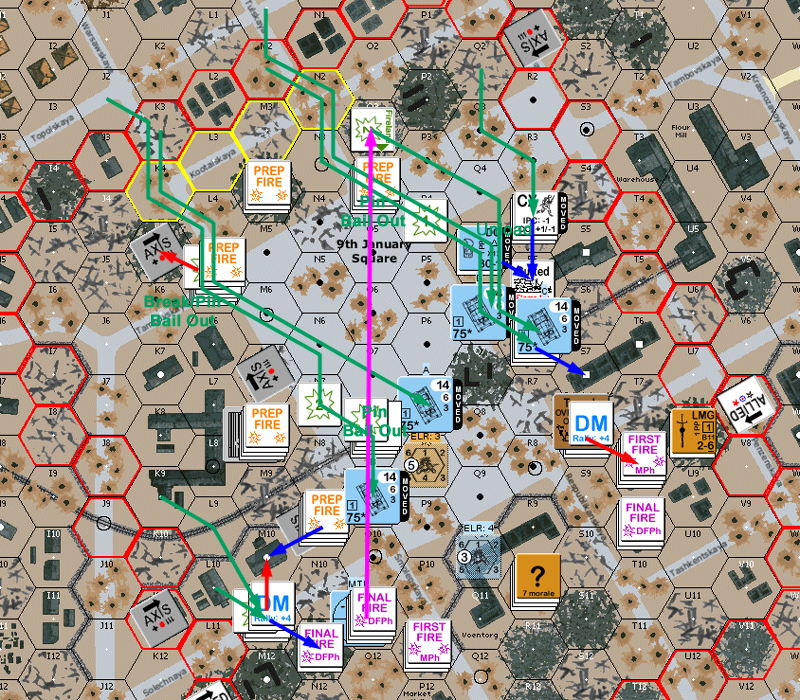
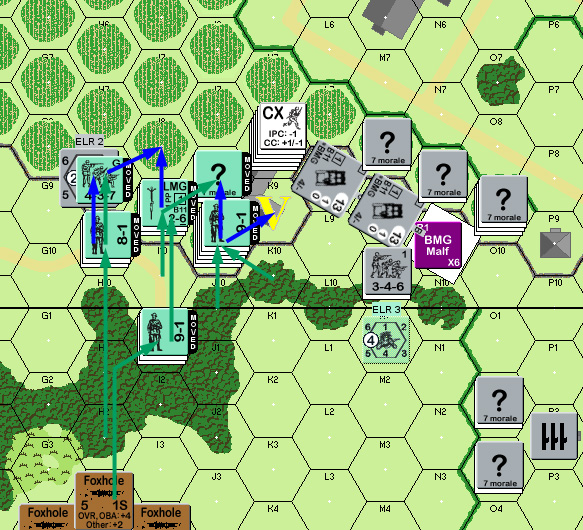
Situation, American Turn 1, showing full setup.

The leader that had been broken in fD3 immediately came back in my rally. The squad didn’t, but getting them on my turn would be fine.

For Prep, Patch fired a PF at my Sherman parked in the middle of the main road, and thankfully missed. bD2 took a 36FP +2 shot at C3 and killed the halftrack parked there. However, the crew survived, and the Hero passed the 4MC. The bad news was that his Sniper went off again, and re-DMed the broken squad in A4.

His defenders on the east end started moving up from dM2. Some of the middle defense in dJ4h2 went downstairs, and the rowhouse defenders in bE4 skulked and split up. Both Hetzers entered on the east road and took up covering positions out of sight.

My defensive fire was notable for a hit on D2 from my Sherman in B3, after revealing the 9-2 AL (…this, also, was a mistake; we forgot the +1 for my overstacking). All three squads and the leader failed the resulting 2MC, seriously unhinging his defense. Worse, there was no good routing from it.


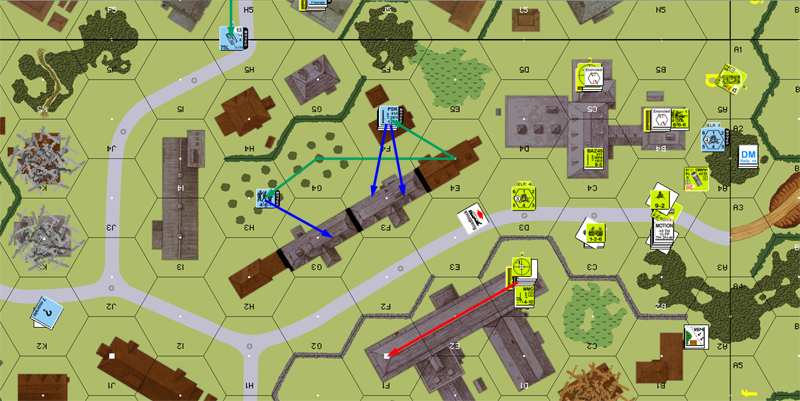
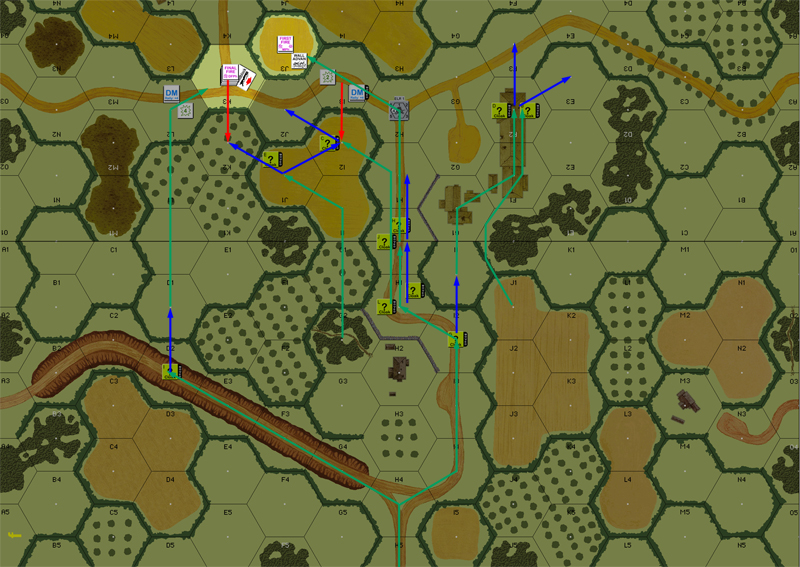
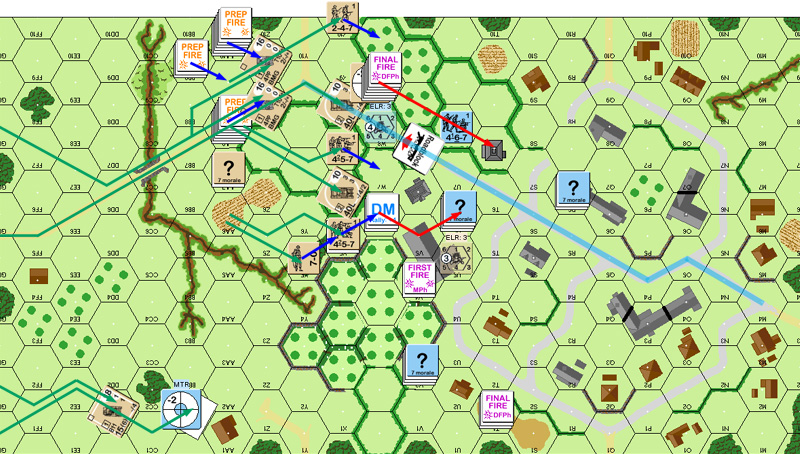
Situation, German Turn 1 in the west.


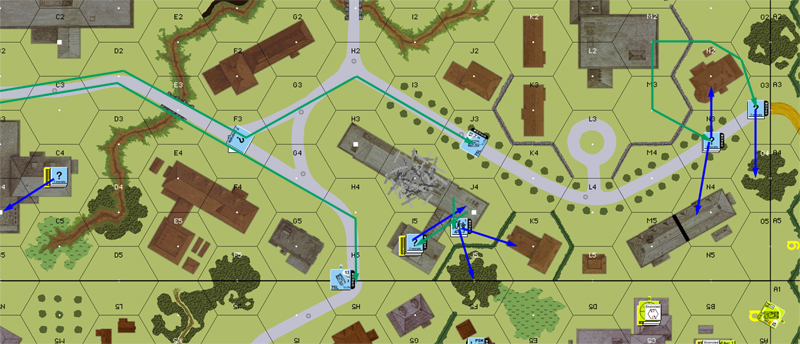
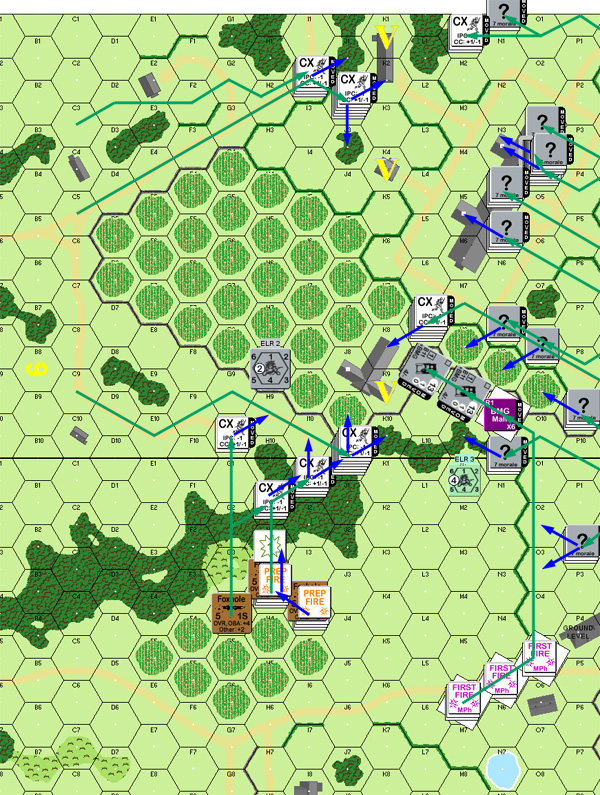
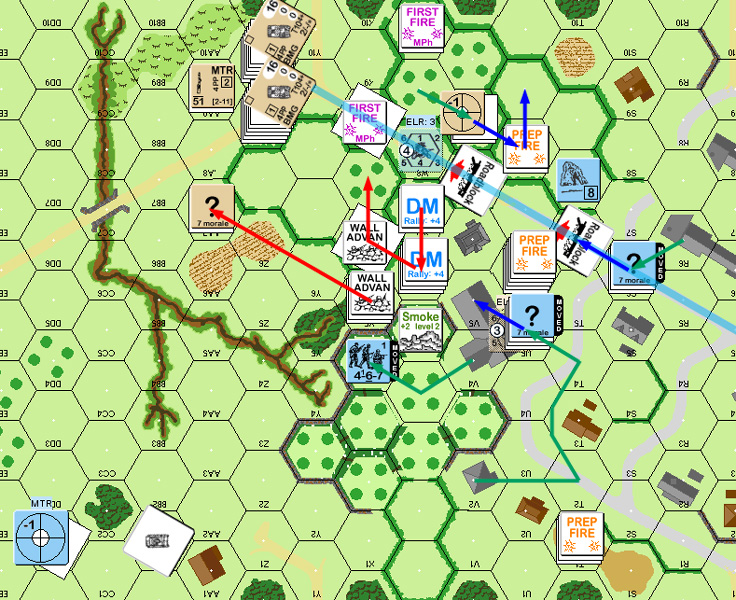
Situation, German Turn 1 in the east.
↓ Read the rest of this entry…

└ Tags: AAR In Progress, ASL, DASL, gaming, Journal 8
3 Comments

VotG21 Defending the Voentorg

by Rindis on December 13, 2012 at 12:00 pm
Posted In: ASL

Valor of the Guards came with an impressive number of scenarios. However, still more were under development, and have since appeared in the ASL Journal. Patch and I have tried a couple out, starting in July 2010…:

With the appearance of new VotG scenarios in the latest Journal, a return to Stalingrad was contemplated. This particular scenario is an interesting one. The Germans have three turns to take a single ground-level Location of building Q10 (at the south end of 9th January Square). If they fail, they can try again, needing two Locations in three turns. If they fail that, they get three turns to try to take the entire ground-level of Q10. Each try is preceded by a mini-RePh to clean things up.

For some insane reason, I took the offense in this crazy scenario.

Setup is restricted by the fact that all German MMC must be at least 2 hexes apart. I set up the MTR in the backfield, looking across the square. The HMG and 7-0 was on the second level of M8 to see most of the perimeter of the square without Hindrance from debris. A couple squads were tasked to advance up the west side to the Russian lines. My reinforcements enter from the north end, with the leaders clutching DCs, wondering if they’d ever get close enough to use them (note: by SSR, all the infantry enters as riders—about four months earlier than the rules normally allow).

Patch set up no one actually in the Voentorg (to avoid a pregame PTC, to be sure), and a nice group on both wings of it.

The opening fire isn’t bad, the HMG nails his ATR crew in the S8 trench, breaking him, but can’t force a CR. The bulk of the action of course centers around his efforts to stop the oncoming StuGs and their riders. Amazingly, while three squads pin, and the 9-1 leader breaks, causing them all to Bail Out in open terrain, they all make their Bail Out MCs and SW checks. I was expecting someone to die crossing the square, but it doesn’t happen. Of course, the only planned unloading I get to do is the 9-2 in Q5.

With most of Patch’s fire occupied, I try moving up on the extreme flank of his position in N11. A SFF shot misses the first AMing squad. A second-liner comes untroubled by the residual, but breaks to a HS on a k/2 FPF shot. If the roll had stuck with the rest of Patch’s defensive fire, he should have broken…. Finally, I stroll a squad and leader up from O3 to R6, because there is literally no one left to fire at him.

In AFPh, I put a couple Area Acquisition counters on the Voentorg. I decide to advance into CC in N11 anyway. It should keep him suitably distracted while the FT in O6 moves up. Despite a Russian edge on Ambush, the Final drs are 4-5 (he rolled a 6, and I still couldn’t get it…). And both sides did no damage to the other (H-t-H CC would have CRed me for no return, good thing I didn’t want it).


Situation, German Turn 1, take 1.
↓ Read the rest of this entry…

└ Tags: AAR In Progress, ASL, gaming, Journal 8, Valor of the Guards
 Comment 

DA11 Sicilian Midnight

by Rindis on December 6, 2012 at 12:00 pm
Posted In: ASL

Patch and I had planned to play our previous game on Vassal, but after our FtF session, we had a backup plan—the other scenario we had been considering. We got started in May 2010…:

After our little FtF Italian DASL foray, we went with the only other DASL scenario with Italians for our next Vassal game. DA11 has everything. DASL. Rare nationality (Italians). Mines. Demo charges. Roadblocks and foxholes. Alternate terrain (olive groves). Night.

Well, no tanks and no ordnance.

ROAR has a pretty even record, and since Patch got the Italians last time, I took them this time. ELR 1. sigh My main group sets up on/near the hill on board e. I also get four auto-HIP squads on board h, but one squad and the only available leader must setup with the roadblock, which must be in hH2 or hK2. The former is closer to the rest of the defense, but the latter is also a bit further from the American entry at the bottom of board f. Patch needs to take all four level 2 hexes of the hill and the roadblock in seven turns.

Hmm. The VC mentions that the Americans win at the end of any Game Turn where he controls them, so I’ll always get a final counterattack. Assuming there’s anyone to counterattack with, of course.

I opt to put the roadblock in hK2. I hope it splits up the offensive for a little bit.

Even with DASL boards the first turn is quiet as the first wave of Patch’s troops can’t get to my positions in one turn. (He gets a nearly identical set of troops on turn 2.)


Situation, turn 1, showing my visible setup.

Patch quickly moves into hH2, and finds the roadblock isn’t there. He tries moving around it into J3, but finds a HIP squad who breaks his… HS. He then moves another Cloak directly into H2, revealing the garrison and roadblock… facing the wrong way. SFF breaks that HS. I was worried I’d just malfunction the LMG instead.

One problem with Night is there’s enough things going on that you’re bound to forget something. Patch should have had to roll for straying with one unit. Of course, he forgot road bonus on the first turn.

I’m a little surprised when one of his Cloaks splits off a couple ‘?’ in advance. Obviously, he’s needing to reshuffle a bit to get leaders to the HSs.


Situation, American turn 2.
↓ Read the rest of this entry…

└ Tags: AAR In Progress, Annual 93a, ASL, DASL, gaming
2 Comments

137 Italian Brothers

by Rindis on November 22, 2012 at 12:00 pm
Posted In: ASL

After our previous early-war scenario, Patch and I moved on to something even earlier, the Spanish Civil War, in March 2010…:

As the previous scenario between me and Patch wound down, we had a chance to talk about what we wanted to do next. Patch mentioned that it had been a while since we’d seen the Italians (in fact, since our Primosole Bridge CG, where they didn’t do so well thanks an ELR of 0). Having recently gotten Doomed Battalions, and busy obsessing over that, I immediately mentioned the old A72 “Italian Brothers” which featured two Italian units fighting on opposite sides of the Spanish Civil War using Italian and Allied Minor counters, and which was updated in the new edition of DB. And so here we are.

I can say that the scenario would be a lot easier to set up if it mentioned which side was the Nationalists, and which side was the Republicans somewhere other than the background text. (Okay, the side symbols also are a guide, but both of us missed that.)

As it is, I’m the Nationalist/Black Flame/Italian forces. Technically, I set up first, but all I have on board are three pitiful non-turreted L3/35 AFVs, with fixed positions and CA, and in Motion. The only real choice I see is whether I want to be BU/CE. (BU, thanks.) Patch is the Republican/Garibaldi/Allied Minors, who set up in two groups, one on board 17 near my L3s, and the other on board 6, set to advance on the manor house. If he can take it, he wins immediately. Otherwise one of us has to have 3 out of 4 other stone buildings, mostly concentrated in front of the manor house, at the end of 6 turns. Otherwise, may he with the most CVP win! (Nationalists win ties.)

Patch set up as expected, took a couple MG shots at the L3s, and started moving for victory buildings. (Two hits, but couldn’t manage the 4 TK….) I fired as he moved out, but only managed to malfunction a BMG/MA for my trouble.

Originally, my plan as I entered with the bulk of my forces was to take 6N4 (of course), 17P2 (also of course), and dash across and advance in to 6K4. With only a single squad in position to take it, I should have a decent chance at it, especially as I had the troops holding N4 to back up my move. As I moved, however, I realized I could get into 6K8 without him being able to do anything about it, and I could make his move in much more difficult, so I went for that instead.


Situation, Turn 1, showing both side’s movement.

Patch had to spend quite a while pondering what to do next after that, but he eventually shuffled a big stack into 6J9, obviously preparing to advance into the blind side of the building, J8. All I could do was pin a single squad. Without much going on in the west (top), I just had a single ineffective shot while assembling my MMGs.

He advanced into CC in 6M1, which pointed out just how vulnerable I am, since I am Lax and have lower FP. However, after successfully Ambushing me, he rolled a ’12’, and I thankfully withdrew back to N0.


Fight for 6N4, Republican turn 2.


Fight for 6K8, Republican turn 2.
↓ Read the rest of this entry…

└ Tags: AAR In Progress, ASL, Doomed Battalions, gaming
2 Comments

J67 The Lawless Roads

by Rindis on November 15, 2012 at 12:00 pm
Posted In: ASL

Journal 4 had an article on the British Universal Carrier, and some scenarios featuring them. I managed to talk Patch into one of them, but I’d still like to try the other scenarios. We got going in January 2010…:

After finishing the Market-Garden set, Patch and I are playing one of the early-war scenarios in Journal 4 featuring Carriers. The British are trying to clear a road through a village (no GO Germans on or adjacent to it), but the Germans are already strongly defending the town. In addition to needing to chase the Germans away from the road, the British will lose if more than four of their AFVs are killed (or if four tanks/tankettes are killed).

Given a choice, and remembering Patch’s problems with a similar set of victory conditions in Khopra’s Crossing, I take the defending Germans. They don’t get any vehicles of their own, and the anti-tank capability isn’t great, but the Brits don’t have anything heavier than an A10. Patch will have to be cautious, especially with two 37mm ‘doorknockers’ hidden somewhere.

Board 12 is an unusual mix of terrain for an early board, and there’s a few of the hedgerow overlays in play (though bocage is not in play—a hedge is a hedge here) and I have to spend some time deciding how to defend. The real target is the road itself, but if I concentrate on that, he could easily bypass part of the defense and strike towards the middle or back end, hoping to leave me without fallback positions. So I opt to defend the entire front with an eye towards hustling towards the road if he attacks down it as expected. The four OB-given ‘?’ are used to conceal where the good leaders, MMGs and ATRs are. The MTR doesn’t have any place with a good LOS and end up on the hill in T1 when I forget that Orchards block non-same level LOS.

Patch setup near the road and got to work clearing it immediately. With some concentrated firepower, and a ROF-tear on his MTR, he broke a leader and LMG squad, and pinned another LMG squad. I was able to do far less to his initial advance than I would have liked. The worst part was that he put three squads past the hedgerow between V and W, and got into the first of the stone buildings. I had figured I’d keep him out of there a while longer.


Situation, British Turn 1 DFPh. The blue ribbon is the victory road, note that an SSR turns a graveyard into an orchard and you can still see pieces of it poking through the overlays.

Even with my broken squad having made it back to my 9-1 leader, I got nothing back on my rally. I wasn’t sure how to reorganize my defense. In general, the plan was to shift for more defense in depth along the road, but he had the two Mk VIs crawling along the south edge of the board, and I didn’t want them getting into my rear unopposed. My opening MTR shot on the lead one hit and got a ‘2’ result on the IFT to kill it with no survivors, that simplified things greatly. A shot from U8 broke W7, taking some more pressure off me, and I decided to gamble with a stone building and a -1 leader and stand up to the rest of his breakthrough in W6. A shot from U6 broke one of the two squads there. Things were looking up.

I pulled out of V2, taking a roundabout route to make sure he couldn’t strip concealment. As I moved other forces around, I came up with a sneaky little plan. First, V4 smoked W5. If that hadn’t worked, I’m not sure I would have gone through with it, but with the smoke (only on a ‘1’!), I put the squad in V4 into X4, where he could cause problems for the broken squad in W6, and was adjacent to the British 7-0 in X5. Sadly, I couldn’t get him in Advancing Fire, and he self-broke to rout away before I could go for CC with him.


Situation, German Turn 1, end of MPh.


Gunner Scott commented:

“Hi-“

“Thats one hell of a scenario. Been a long time since I played it, but I do remember those little carriers giving the Germans grief as they would race to cut rout paths.”

“Scott”
↓ Read the rest of this entry…

└ Tags: AAR In Progress, ASL, gaming, Journal 4
1 Comment
  • Page 1 of 7
  • 1
  • 2
  • 3
  • 4
  • 5
  • »
  • Last »

©2005-2026 Rindis.com | Powered by WordPress with ComicPress | Hosted on Rindis Hobby Den | Subscribe: RSS | Back to Top ↑