Rindis.com

All my hobbies, all the time
  • Home
  • My Blog
  • Games
  • History

Categories

  • Books (503)
  • Comics (10)
  • Gaming (917)
    • Boardgaming (673)
      • ASL (154)
      • CC:Ancients (83)
      • F&E (78)
        • BvR – The Wind (26)
        • Four Vassal War (9)
        • Konya wa Hurricane (17)
        • Second Wind (5)
      • SFB (78)
    • Computer games (162)
      • MMO (77)
    • Design and Effect (6)
    • RPGs (66)
      • D&D (25)
        • O2 Blade of Vengeance (3)
      • GURPS (32)
  • History (10)
  • Life (82)
    • Conventions (9)
  • News (29)
  • Technology (6)
  • Video (49)
    • Anime (47)
  • Writing (1)

Patreon

Support Rindis.com on Patreon!
Become a patron at Patreon!

Other blogs:

RSS Inside GMT

  • Coast Watchers – Session Report – “The Airfield” June 5, 2026

RSS Playing at the World

  • Playing at the World 2E V2 Arrives May 5, 2025

RSS Dyson’s Dodecahedron

  • Cyberstyle 8.4 June 6, 2026

RSS Quest for Fun!

  • The Expense Post May 24, 2026

RSS Bruce Heard and New Stories

  • Pain, Exhaustion, and Morale in D&D BECMI June 7, 2026

RSS Chicago Wargamer

  • The 2 Half-Squads - Episode 310: Cruising Through Crucible of Steel January 27, 2023

RSS CRRPG Addict

  • BRIEFs: Black Crystal (1982), Creepers (1982), Chitei Tanken (1982) June 8, 2026
SF&F blogs:

RSS Fantasy Cafe

  • The Leaning Pile of Books May 24, 2026

RSS Lynn’s Book Blog

  • Booking Ahead/Weekly Wrap Up June 7, 2026
ASL blogs:

RSS Sitrep

  • Cardinal ASL Sins March 18, 2026

RSS Hong Kong Wargamer

  • FT114 Yellow Extract After Action Report (AAR) Advanced Squad Leader scenario April 16, 2025

RSS Hex and Violence

  • This still exists? March 25, 2025

RSS Grumble Jones

  • AAR Slides for Schwerpunkt SP96 Husum Hotfoot June 5, 2026

RSS Desperation Morale

  • How to Learn ASL March 16, 2025

RSS Banzai!!

  • October North Texas Gameday October 21, 2019

RSS A Room Without a LOS

  • [Crossing the Moro CG] T=0902 -- Rough start July 18, 2015
GURPS blogs:

RSS Dungeon Fantastic

  • Felltower House Rules Examined June 7, 2026

RSS Gaming Ballistic

  • B-Scale: Damage That Scales from Tardigrades to Kaiju June 5, 2026

RSS Ravens N’ Pennies

RSS Let’s GURPS

  • Review: GURPS Realm Management March 29, 2021

RSS No School Grognard

  • It came from the GURPS forums: Low-Tech armor and fire damage January 29, 2018

RSS The Collaborative Gamer

  • Thoughts on a Town Adventures System January 18, 2022

RSS Don’t Forget Your Boots

  • GURPS Supers Newport Academy #6: “Old Friends, New Again” June 7, 2026

RSS Orbs and Balrogs

  • Bretwalda - Daggers of Oxenaforda pt.4 - Fallen King May 27, 2017

Lost Time

by Rindis on July 21, 2020 at 12:00 pm
Posted In: Boardgaming

Mark and I have fallen into a bunch of fairly regular Vassal sessions over the past few months. Our primary slot has been our learning sessions with Operation Dauntless, and we had a few weeks of three-day weekends, so I proposed we start something a bit faster moving than our fumbling learning sessions, and well-known to the both of us, and we ended up going for A Victory Lost, doing one turn per session, and it (after a later schedule shuffling) became our Sunday morning slot.

Now, neither of us has ever been experts, and it’s probably been a decade since I last played, so expect a lot of sub-optimal play from us (moving HQs was a particular problem on a few occasions, espeically later, since the module, for all its great features, doesn’t mark the HQ as active along with everything else, so it can be easy to forget).

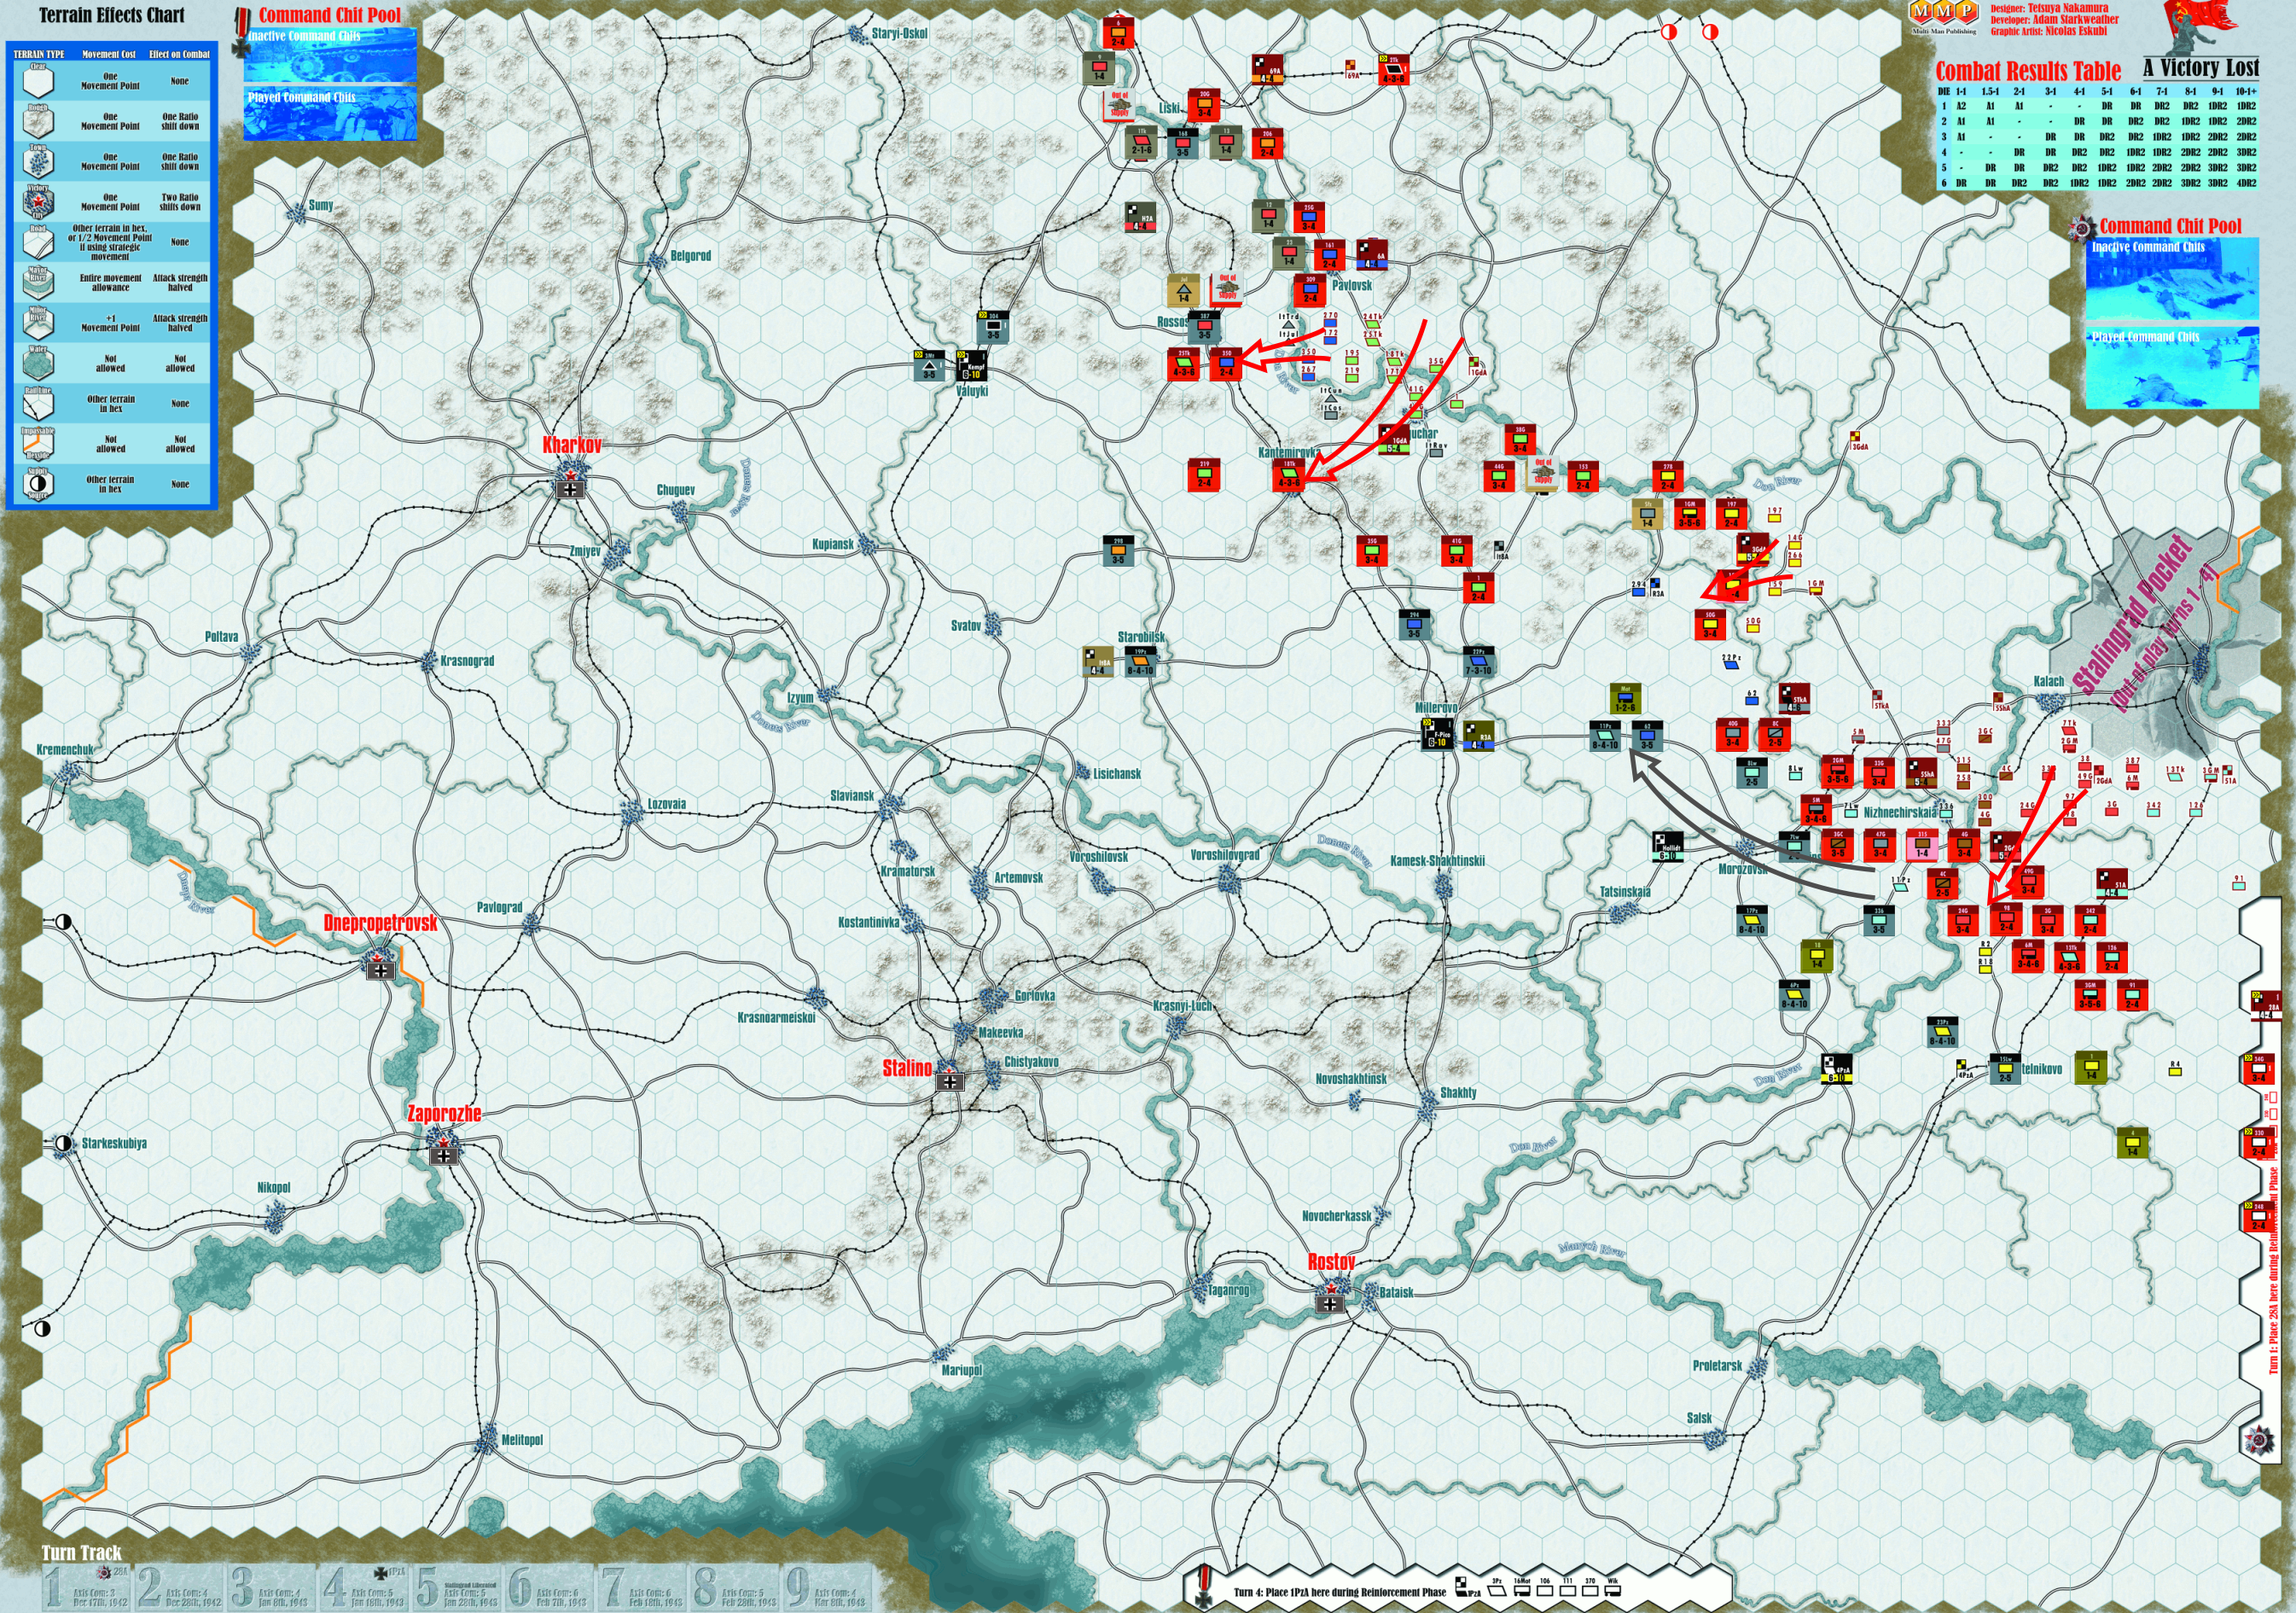
Mark wanted the Germans, so I started with a decision to mostly press in the center, keeping the 1GdA, 3GdA, 5ShA, and 5TkA chits (along with Popov who shows up at the end of turn 4), and of course picking 1GdA for the special combat segment, which eliminated the Ravenna division and retreated Julia and Tridentia, but got no effect on Cosseria and Cuneense.

Turn 1 chit sequence: 5TkA – 3GdA – 1GdA – R3A – Hollidt – 4PzA – STAVKA

My first chit draw also saw my first losses, as I tried a 1.5:1 and two 2:1s to get across the initial river lines (thought it was three 2:1s until I saw a town, which reduced it to 1.5:1), for a pair of A1 results, but I pushed the 7Lw back to break that line in the middle. I got a mechanized division across a gap for a second try to eliminate a pair or Romanian divisions, and then blew open the Italian sector (pretty standard stuff), to start heading west, with the 1st heading south towards Millerovo after bouncing the It8A HQ away from the remaining Italians. However, a 3:1 was NE, to keep a road clogged.

The Romanians ordered a fall back, with units heading to Millerovo, while the 62nd shifted to hold the flank of the southern line. Hollidt also fell back, with a thin line of infantry while the 11Pz headed northwest toward Millerovo. 4th Panzer Army sent two divisions circling behind the lines towards Hollidt and everything else putting up a light screen… safely away from the Russians. Stavka found that three divisions had been too eager, and were out of command range, so my tanks (most notably) didn’t roll any further forward. There wasn’t a lot of combats, and notably, the Hungarians refused to budge to a 2:1 in the north, even as the Italians next door ran for the hills.

Mark put all three new divisions and Kempf in and around Valuyki, and F-Pico went to Millerovo, while I put the 2Tk a bit behind the 69A, ready to use strategic movement down into the fairly open center.


↓ Read the rest of this entry…

└ Tags: A Victory Lost, gaming
 Comment 

‘Soft’ ZOC and Movement in A Victory Lost

by Rindis on December 19, 2008 at 11:53 am
Posted In: Design and Effect

Crossposted from the Design and Effect blog at GameSquad.

Zones of Control have been a concept in wargaming since the very early days. The traditional version is a ‘hard’ ZOC where any unit that moves adjacent to an enemy unit must immediately stop moving. This is generally described as the idea that a unit does not exist solely in the hex it counter is in, but rather would have detachments out covering the flanks, etc. Thus an enemy unit needs to ‘stop’ and deal with the enemy in the adjacent hex before continuing through the area (i.e., combat).

I would like to point out that there are plenty of other interactions that could also have this effect. Most notably, that the defending unit is going to react to the movements of the approaching enemy, including shifting its units around to get in the way of the approaching enemy, counterattacking anyone moving by without proper flank protection (which would slow it down…). At this point, it gets easier to see ZOC for what it is: a mechanism for keeping the on/off system of alternating turns from wrecking the simulation of warfare.

There are problems with this coping mechanism, as the full stop demanded can be too limiting. Considering that the mechanism dates back to the original Tactics, a bit of primitive simplicity can be forgiven.

There have been all sorts of adjustments to the basic idea to make it work better, such as dual-impulse turns, automatic victory… and ‘soft ZOCs’ which impede movement rather than stop it. A Victory Lost, a game chock-full rules designed for maximum elegance uses an extremely effective ‘soft-ZOC’ system.

The rule effectively boils down to the fact that entering or leaving a hex in an enemy ZOC costs two extra movement points. So moving adjacent to an enemy costs three (one for the hex and two for the ZOC), and the same is true for pulling out of combat. Moving directly from one hex in enemy ZOC to another is permitted with an expenditure of five movement points (two to leave the current hex, one for the movement itself, two to enter the new ZOC).

What makes this work so well is the movement factors given to the various units. Soviet and allied Axis infantry units get a ‘4’. Beyond the usual meaning of how much mobility on the map this grants, it means that such a unit can go one hex, and then move into an enemy ZOC. If the enemy line is further than two hexes away, they will not be able to engage in a single movement. This also limits the units to a two-hex move when pulling out of the line.

German infantry (and Soviet cavalry) gets ‘5’ movement, which opens up a number of additional options. As the Germans are generally on the defensive, and will be pulling back to new lines at several points, the ability to put themselves 3 hexes away from the Soviet line from being in contact is not to be overlooked. However, 5 MP is [I]also[/I] exactly what it takes to be able to shift a hex within an enemy ZOC. While Soviet units are generally ‘stuck’ once on the line, German units retain some mobility. I find this an exceedingly elegant way to reflect the relative tactical flexibility and capabilities of the two armies.

This comparison continues to the mechanized units as well. Soviet tank corps and mechanized units have a movement of ‘6’ and German panzer and mechanized divisions have a movement of ’10’. This last makes the German panzer units (which also have very high offensive values) very dangerous. Away from the front line, they can cover large distances very quickly and can easily show up to plug a distant hole in the line. They are also capable of moving two hexes at a time in direct contact with the enemy—generally much to the frustration of a Soviet player that is trying to isolate an overextended counterattack.

Soviet doctrine was solidly a complete ‘top-down’ approach. Orders were generated at the top, flowed down to individual units, and tactical flexibility was not expected, and was discouraged. German doctrine was heavily dependent on the individual initiative of individual officers and NCOs, and was geared around principles of mobile warfare. This campaign, especially, saw the use of armored ‘fire brigades’ used to blunt and halt the Soviet breakthroughs. A Victory Lost, through a single simple rule, and some intelligent choices on factors achieves a great sense of the historical strengths of each side.

└ Tags: A Victory Lost
 Comment 

Denying Victory

by Rindis on September 22, 2008 at 10:00 am
Posted In: Boardgaming

Had Mark over yesterday for some gaming. First, he showed me game I hadn’t heard of, Cowboys, and we did a really fast two gunmen shootout (maybe 45 minutes including absorbing the really short rulebook?). Anyway, it seems to have a lot of potential as a really light game, and Mark may bring it over for one of the ‘bigger’ meetings at some point. (Ur, yes, I did win, with the side that was distinctly easier to play.)

After that, we setup and started a game of A Victory Lost, which I’ve been meaning to introduce him to for ages. As the Soviets are a little more obvious as to how to play, he took them, giving me my third game as the Germans (I’ve got to get in a game as the Soviets…). We got through the end of turn four, and will be finishing it off on Vassal.

Overall, I’d say I’m in a pretty good position. Mark’s been a little conservative movement-wise, and maybe a little too willing to make 1:2 attacks. My main problem is that he’s starting to move into a gap in my line near Voroshilovgrad, and I’m not sure what to do to plug it. Otherwise, I’ve got the usual raft of problems at this stage.

The opening demolished the Italian 8th Army as usual, and later attrition has meant that the Julia division are now the only survivors. I actually managed to get the 3rd Romanian Army early this time (usually I don’t get to try to save the units in that area until after STAVKA has already been drawn. So, I had some luck with the initial withdrawl, and the fighting around Millerovo has been pretty intense for the entire game. My usual luck at this stage intervened and a couple of attacks on exposed Soviet units failed, and he managed to rescue two tank Corps that should have at least been reduced.

I started pulling the Hungarian 3rd Army back last turn. Thankfully the Soviets got stalled for a couple turns with 2:1s that reduced his units on the flank of my line. It seems like I’ll get most of the units out, but there’s no real natural line available until I get back to the river near Valuyki, and it could get bad pretty fast.

Hollidt also started pulling back to the Donets River last turn. I think I left it longer than I should have, and things haven’t gone too well, and I lost the 7th Luftwaffe Division. Further south, things are potentially worse, as I’ve lost most of the Romanian units down there, one of the Panzer divisions took a step loss early (as was then reassigned to Hollidt). So the remaining two are slowly backing down the length of the Don River, and there’s not really anything I could call a ‘line’ down there. There is a mass of Russians though.

The good news is that he’s just getting units across the Maynch River at all, and he’s still trying to dislodge an infantry division that’s holding Proletarskaia. This is by far the best shape I’ve been in down there at the end of Turn 4, and with a little luck the 1st Panzer Army will save the day nicely.

It’s still tough, I feel like I’ve lost more units than normal, and certainly my line is a lot more tenuous than I’d like. We’ll see if I can hold it together. Mark is definitely enjoying the game, which is great.

└ Tags: A Victory Lost, gaming
 Comment 

A Victory Regained

by Rindis on April 22, 2007 at 9:14 pm
Posted In: Boardgaming

And the other thing I’ve been meaning to write for a week….

Finally got a second chance to play A Victory Lost last Saturday. I’m afraid it got started later than I wanted, and went much longer than I expected. At any rate, I got to be the Germans/Axis and Dave took the Soviets. (I would like to try a game on the other side…)

Things started as expected. The initial Soviet push demolished the center of the line and destroyed a good portion of the Italian 8th Army. I tried to put up a defense at Melikovo, the first defensible spot south of the break, but the Soviet army nearly beat me there, and certainly got to the city before I could put up much of a defensive line. I managed a counter attack that reduced two armor corps, but a pair of further attacks failed to do anything.

This is the same type of thing that caused a large problem for me in my last game. So when a pair of 1s left me out of position, and ultimately led to the destruction of two valuable panzer divisions and five German infantry divisions… I knew I was getting behind the curve.

Worse, I was just barely avoiding getting the extreme southern flank turned, and 1st Panzer Army, which enters from down there hadn’t arrived yet. Thankfully, I put just enough low-power infantry in the road to Rostov to keep Dave from just taking it uncontested. As he arrived across the river from the city, I managed to pull out my southern flank and start redeploying it on the Don River line. Then the 1st Panzer Army shows up and starts to engage the Soviet forces in the way.

This seems to be one of the critical points of the game. Those reinforcements are too valuable too loose, but come in late enough that it’s tough not to have them cut off on entry. In this case, they were aided by AVL‘s supply rules, which are exceedingly generous. There’s a road off in the extreme south-east corner of the map that goes nowhere (nowhere on map that is). But it does provide a bridge that allows tracing a line of supply out of the area. There was a gap elsewhere in the line that allowed supply to be traced to that. A single Soviet unit sitting on or next to this bridge would have put the German formation out of supply, and complicated command to no end. Something to remember for the future.

In the event, the Germans were in supply, and the powerful units systematically ground up the entire Soviet force in the area, and Rostov was under no serious threat for the rest of the game. Then I passed the heavy offensive armor units around the area patching up the various defensive lines I had established.

I now begin to understand the “backhand blow”. An active, flexible concentration of armor and mechanized units can do wonders. Dave’s problem for the rest of the game on 2/3rds of the line was that he could push me back, and cross the various rivers that I was set up on, but then he was across the river, away from defensive terrain of his own, and my counter-attacks would promptly push him back. Or, if he’d gotten a little deeper in, I’d cut off some of the offending units and eliminate them.

Meanwhile in the north, after the usual slow start, the Soviets had started grinding their way forward, against opposition that was slowly pulling back, and slowly getting ground up. With all the high-profile events in the south, I never paid as much attention to this sector as I would have liked, and towards the end the Soviet forces were making some good time. The last turn of the game saw the Soviets unexpectedly get to and occupy Kharkov after pushing out the defending units. This was not enough to win the game, but with my high early losses, it put him close. The final total was 28 to 24 for a German win.

I’m still exploring aspects of the game, but it is holding up well, and is really subtle in some places.

On another note, I just got an email from Against the Odds for a game named Wintergewitter, on the last German attempt to relieve Stalingrad (which the Germans are in the middle of as AVL starts). Hmm… where to get the money….

└ Tags: A Victory Lost, gaming
 Comment 

©2005-2026 Rindis.com | Powered by WordPress with ComicPress | Hosted on Rindis Hobby Den | Subscribe: RSS | Back to Top ↑